
Views: 646
Кухонний таймер з безконтактним керуванням жестами дозволяє встановити необхідний період часу для приготування страв, не торкаючись пристрою. Дуже зручно під час приготування їжі, коли руки забрудниться. Усі налаштування тривалості, увімкнення та відключення таймера виконуються за допомогою жестів, не торкаючись пристрою, ви зможете відчути себе чарівником, якому підвладне управління предметами.
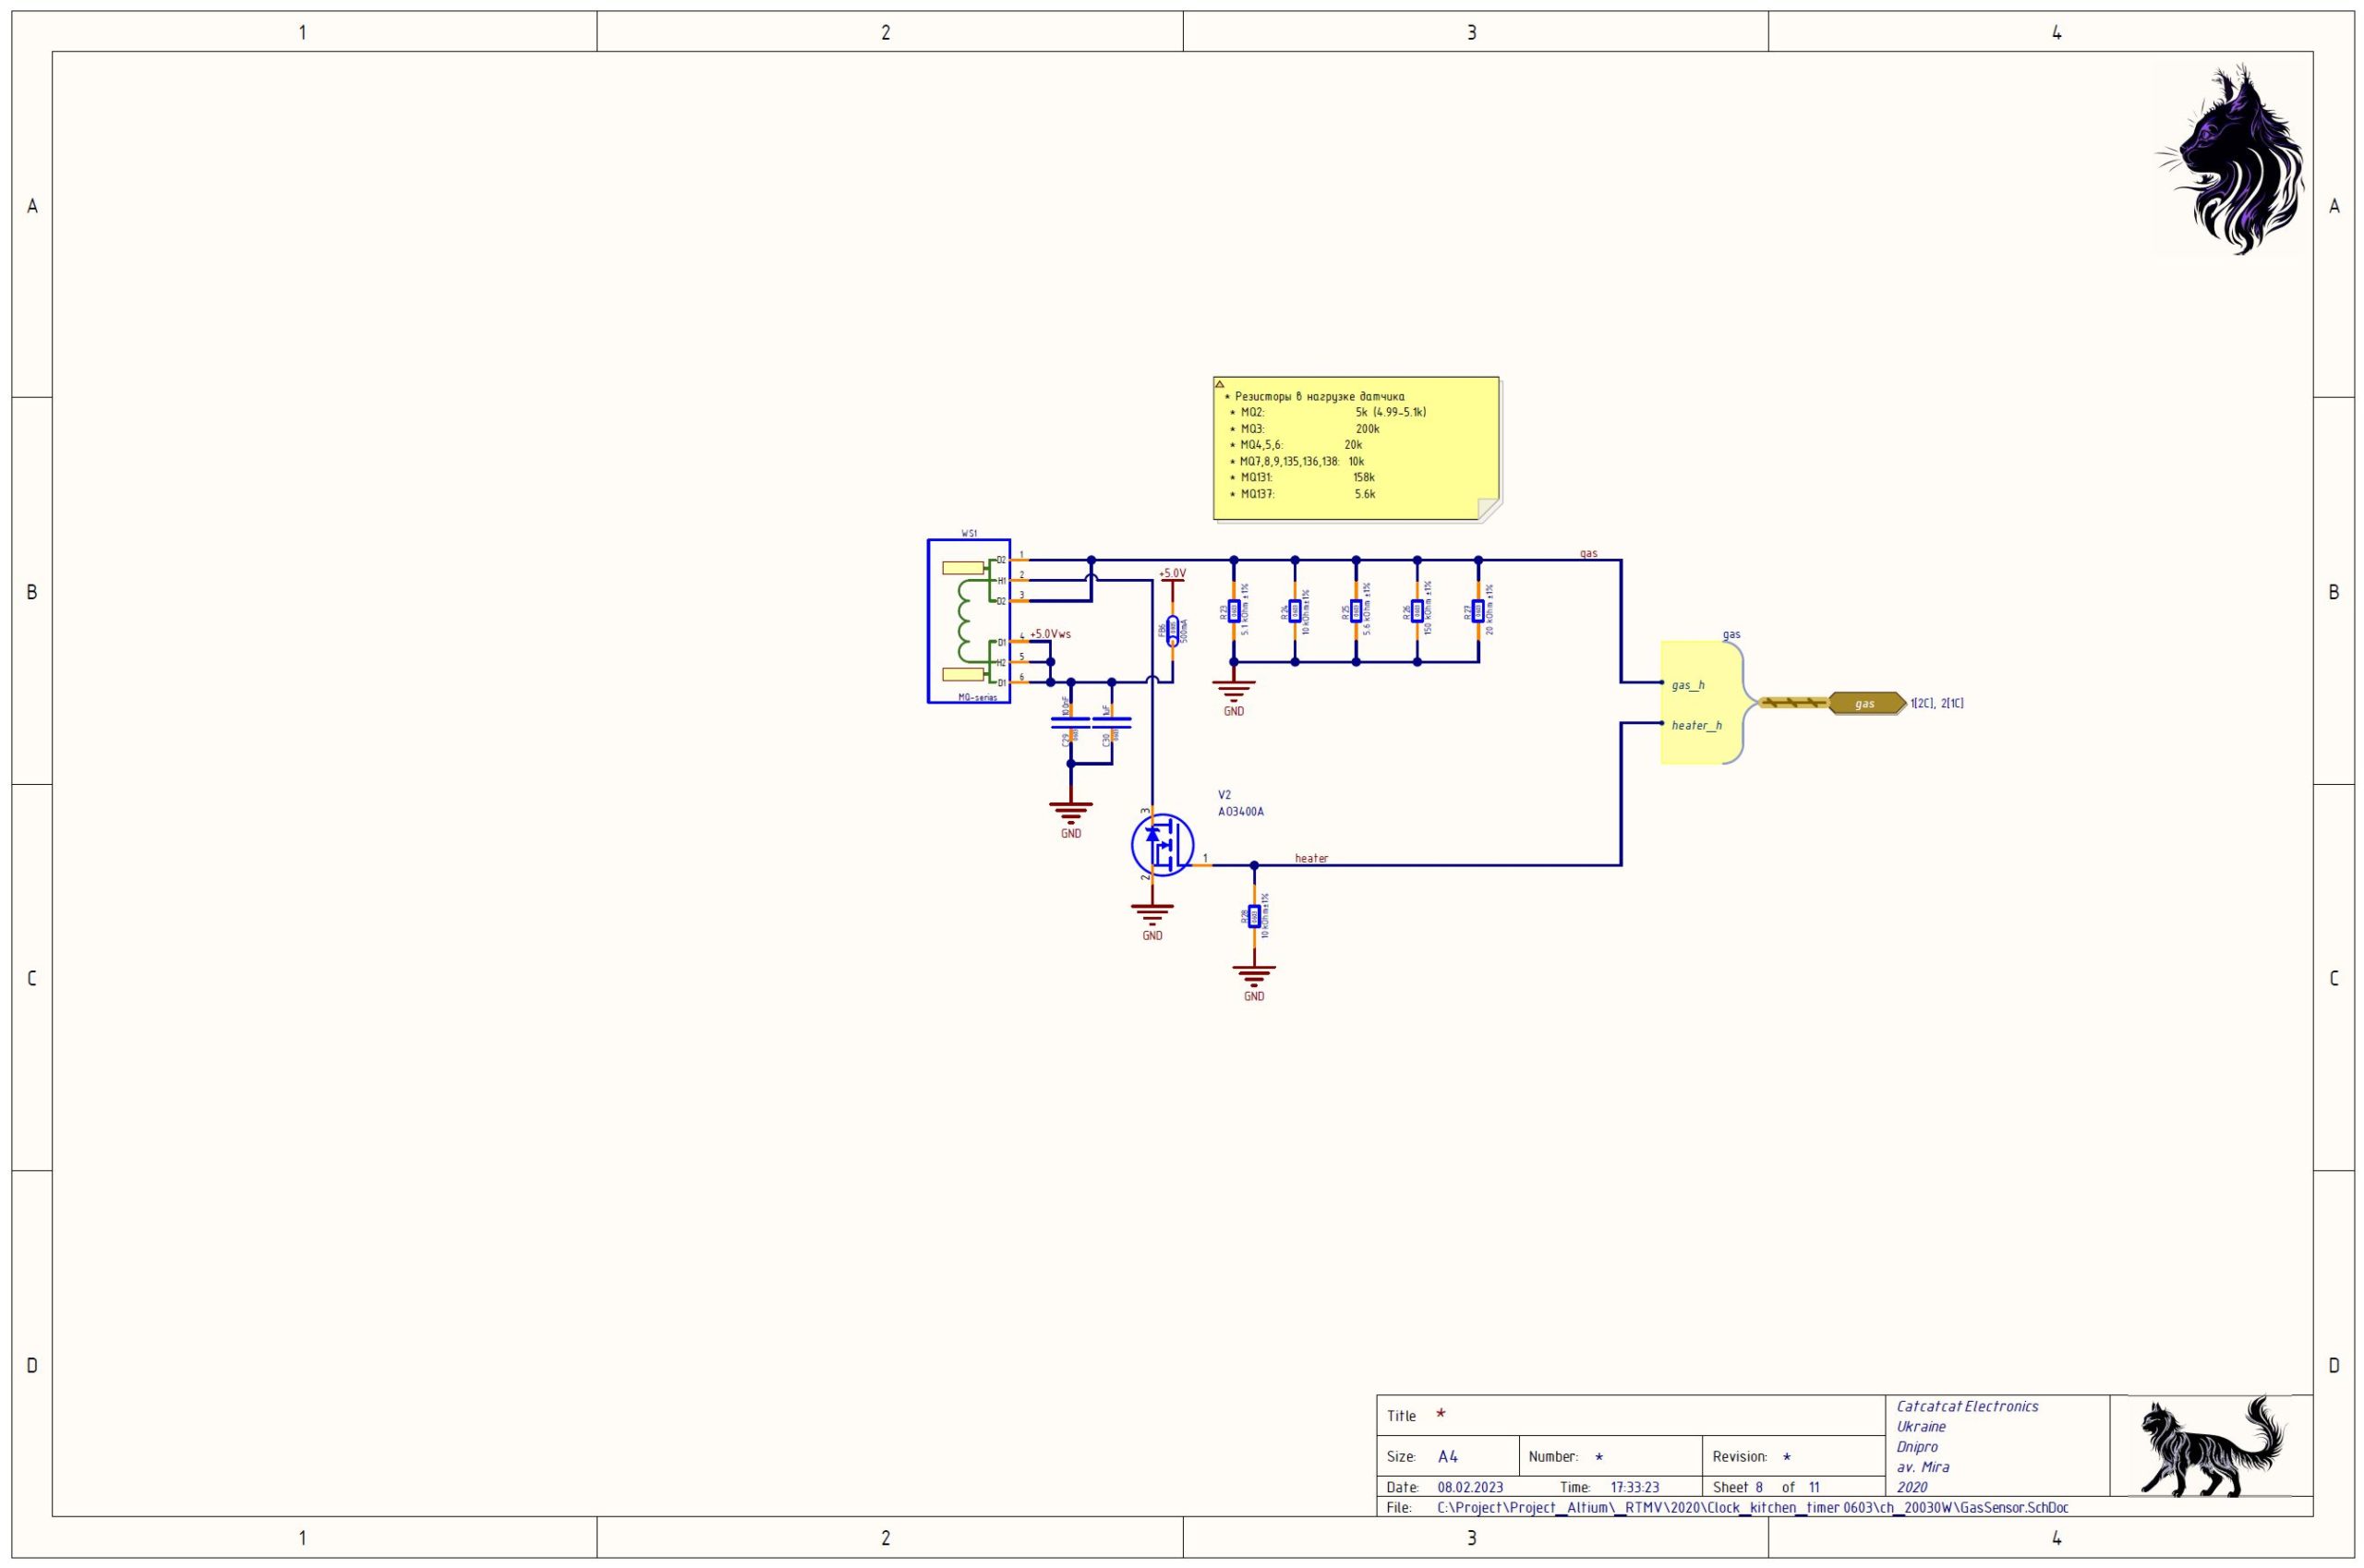
У кухонний таймер вбудований аналізатор чистоти повітря в приміщенні, який попередить вас, коли кількість шкідливих речовин перевищить допустимий рівень. Це також зручно для контролю витоку газу, якщо на кухні використовується газова плита. Ви можете у будь-який час проконтролювати рівень шкідливих речовин у приміщенні.
Таймер передбачає функції керування витяжною вентиляцією приміщення. Контрольованими параметрами може бути температура в приміщенні та/або кількість шкідливих речовин присутніх у повітрі приміщення.
У пасивному режимі ми можете користуватися вбудованим годинником, календарем, функцією будильника.
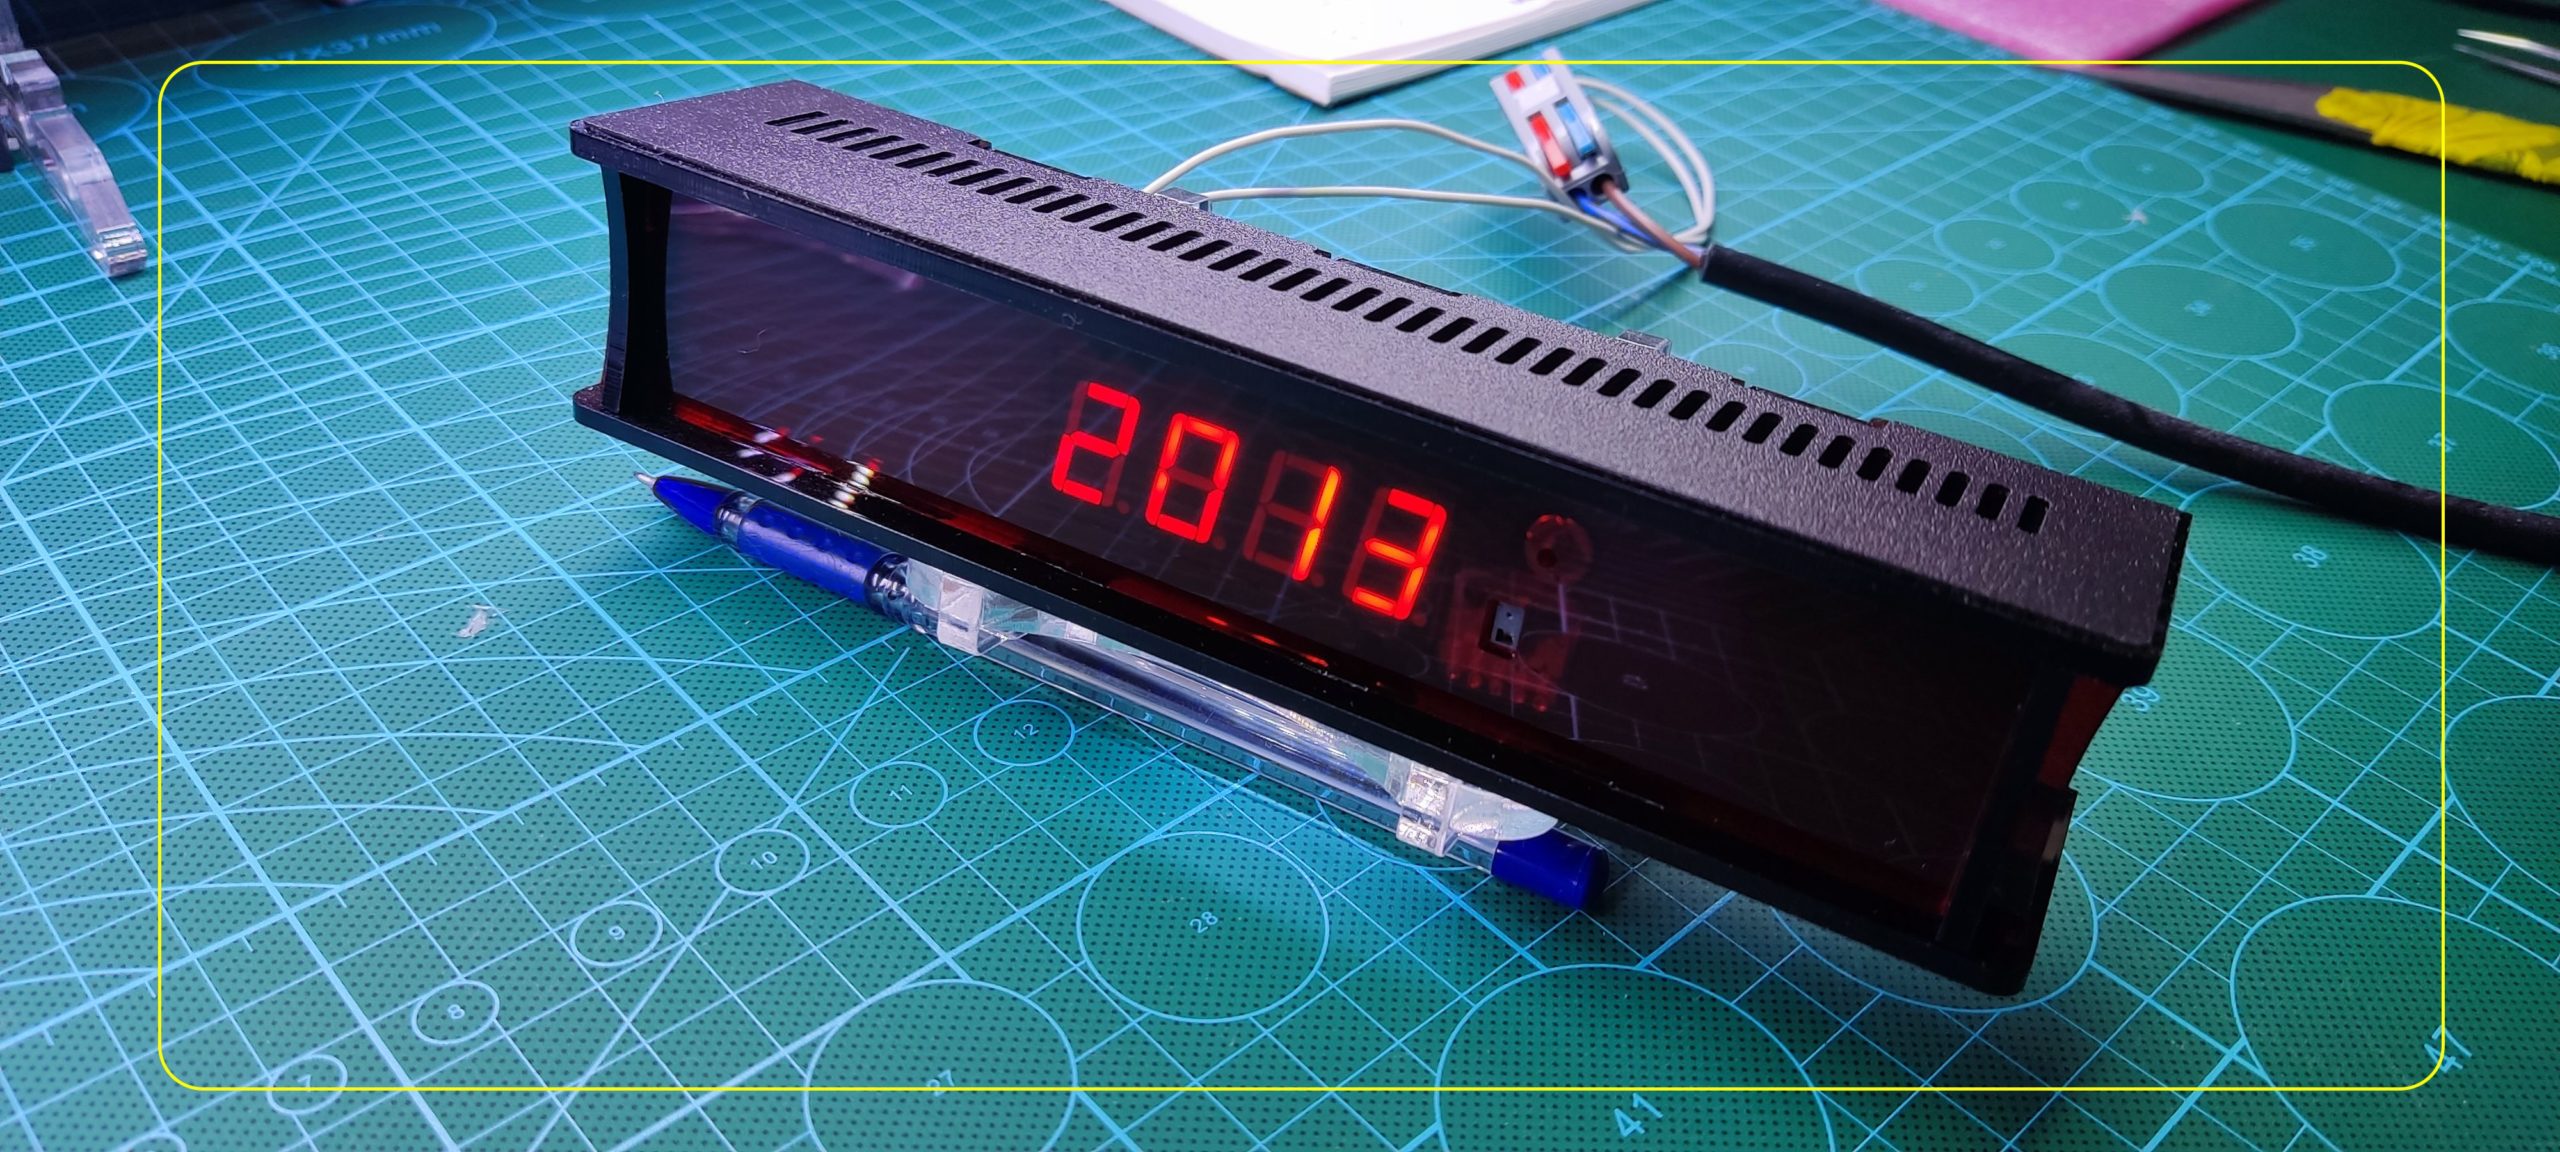
Можливості кухонного таймера дозволяють задавати період часу від 1 до 99 хвилин. Індикації часу, що залишився, у форматі хвилин і секунд.
Всі функції доступні з WEB інтерфейсу таймера, ви можете до нього підключитися з вашого мобільного телефону на пряму через WIFI або підключивши його до вашої домашньої мережі керувати і налаштовувати функції через ПК. При цьому вам немає необхідності встановлювати додаткове програмне забезпечення, вам просто необхідно використовувати звичайний WEB браузер.
Якщо ви фанат точного часу, ви можете активувати функцію синхронізації часу вашого таймера із серверами точного часу мережі інтернет, а якщо у вашій країні використовується перехід на “літній час”, то таймер самостійно буде переводити стрілки годинника на годину вперед навесні і повертатися в нормальний час восени.
Smart devices
Kitchen timer
Technical description
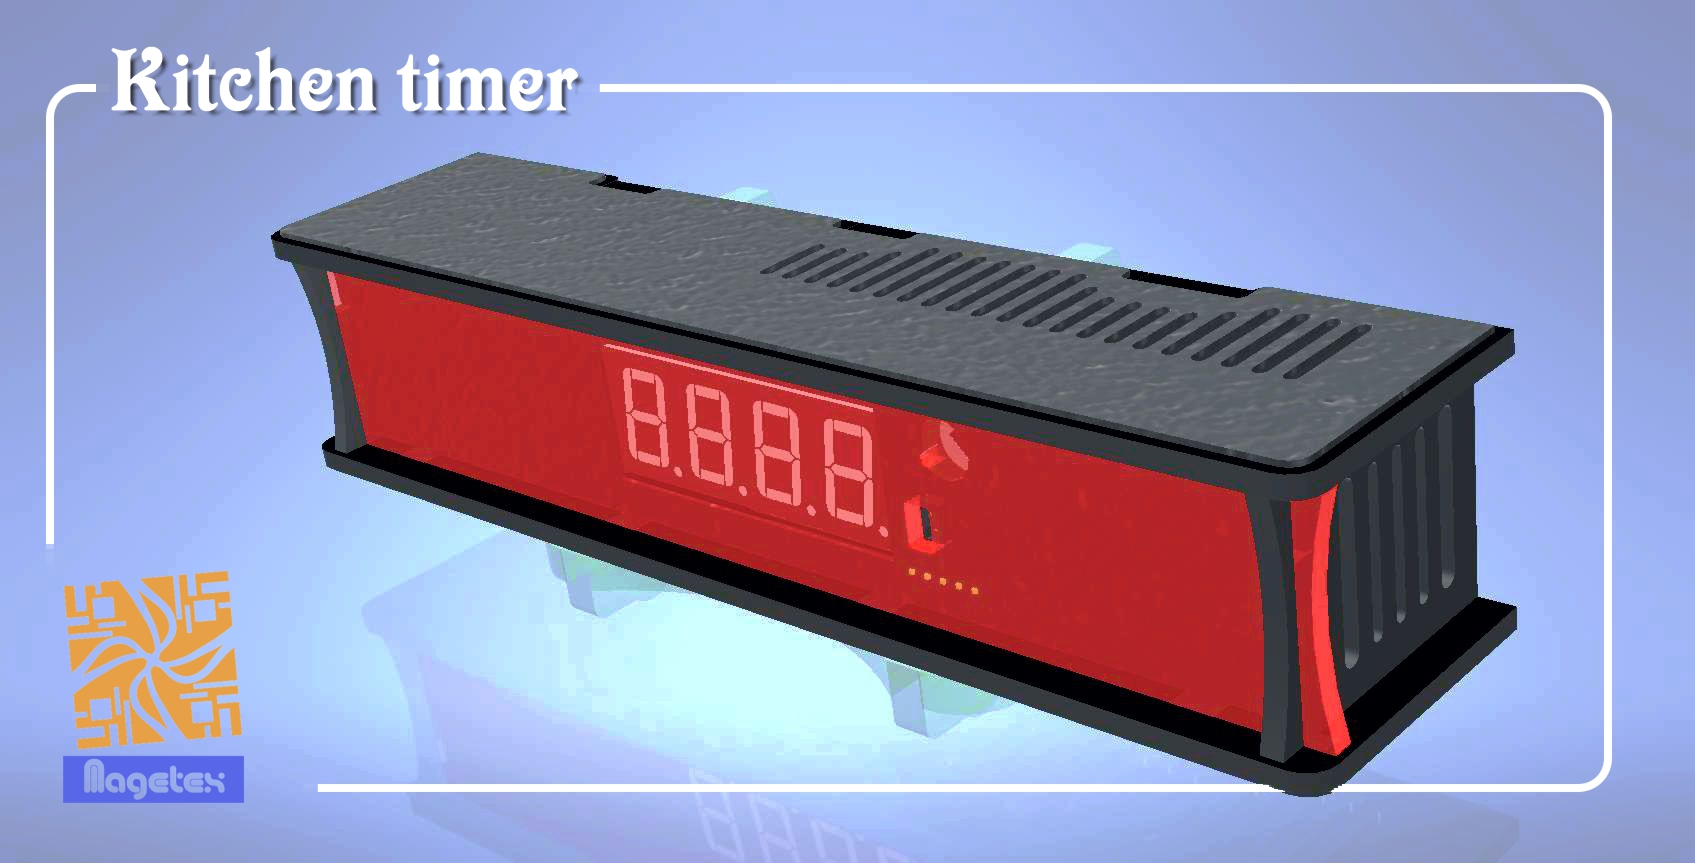
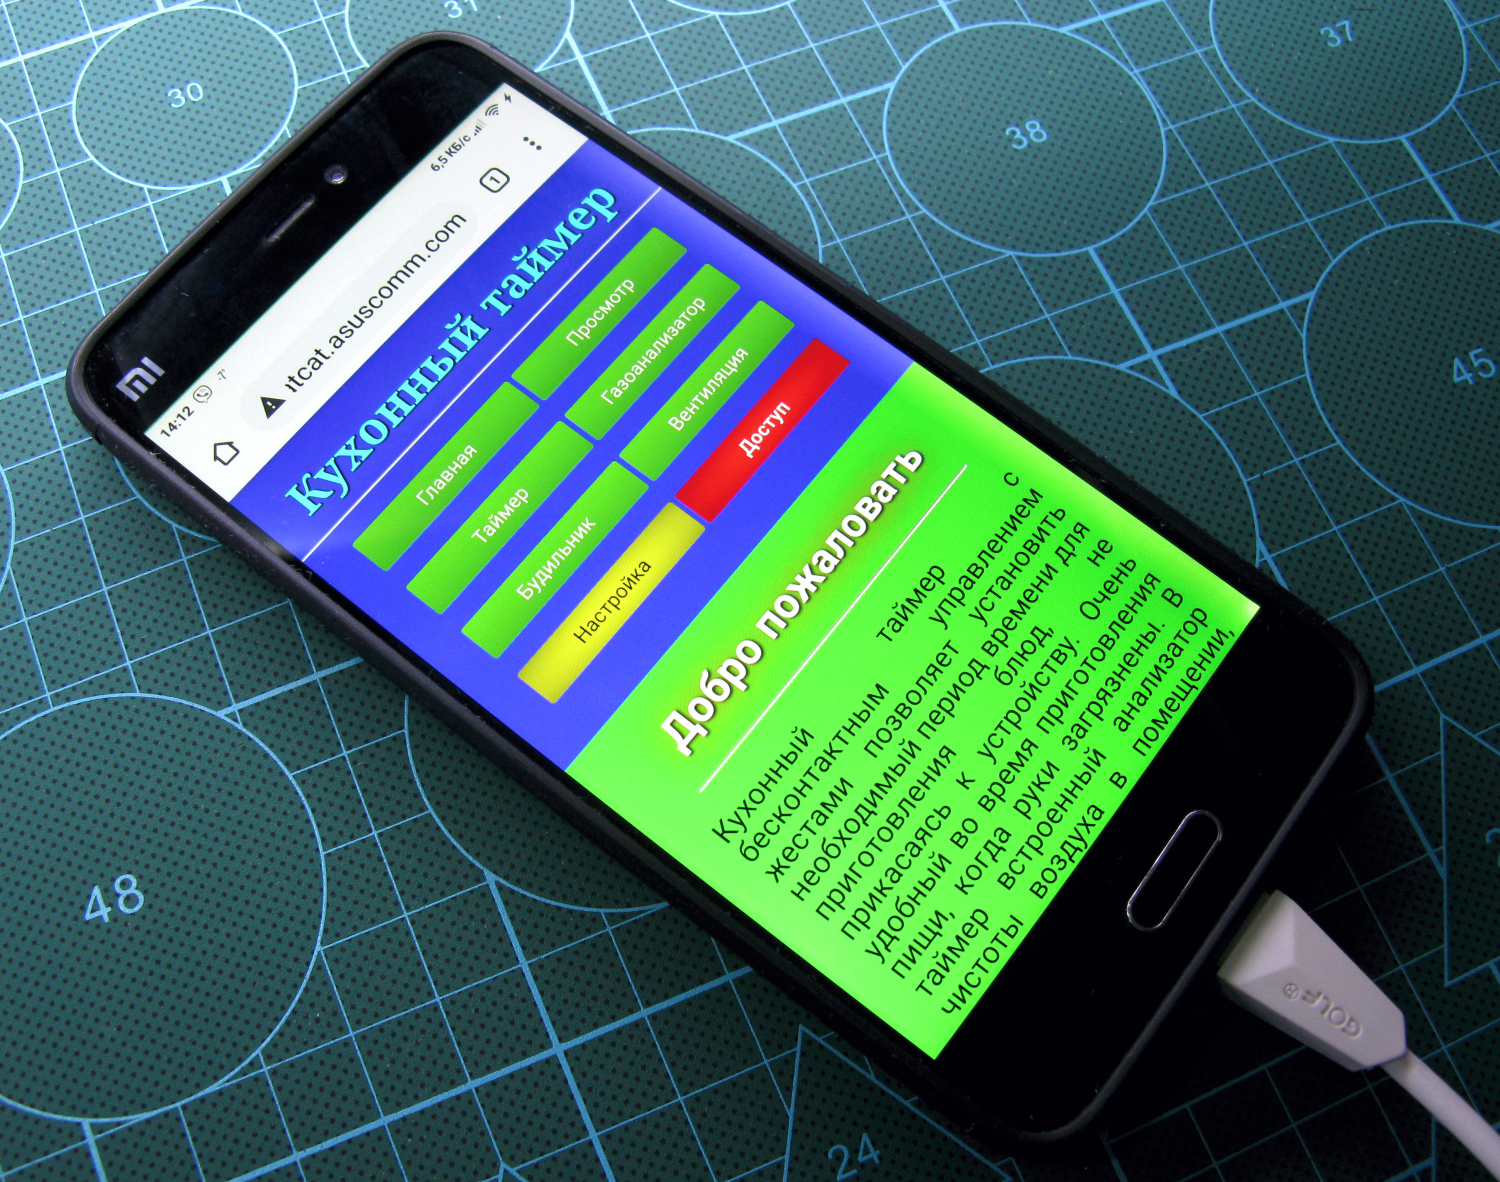
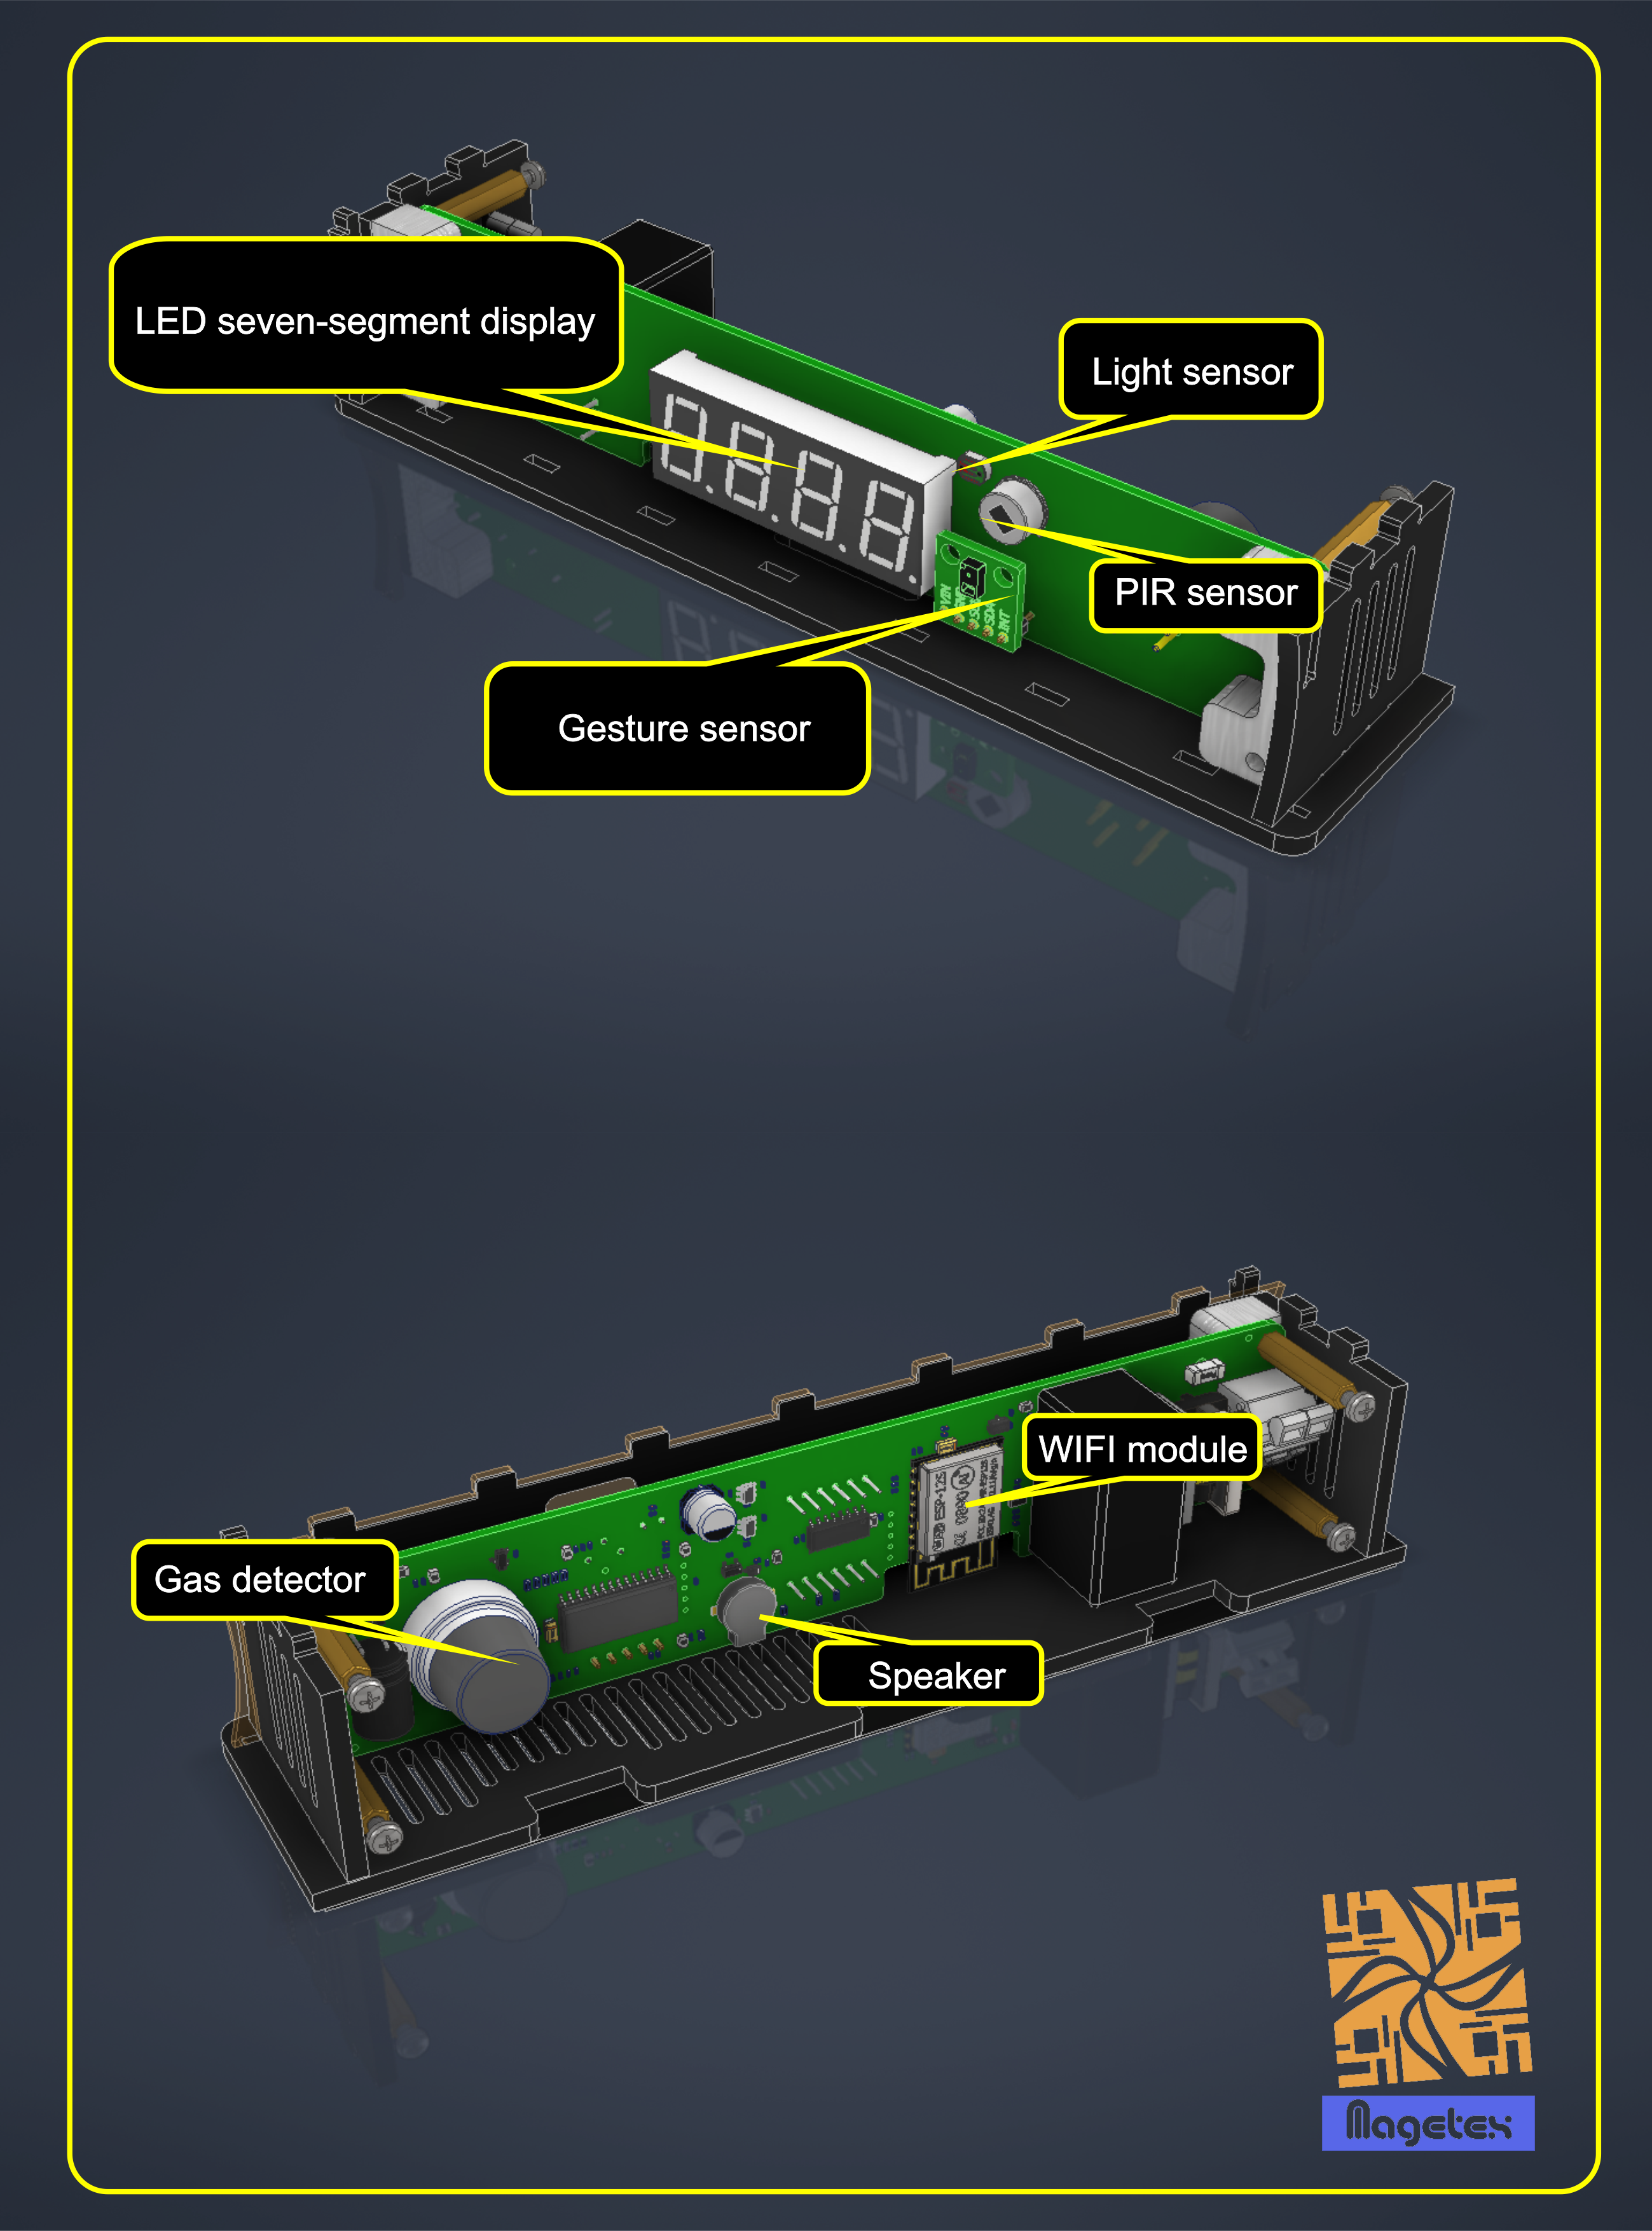
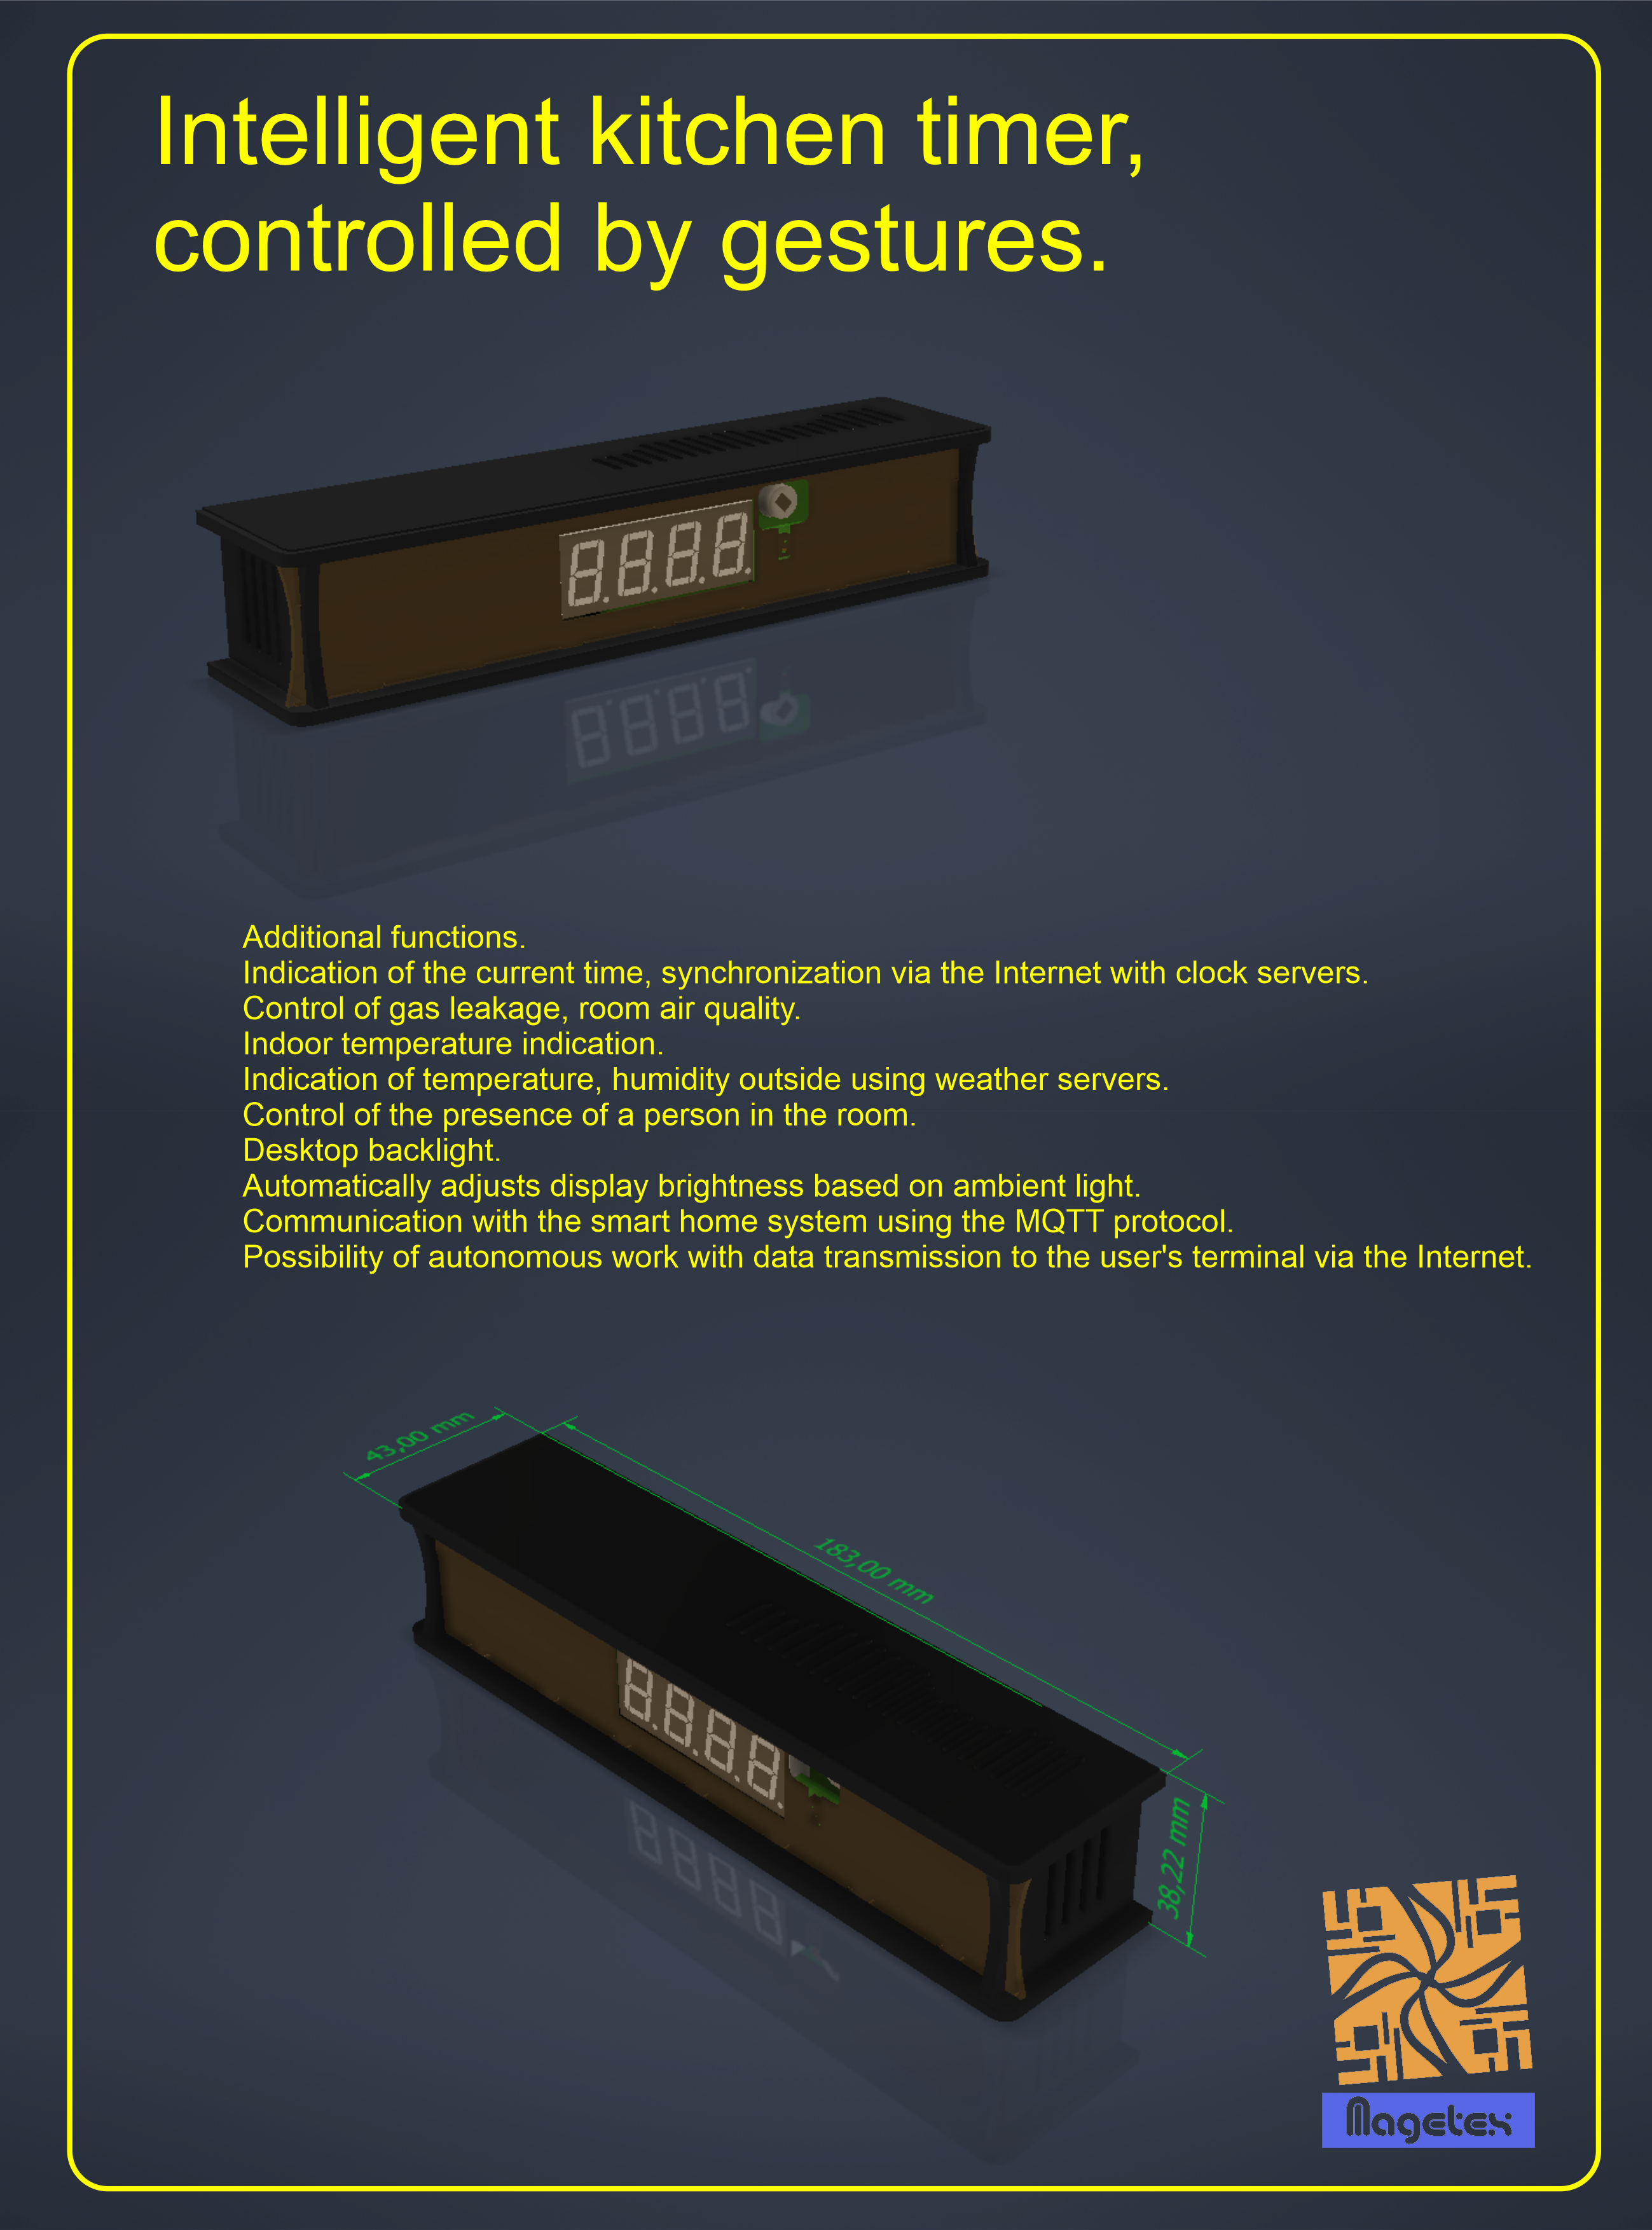
Table of contents
- Introduction.
- Technical specifications.
- Operating modes.
- Gesture control.
- Timer features.
- Gestures.
- Setting mode.
- Main operation mode.
- WEB interface.
- Connecting the timer to home network.
- How to get remote access via the Internet.
- I forgot my access password.
- Timer connection interface.
- Timer assembly and installation.
- Gas sensor calibration.
- First start and timer setting.
- Project participants.
- Electrical project diagram.
- Download.
1. Introduction
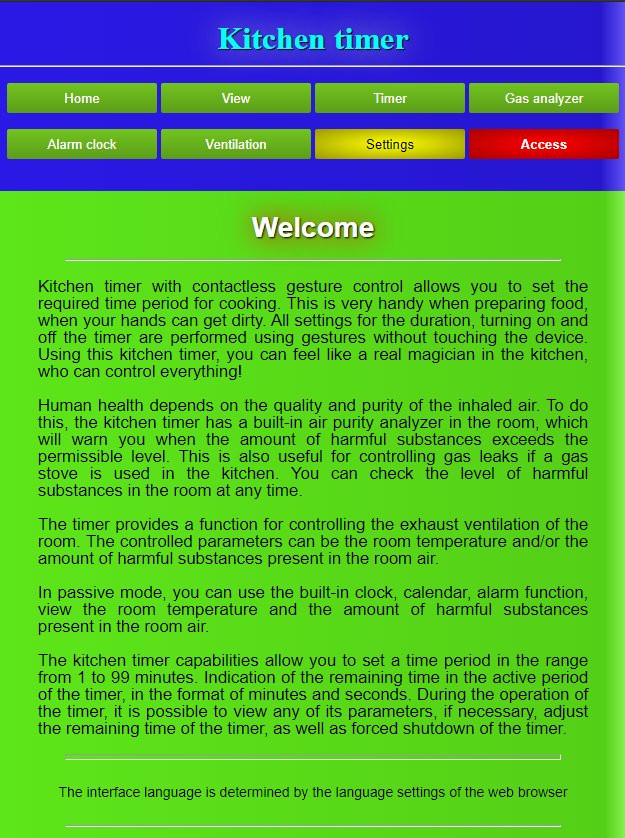
Kitchen timer with contactless gesture control allows you to set the required period for cooking. This is very convenient during cooking, when your hands can get dirty. All duration settings, turning the timer on and off are done with gestures, without touching the device. Using this kitchen timer, you will be able to feel yourself as a kitchen wizard, who is able for everything!
Purity of the air directly affects our health. In order to control it, an air analyzer is built into the kitchen timer, which will warn you when the amount of harmful substances in the room exceeds the permissible level. It is also useful for controlling gas leaks if a gas stove is used in the kitchen. You can check the level of harmful substances in the room at any instant.
The timer provides the function of controlling the exhaust ventilation of the room. The controlled parameters can be the room temperature or the amount of harmful substances present in the room air.
In passive mode, you can use the built-in clock, calendar, alarm clock function, and remotely check the temperature or the amount of harmful substances present in the room air.
The kitchen timer allows you to set a time period ranging from 1 to 99 minutes. During the timer operation, the remaining time is displayed in minutes and seconds format. While the timer is running, it is possible to view any of its additional functions and, if necessary, correct the remaining time of the timer. It is also possible to turn off the timer prematurely.
All control functions and settings are available from the WEB interface of the timer. You can connect to it from your mobile phone, directly through the WIFI network of the timer, or by connecting it to your home network, in order to control and configure the functions through a personal computer. And you do not need to install any additional software, you just need to use a regular WEB browser. The WEB interface allows you to view all the parameters of the kitchen timer, as well as manage its operation. The interface is available in three languages, English and Ukrainian by default, and the third language that depends on the software version. The language is set automatically depending on your browser settings.
If necessary, you can access the timer via the Internet, from anywhere in the world!
If you are a fan of accurate time, you can activate the function of synchronizing your timer with the timeservers of the Internet. Moreover, if your country uses daylight saving time, the timer will automatically move the clock one hour forward in spring and return to normal time in the fall.
2. Technical specifications
Package
| Kitchen timer – 1pc | 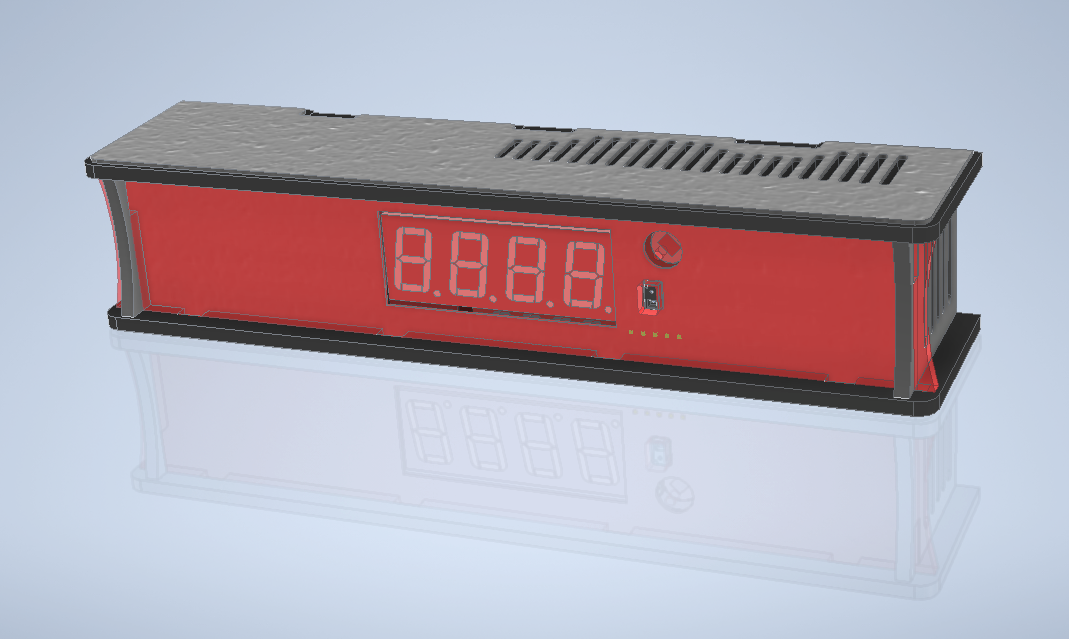 |
| Table stand – 1pc. |  |
| Short suspension for fastening under the shelf – 1 pc. | 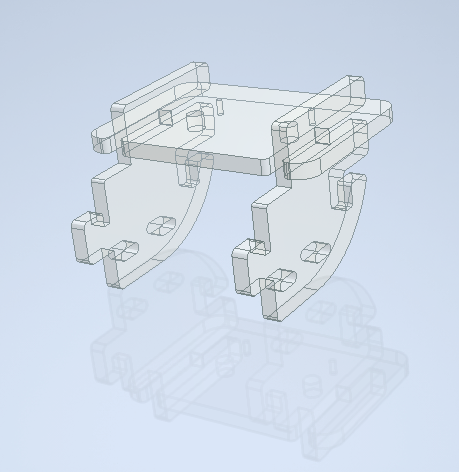 |
| Long suspension for fastening under the shelf – 1 pc. | 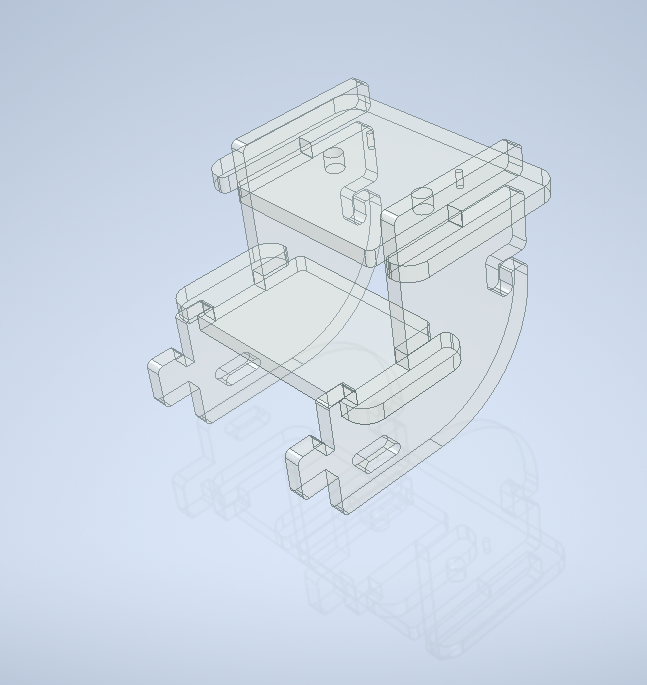 |
| Power cable ……………………………. 1 pc. | |
| EU – US plug adapter ……………. 1 pc (US delivery only) | |
| Supply voltage | 100 – 240 Volts. |
| Power consumption | no more than 2 W. |
| Gesture detection distance | up to 20 cm. |
| Motion sensors’ control distance | up to 3 m. |
| Display |
LED. |
| Gas sensor | MQ4/MQ5/MQ135.* |
| WIFI module | hotspot, station mode. |
| Overall dimensions | 183*37*43 mm.** |
* sensor type is specified when buying a kitchen timer.
The manufacturer reserves the right to change the design of the kitchen timer without compromising its performance.
** without fastening mechanism
3. Operating modes
The kitchen timer has two operating modes: main mode and setting mode.
Main mode – this is the kitchen timer (KT) mode, the displayed function depends on user settings. By default, when the timer is not active, the current time will be displayed.
If the timer is activated, the display will show the remaining time in minutes and seconds. If you want to see the current time, while the timer is running, you easily switch to it, using gestures. After that, you do not need to switch back to the timer mode, it will be done automatically, after a short period of time.
The motion sensor allows you to intelligently turn on the table backlight, activate the clock indication in the “night mode” state without approaching the kitchen timer, and remotely turn off the alarm signal (if this function is activated).
Setting mode – is a mode in which the basic functions of the KT can be set. To enter the setting mode, you need to perform a certain sequence of gestures (will be described below). Setting includes special features not available in other modes, such as turning on the WIFI module (if you turned it off), resetting to factory settings, and calibrating the gas sensor.
Additional functions are available through the WEB interface.
4. Gesture control
Gesture control is divided into approach mode and gesture mode. In the approach mode, only one command can be executed, the user needs to bring the hand to the minimum distance to the timer, after which the kitchen timer will enter the gesture mode. Sound signal and increase of the display brightness will indicate that timer is in gesture mode.
The kitchen timer always returns to approach mode after some time of user inactivity. This algorithm is necessary for the timer not to perceive your random movements as gesture control.
Gesture control is carried out through an optical gesture sensor that recognizes human gestures. For correct gesture recognition, they must be performed relative to the sensor axis of symmetry. This means that the user needs to place hand just below the center of the sensor and perform gestures with fingers or palm, crossing the optical axis.
After performing approach gesture, proceed to the next gestures after 1 second. The timer has a delay for mode switching, in order to perceive approach and control gestures correctly.
Additional functions associated with the motion sensor allows to turn on the time display, when the “night mode” is active, turn off the alarm, turn on table backlight, if a person or movement is detected in the sensor’s range.
5. Timer features
In passive mode, the timer displays the current time. The factory settings provide “Night mode” and “Dynamic display” options. “Night mode” turns off the timer display at night and activate it if there is a person in the sensor’s range. “Dynamic display” shows sequentially the date, day of the week, air pollution or temperature every minute. If the timer is active, the display shows the remaining time.
The function of air pollution analysis has the highest priority. If the gas analyzer of kitchen timer detects that the pollution over allowable threshold, the display will indicate an alarm and periodically show the current air pollution level. Until the air is cleaned, it is impossible to use the timer in other modes. If the air pollution drops below allowable threshold, the gas analyzer automatically turns off the alarm indication and switches to normal mode. However, if you need to control the air condition in the room during your absence, it is possible to block the automatic reset of the gas alarm. In this case, the manual reset is only possible, using the gesture function. This option is useful for controlling gas leaks that may occur spontaneously in your absence.
If there is no need to control air pollution of the room, the gas analyzer can be switched off. It is also possible to disable the WIFI module if there is no need to control and monitor the timer via the WEB interface.
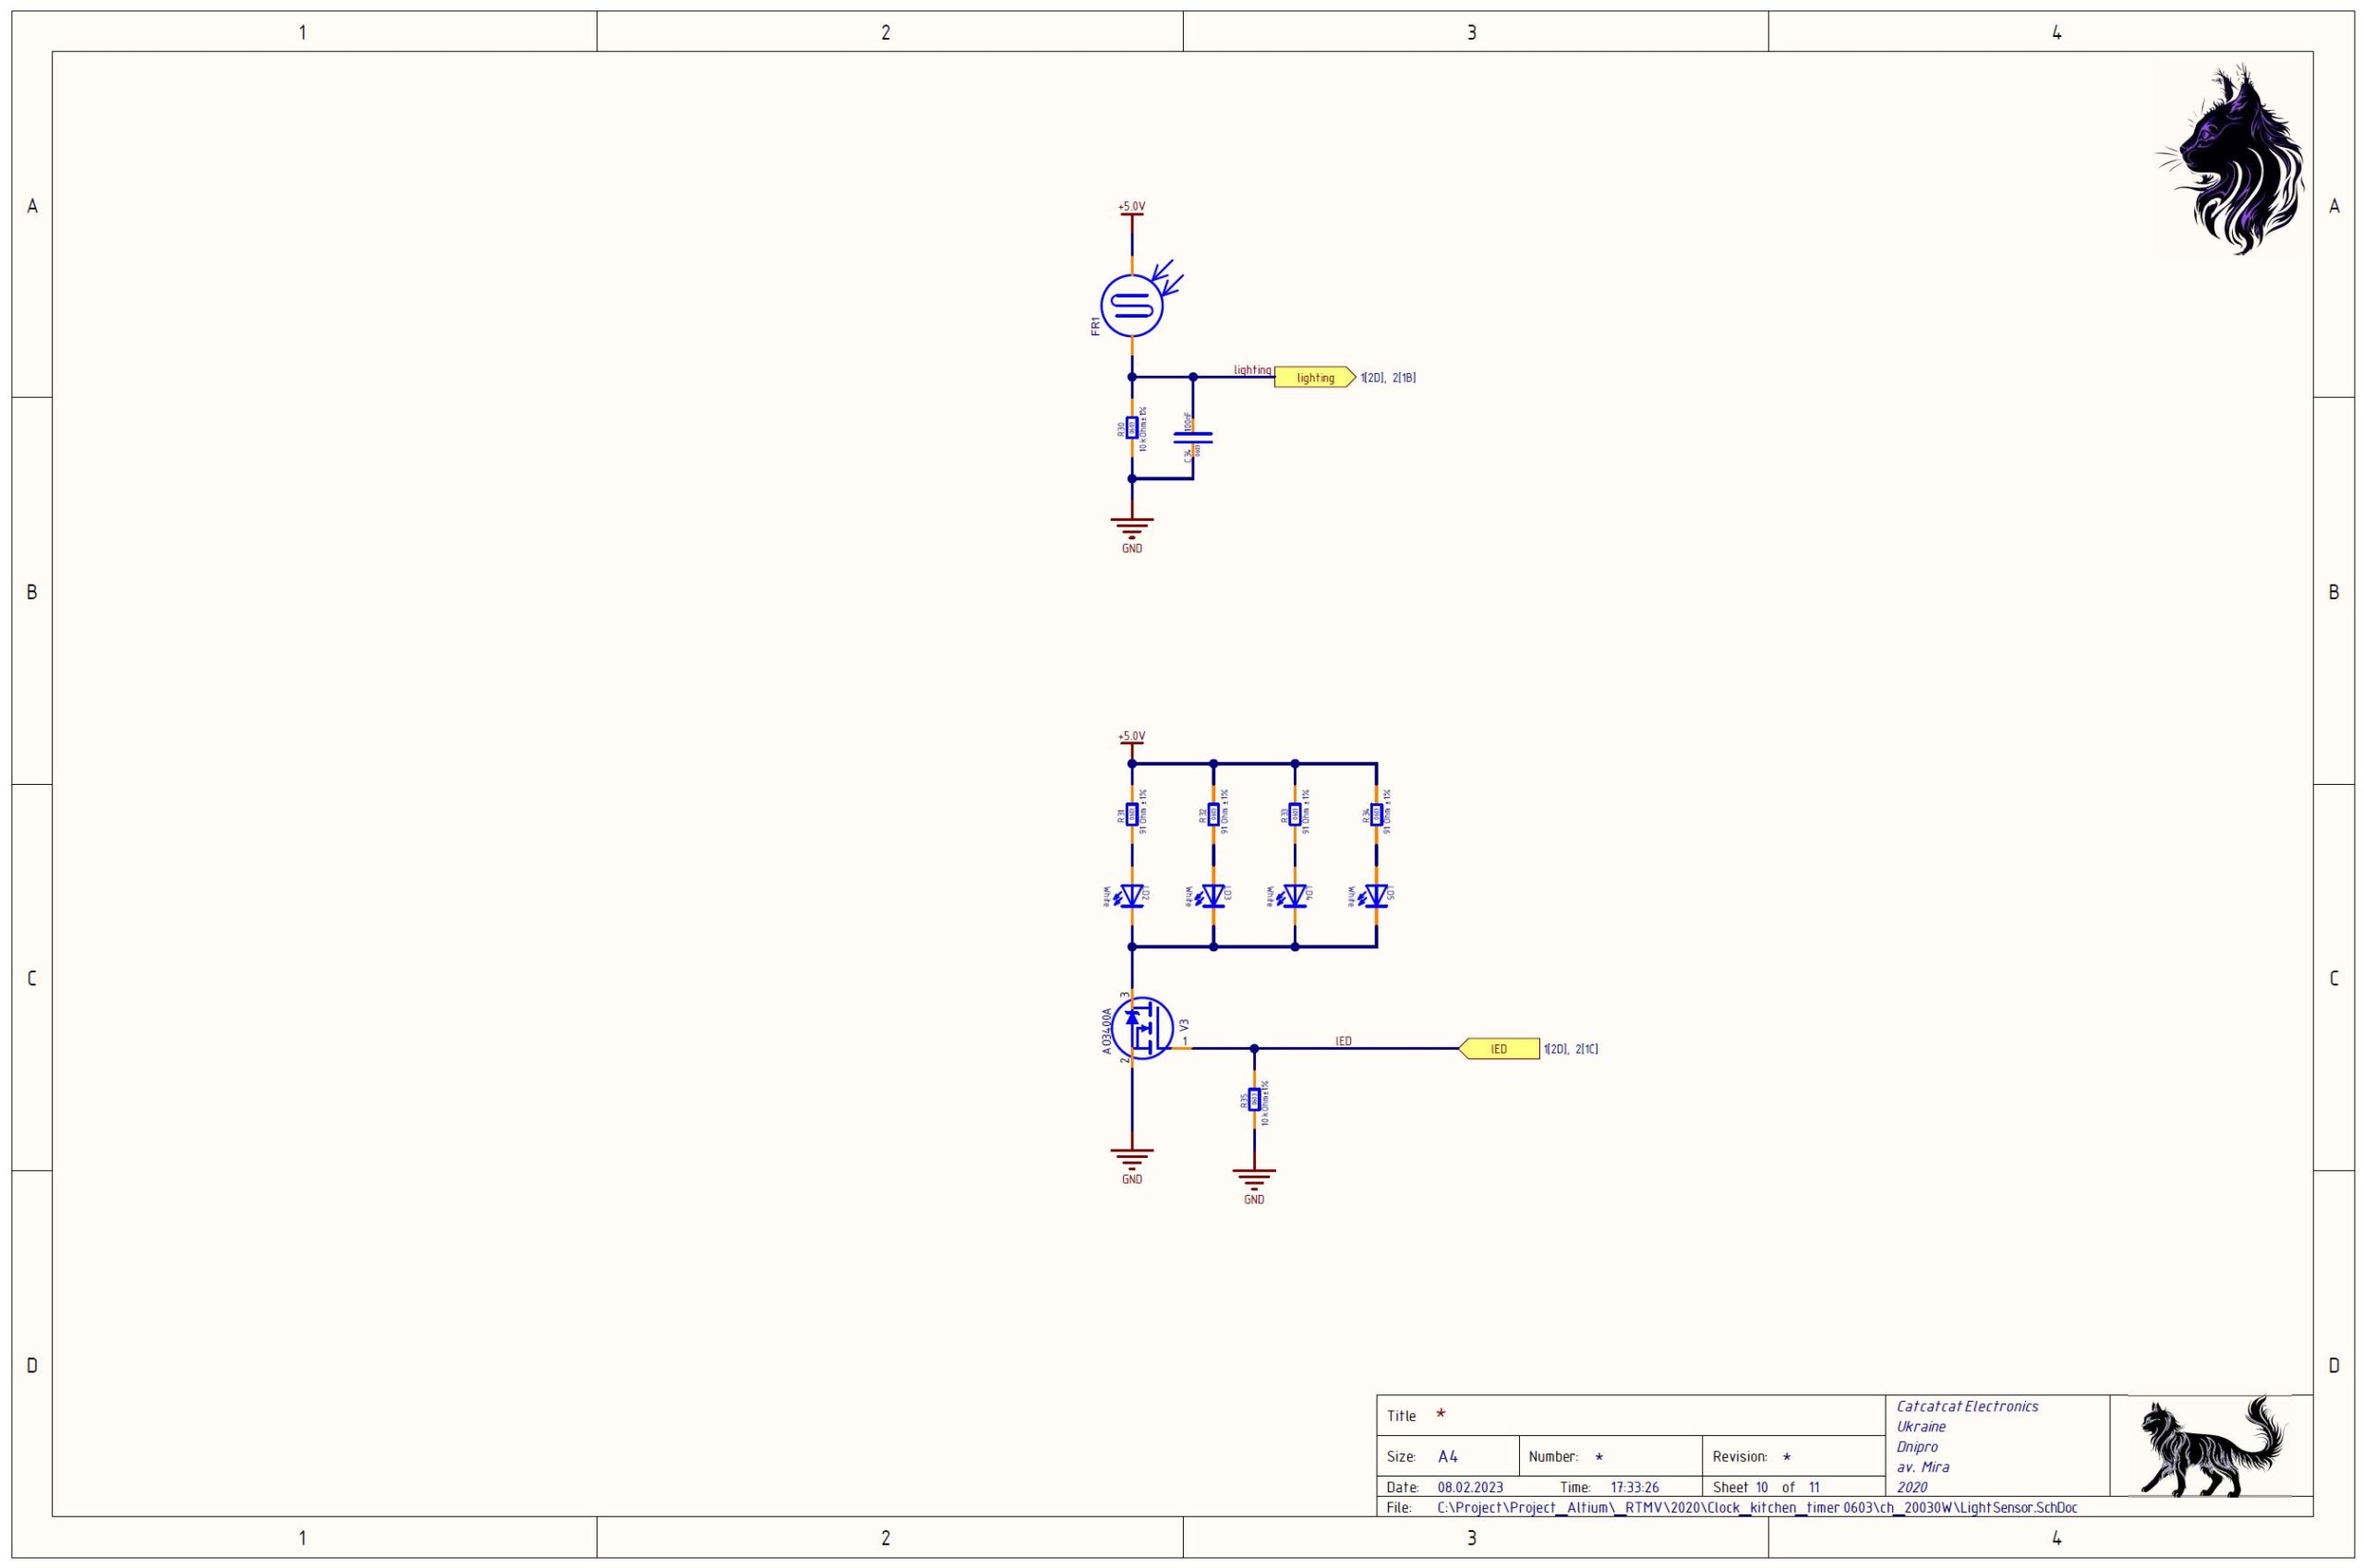
The kitchen timer can detect the presence of a person in the room using built-in motion sensor. The motion sensor can control the built-in table backlight, turn off alarms, turn on the timer display in “Night mode”.
The kitchen timer has three logical outputs that can control the ventilation of the room and the kitchen table light. Ventilation settings are available both in the setting mode and through the WEB interface.
WIFI module is enabled by default. When powering up the timer, you can detect a WIFI network named Kitchen Timer. You can connect to it by entering a password 12345678. See the WEB interface section for more details.
When using the WEB interface, it is highly recommended to change the timer access settings!
6. Gestures
The gestures definition.
Gestures refers to the movement of the palm in front of the kitchen timers’ gesture sensor. All gestures must be performed relative to the optical axis of the sensor. The normal gesture detection distance is 15-20 cm from the timer.
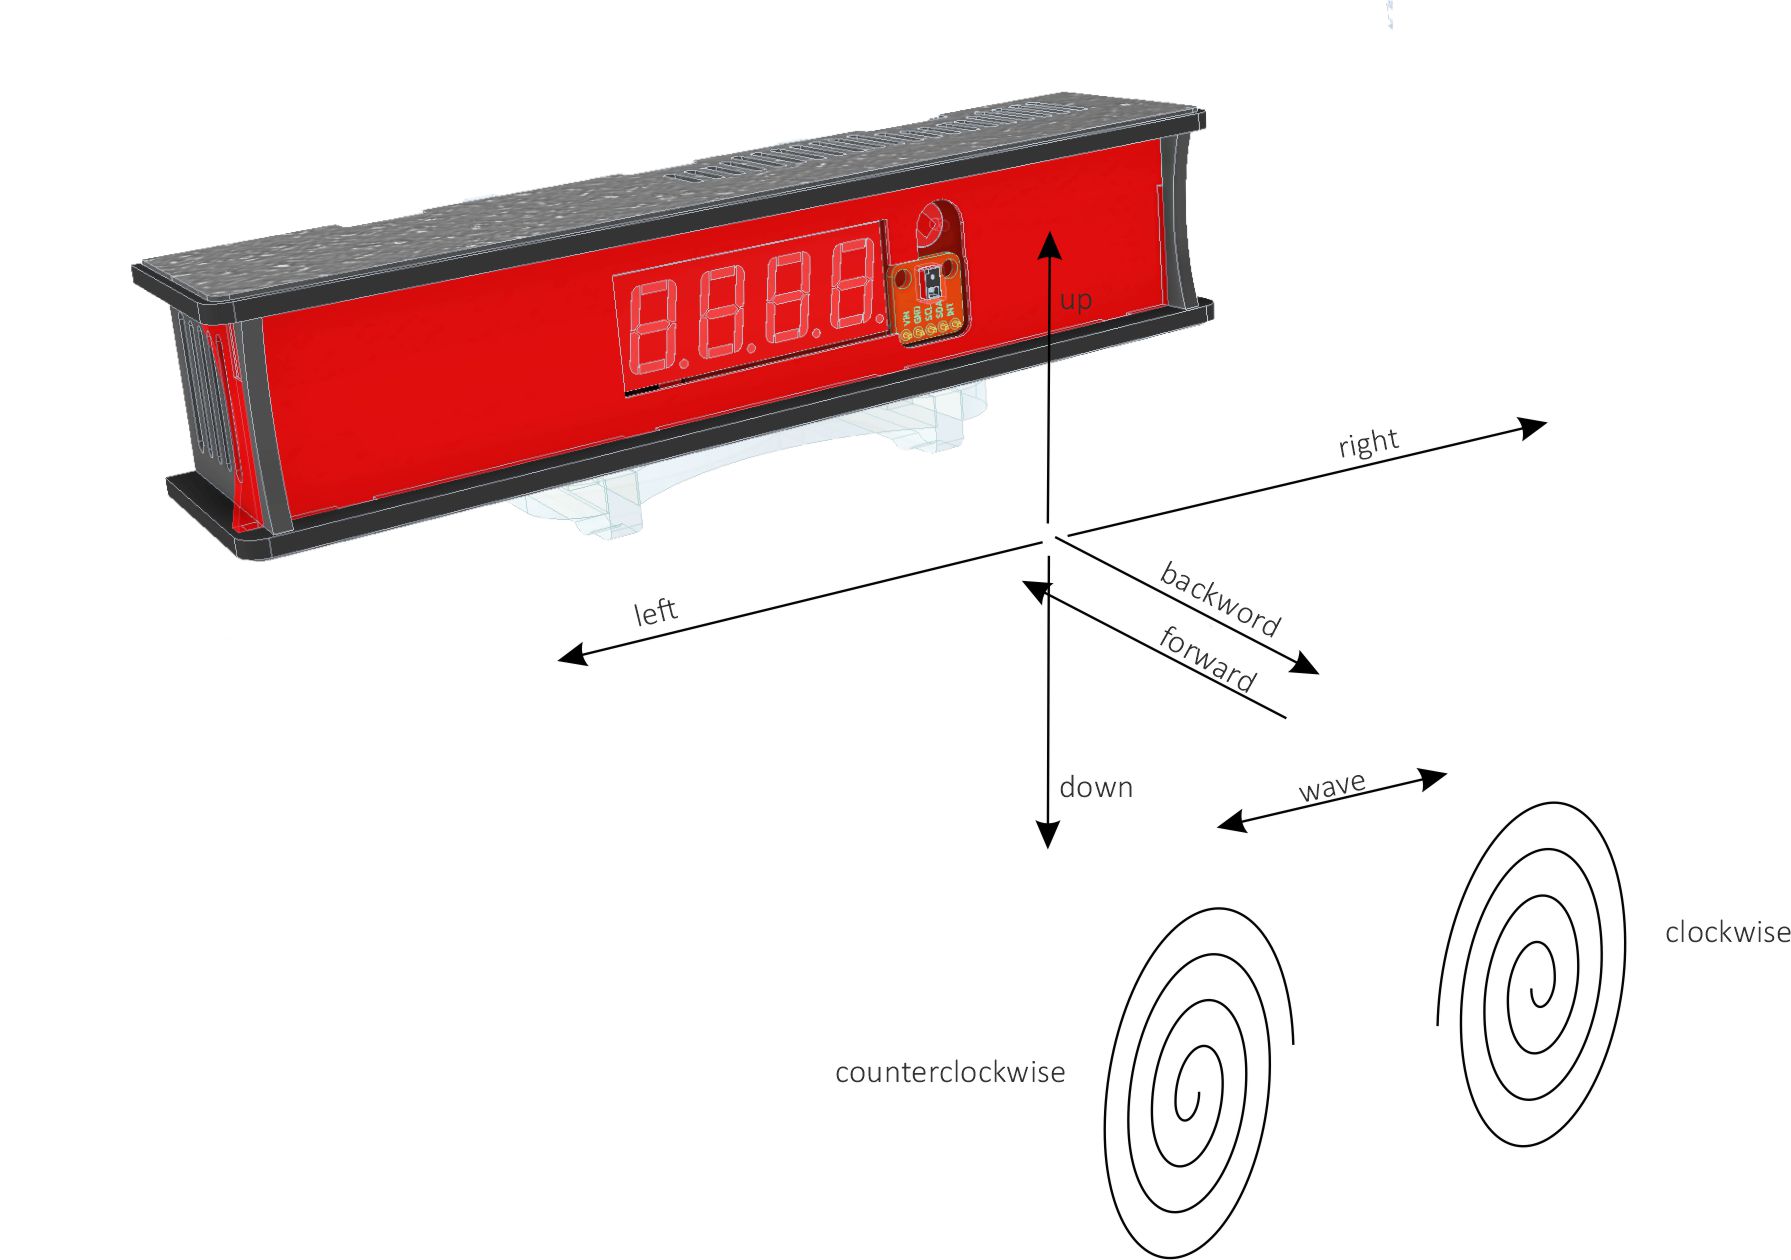
Gesture to the left.
The user must perform a gesture – swipe from right to left.
Gesture to the right.
The user must perform a gesture – swipe from left to right.
Gesture upward.
The user must perform a gesture – swipe from bottom to top.
Gesture downward.
The user must perform a gesture – swipe from top to bottom.
Clockwise rotation gesture.
The user must perform a clockwise rotation gesture, it is sufficient to perform a part of circle.
Counterclockwise rotation gesture.
The user must perform a counterclockwise rotation gesture, it is sufficient to perform a part of circle.
Approach gesture.
The user must bring palm to the kitchen timer at distance less than 5 cm.
Wave gesture.
The user must wave the palm from left to right (or vice versa) at least 3 times.
Work feature.
In passive mode, the timer actively works only with the motion sensor, performing only the functions activated in its settings.
To activate the gesture control interface, you need to bring your hand to the timer at distance less than 5 cm. Timer will switch to gesture mode. Do not rush to issue commands immediately after switching. After switching from approach mode to gesture mode, gesture recognition is disabled for 1 second, this is necessary for user hand to be removed from the sensor and to give user some time to get ready to perform the required gesture.
7. Setting mode
The Kitchen Timer (KT) allows all basic function parameters to be set via the WEB interface and only limited special functions are available via gesture controls. Through gesture control, the main functions is available: resetting to factory settings, calibrating the gas sensor, turning on the WIFI module. These functions are not available through the WEB interface due to the access protection logic of the device.
Follow the steps below to enter setting mode:
- Switch KT gesture mode. To do this, bring your hand to the KT at distance less than 5 cm. A sound signal will come out and the display brightness will increase.
- After 1 second, perform the gesture “wave” (already at a normal distance of 15-20 cm). An audio sequence will sound.
- Perform approach The display shows the message -US-, informing you that you have entered the setting mode.
To exit the setting mode:
The KT will automatically return to the main operation mode after 60 seconds from last gesture. However, if you want to immediately return to the main operation mode, perform the sequence of gestures similar to that for entering the setting mode.
In the current version, 23 functions are available in the setting mode.
Control of Kitchen Timer in setting mode:
- Function selection (function selection mode) is carried out “in a circle”, use gestures to the left or right for switching.
- Showing function parameter (parameter changing mode) perform gesture downward in order to see the function’s parameter value.
- To change the function parameter value by one, perform gestures to the left or right. Clockwise or counterclockwise rotation gestures enable automatic change of value. To stop automatic change perform approach gesture.
- To exit from function parameter changing mode to function selection mode, perform gesture upward.
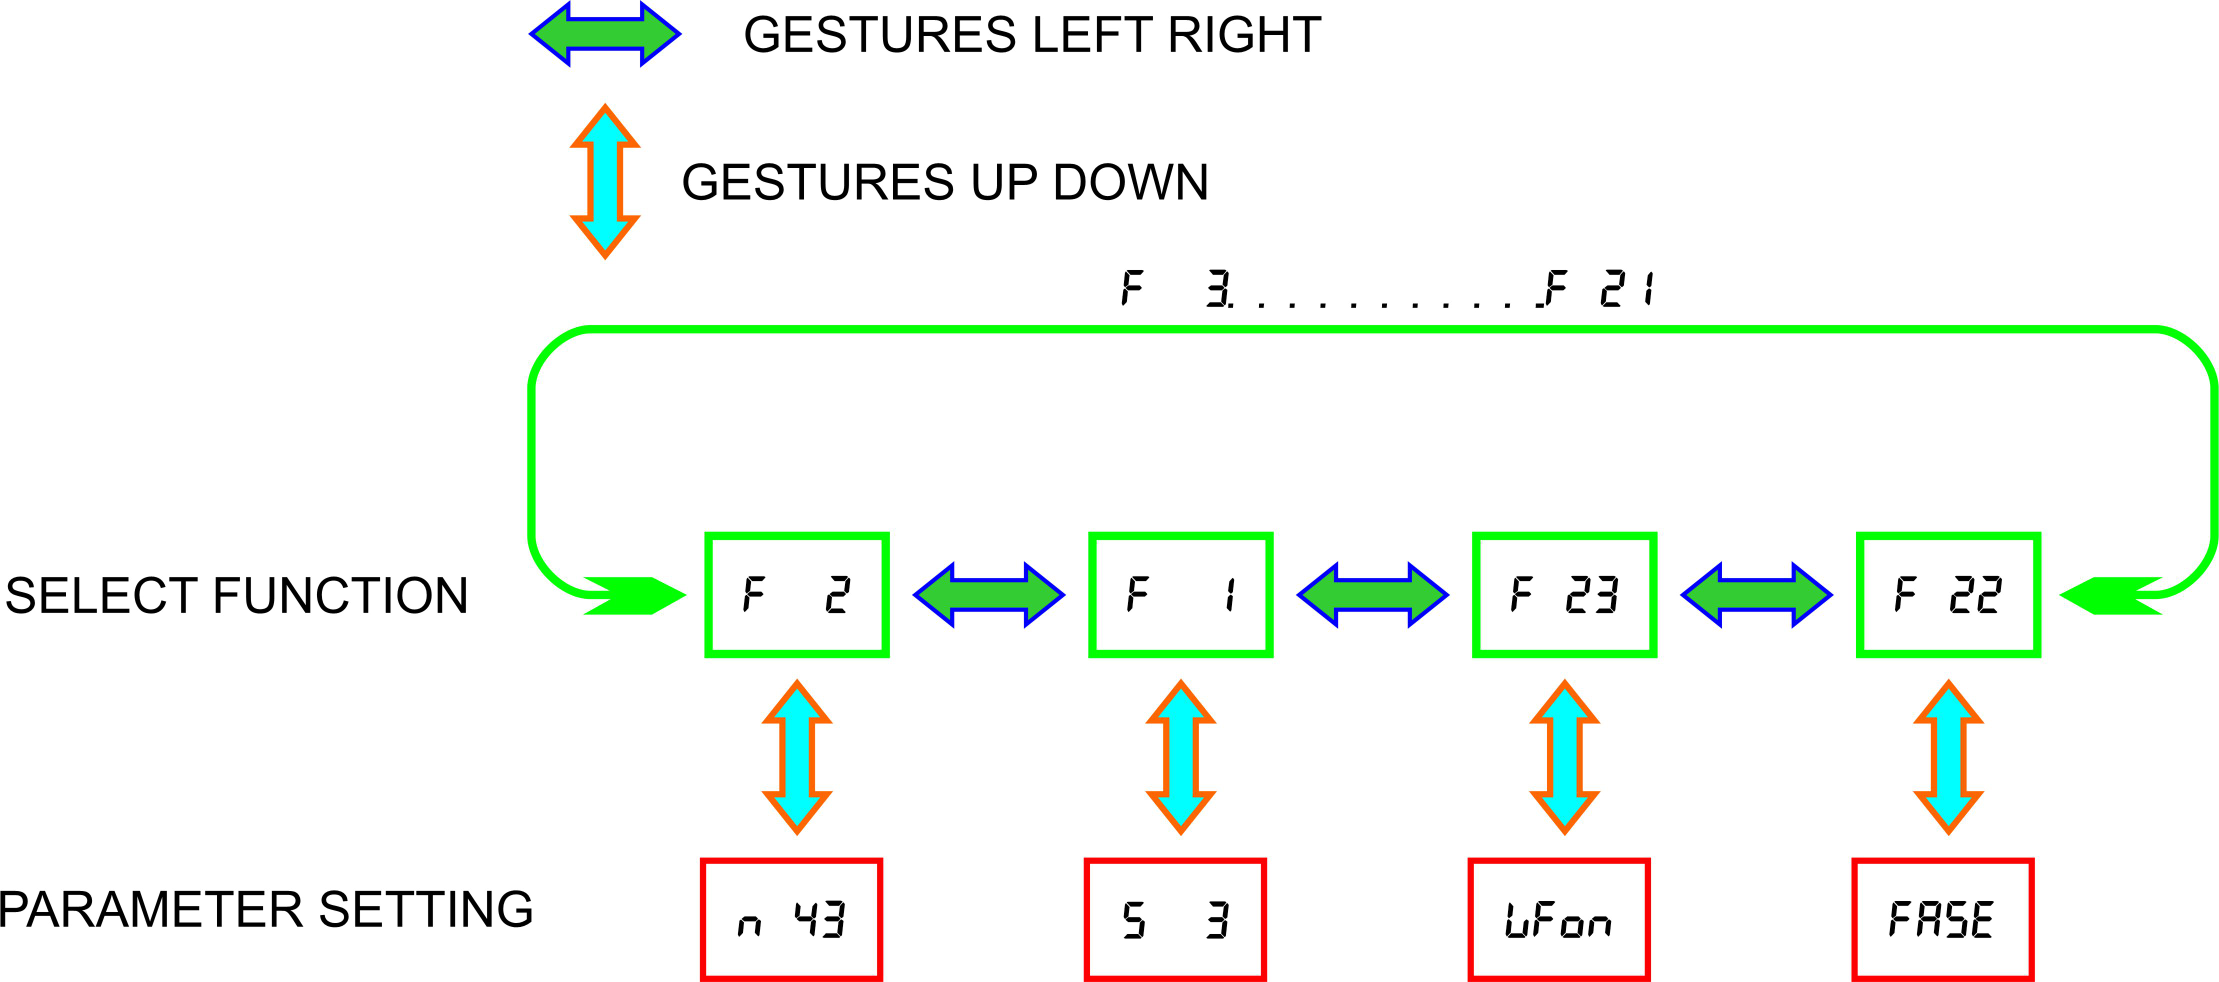
Setting mode functions:
- F 1. Time synchronization function. This function allows to accurately synchronizing the real time clock of the kitchen timer. For this purpose, a reference clock with an indication of seconds is required. Enter the parameter changing mode of this function. The display shows the value of seconds of KT clock. Controlling the value of the seconds of the control clock, perform gesture to the right when the seconds pass through zero. The time of KT clock will be synchronized with maximum accuracy.
Function parameter display example: the display will show the symbol S and the current value of seconds, for example, S 21 – 21 seconds. After performing the synchronization the display will show S 0 synchronization completed.
- F 2. Setting minutes of real time clock. By selecting this function, you can change the minute settings. Enter the parameter changing mode of this function. Current value of minutes is displayed. By gestures to the left or to the right, you can increase or decrease the minutes by one. If you need to change the parameter by a much larger number, use the clockwise rotation gesture to increase the value, and counterclockwise to decrease it.
Setting the minutes display example – n 15 – 15 minutes.
- F 3. Setting the hours of real time clock. The setting is the same as described for the minutes.
Display example – h 12 – 12 hours.
- F 4. Setting the day of the week. The setting is the same as described for the minutes.
Display example – dn 2 – 2nd day of the week, Tuesday.
- F 5. Setting the day of the month. The setting is the same as described for the minutes.
Display example – c 9 – 9th day.
- F 6. Setting the month. The setting is the same as described for the minutes.
Display example t 2 – 2nd month, February.
- F 7. Setting the year. The setting is the same as described for the minutes.
Display example y 21 – 21st year.
- F 8. Function of automatic return of display to the time indication mode. When some function parameter were viewed, after a certain period, the timer will switch to display the current time. However, if, for example, a constant indication of air quality is needed, then by switching this function off, any other indication function can be selected and the kitchen timer will show it constantly. Function setting: Enter the parameter changing mode of this function. Change the parameter using gestures to the left or to the right. Indication rE e – displays that after a certain time, the timer will return to the display the indication of the current time. Indication rE d – displays that the parameter of the function you have chosen will always remain on the CT display. For example, you have chosen to display the readings of a gas analyzer in order to observe how the air quality changes over time during cooking.
- F 9. Duplicating gestures with sound signals. Gesture sound signals allow the user to get feedback from the device, but if for some reason they bother you, you can turn them off. Function displays bE e – gesture sound signals on. bE d – gesture sound signals off.
- F 10. An air quality alarm will be accompanied by a sound signal. The buzzer will be automatically turned off when the quality of the room air returns to normal. However, the user can temporarily disable the sound of the alarm by performing approach gesture. The disable time for the alarm sound is set to 5 minutes by default, but can be changed up to 20 minutes if necessary. Select the gas alarm silence value Gb 5 – turns off for 5 minutes, Gb20 – turns off for 20 minutes.
- F 11. This function detects gas leaks during the absence of the user. This function allows leaving the gas alarm on, even when the level of harmful substances in the room air has returned to normal. The user manually with a approach gesture performs switching off the alarm. The display of the function for automatic turning off the alarm GA e – on, GA d – only manual turn off.
- F 12. It is possible to turn off the gas sensor if it is not needed. This provides a 60% reduction in the energy consumption of the timer. Three operating modes of the gas sensor are built in:
- G on – always on;
- G ct – on when the kitchen timer is running;
- GoFF – always off.
- F 13. The LED display can change its brightness depending on the ambient light. It is brighter during the day, and at night, brightness of the display is reduced. Automatic display brightness adjustment Ac d – off, Ac E – on. By default, function is disabled.
- F 14. At night, the kitchen table backlight is useful. Built-in motion sensor turns on the backlight, when a person is detected. Table backlight controlled by motion sensor bA E – on, bA d – off. By default, function is enabled. This function is duplicated with kitchen timer output (see attachment). This output can be used for controlling light over the kitchen table.
- F 15. Air quality sound alarm activation threshold. This function turn of the sound alarm when the amount of harmful substances in the room exceeds the allowable level. Don’t set threshold too high, your health depends on it. Display example 200 – 200ppm. Please note that the minimum allowable difference between the turn-on threshold and the turn-off threshold is 5ppm.
- F 16. Gas alarm shutdown threshold. Display example 100 – 100ppm.
- F 17. Exhaust ventilation control according to room temperature. The kitchen timer can measure the ambient temperature when the gas sensor is off. This function sets the temperature threshold. In the case of its exceeding the ventilation is turned on. Ventilation is turned off when the room temperature drops 2 degrees below this set point. See the appendix for connecting a kitchen timer to the ventilation system. Please note that the kitchen timer measures the temperature with an internal sensor and its readings may be slightly higher than the actual room temperature.
- F 18. Exhaust ventilation control according to room air pollution. This function works when the gas sensor is on. The parameter of this function sets the threshold for switching on exhaust ventilation. The threshold is compared with the readings of gas analyzer, and if the air pollution level exceeds the exhaust ventilation is turned on. See the appendix for connecting a kitchen timer to the ventilation system.
- F 19. Exhaust ventilation control according to room air pollution. This function works when the gas sensor is on. The parameter of this function sets the threshold for switching off exhaust ventilation. The threshold is compared with the readings of gas analyzer, and if the air pollution level is less than or equal to it the exhaust ventilation is turned off. See the appendix for connecting a kitchen timer to the ventilation system.
- F 20. Function of gas analyzer calibration. The gas analyzer is calibrated at the factory, but user can calibrate it manually. For this purpose, place the kitchen timer in a clean, ventilated room or outdoors and turn on the calibration. Enter the parameter changing mode of this function. Display shows a message cali. Swipe to the right and the display starts counting down from 200 to 0. At the end of the countdown, the gas analyzer is calibrated, sound signal comes out and the timer switches to the main mode.
- F 21. Reset to factory settings with gas analyzer calibration. This function is intended for a situation when user is confused in the timer settings and want to return everything to default, for example, when the passwords for accessing the WEB interface was forgotten. Perhaps the WIFI module was disabled via the WEB interface and only option to enable it, is to reset the timer to the factory settings in which the module is enabled. Enter the parameter changing mode of this function. Display shows a message FASE and perform swipe to the right gesture. The gas analyzer sensor is calibrated and all settings is reset to factory defaults. After that, you can connect to the timer via the WEB interface and set it from the very beginning.
- F 22. Enable/disable the WIFI module. If there is no need for the WEB interface, the WIFI module can be disabled. wF0n – module is on, wFof – module is off. By default, module is enabled.
- F 23. Temperature display selection in Celsius or Fahrenheit. in C – display in Celsius, in f – display in Fahrenheit . By default, temperature is displayed in Celsius.
8. Main operation mode
The timer always returns to the main mode from any state automatically. Cyclically every 1 minute for 2 seconds (by default) the kitchen timer (KT) shows the date/month, day of the week and air pollution. The current time is displayed for one minute (the dot after the hour value is flashing). This is convenient when it is possible to check the time at any moment. If user wants to see the date and month or day of the week, just wait a bit and the timer will show these parameters. When the ambient light changes, for the convenience of the user, the KT changes the brightness of the display (the auto-brightness function can be turned on by the user).
If the person is detected, the KT turns on the built-in table backlight (if this function is activated in the settings).
The alarm can also be disabled by motion sensor.
Gesture control function.
In the initial state, when the user stops interacting with the timer, the gesture functions are disabled, only the approach function works. This algorithm is necessary for the KT not to perceive user random movements in gesture area as gesture control. When user bring hand close to the KT, it understands that it is necessary to switch to the gesture mode and wait for a commands from the user.
When switching to the gesture mode, the KT increase the brightness of the display and plays sound signal. After that, KT is ready to receive your commands.
Please note, that after performing approach gesture, the gesture recognition is disabled for 1 second. I.e. after performing the approach gesture to switch the timer to the gesture mode, make pause for 1 second, remove your hand from the timer and then begin to perform the gestures at a normal distance of 15-20 cm from the timer.
Remote turning off the alarm signal refer to the functions of the motion sensor.
Graphical representation of main mode
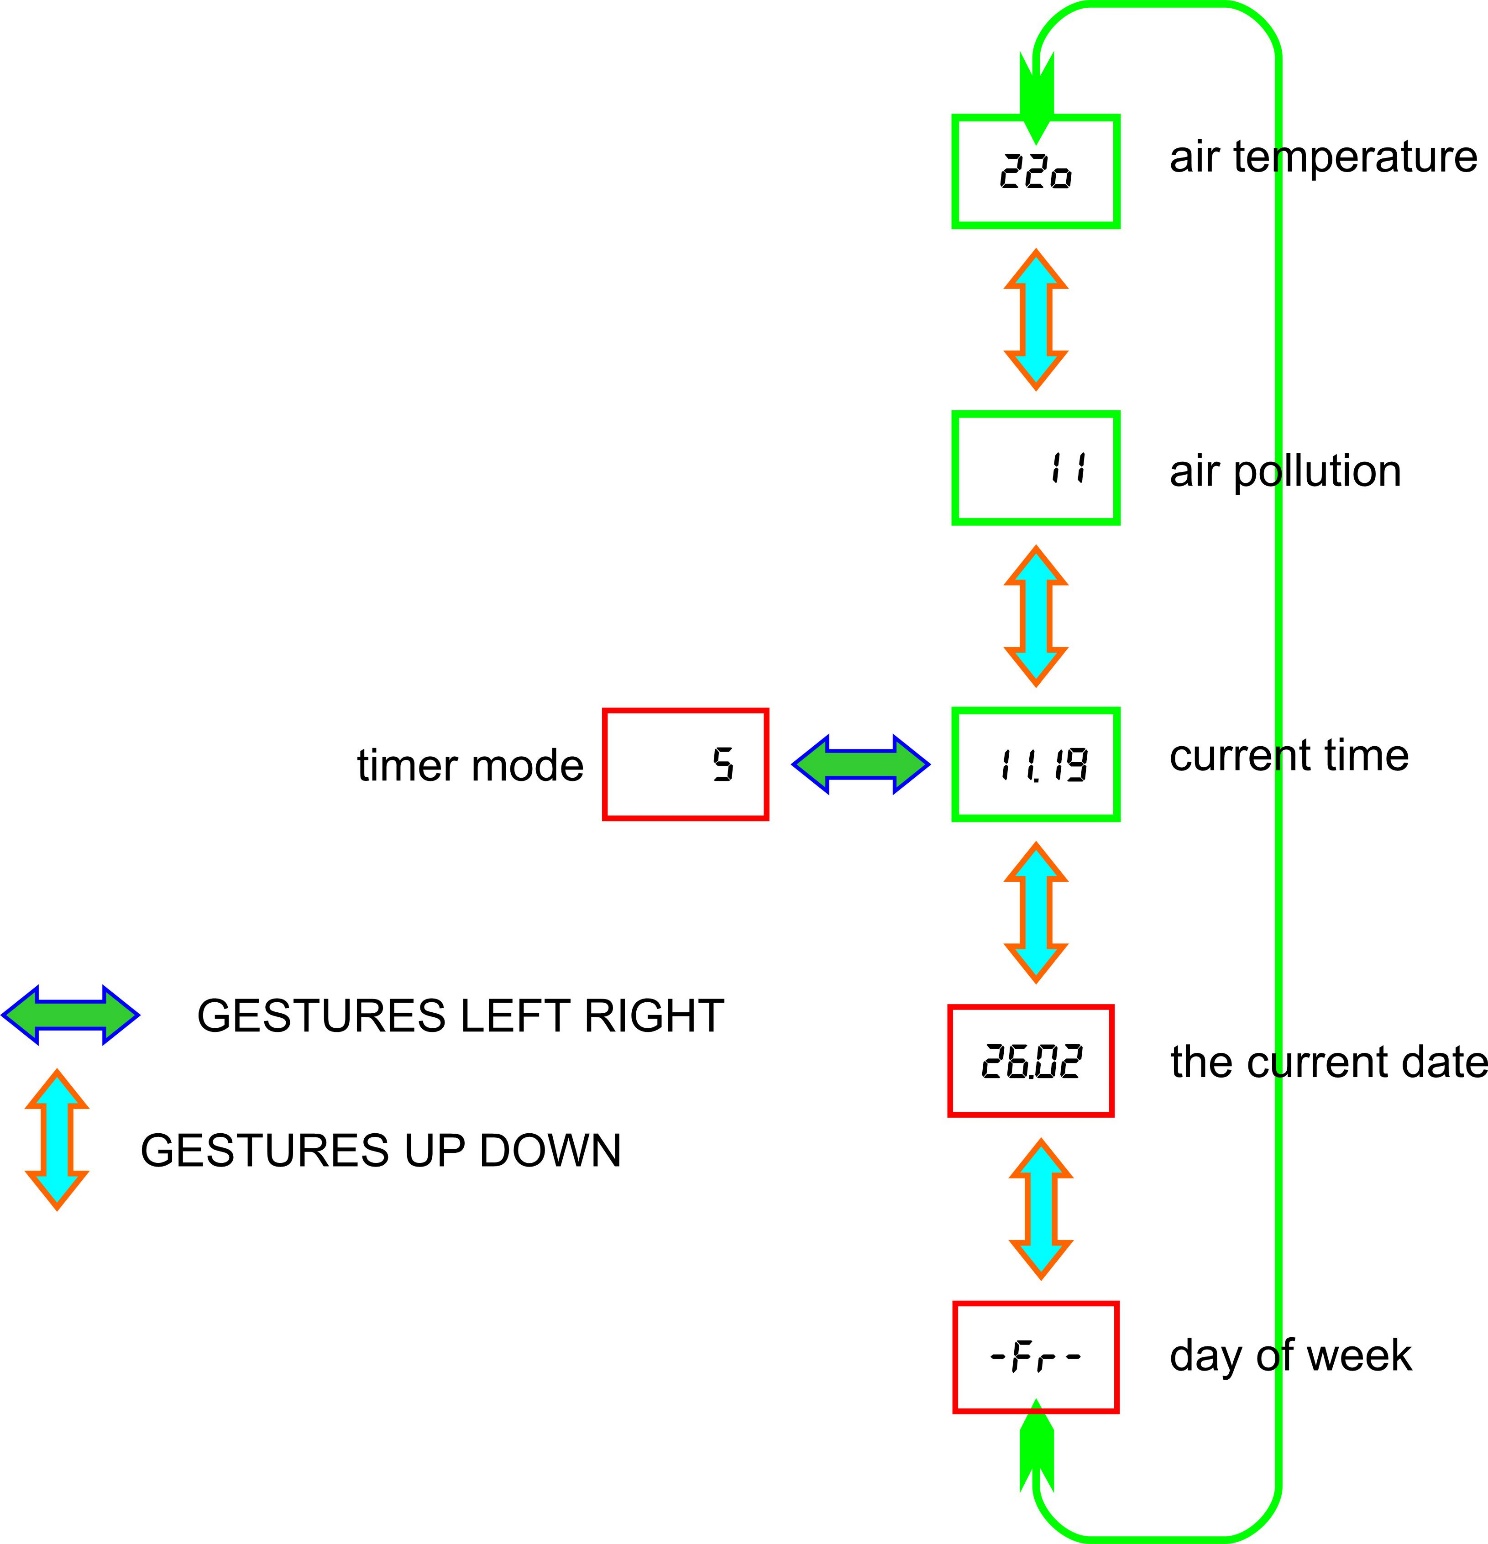
Control commands and display modes:
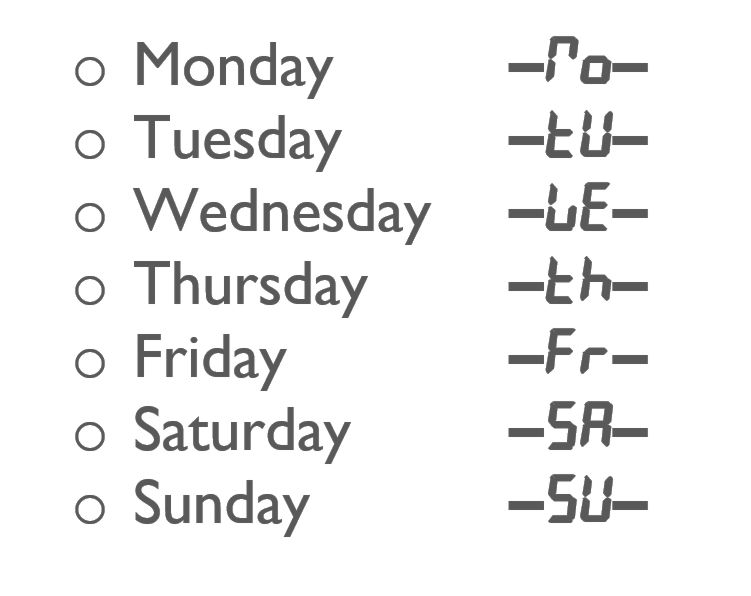
- Viewing the parameters of the KT display functions. By swiping upwards or downwards, user can cycle through Time, Calendar, Day of the Week, Temperature and Gas Analyzer readings. The time is displayed in the format, 19 with flashing dot. Calendar is displayed in the format 26.02 (day, month, dot does not blink). Day of the Week: Monday –Mo–, Tuesday –Tu–, Wednesday –We–, Thursday –Th–, Friday –Fr–, Saturday –Sa–, Sunday –Su–. Gas Analyzer — this is the parameter that shows the air pollution in the room, the larger the number is, the higher the amount of harmful substances is in the air of the room. Temperature is displayed in the format of two digits and a degree symbol 22o. Please note. If the gas analyzer is enabled, the temperature sensor is disabled –LoFF and all functions associated with it is also disabled.
- How to quickly switch to the current time display? In order not to perform multiple gestures after checking, for example day of the week, user can easily switch to the current time display, by performing one gesture to the left.
- Starting the kitchen timer. Swipe to the right to start the kitchen timer. The KT displays the last timer setting. If no actions are performed for 4 seconds, the KT starts running and the countdown begins. The timer can remember the last 6 time settings, they can be viewed by performing the gesture to the right. The user can change any setting and the timer remembers it. In order to increase time by 1 minute swipe upwards. In order to decrease time by 1 minute swipe downwards. In order to increase time by 5 minutes perform clockwise rotation gesture. In order to decrease time by 5 minutes perform counterclockwise rotation gesture. After setting the desired time, wait 4 seconds for the timer to start countdown. User can adjust the time without stopping the countdown, if necessary.
- Is it possible to check the current time while the timer is running? It is possible to view all the timer display functions – time, calendar, etc. User can adjust remaining time or turn it off prematurely.
- How to turn off the timer prematurely? Perform two gestures to the left in gesture mode. After the first gesture to the left, the last viewed display function will be displayed. After the second gesture to the left, the KT is stopped and the current time is displayed. If the timer is in approach mode, perform the approach gesture and two gestures to the left afterwards.
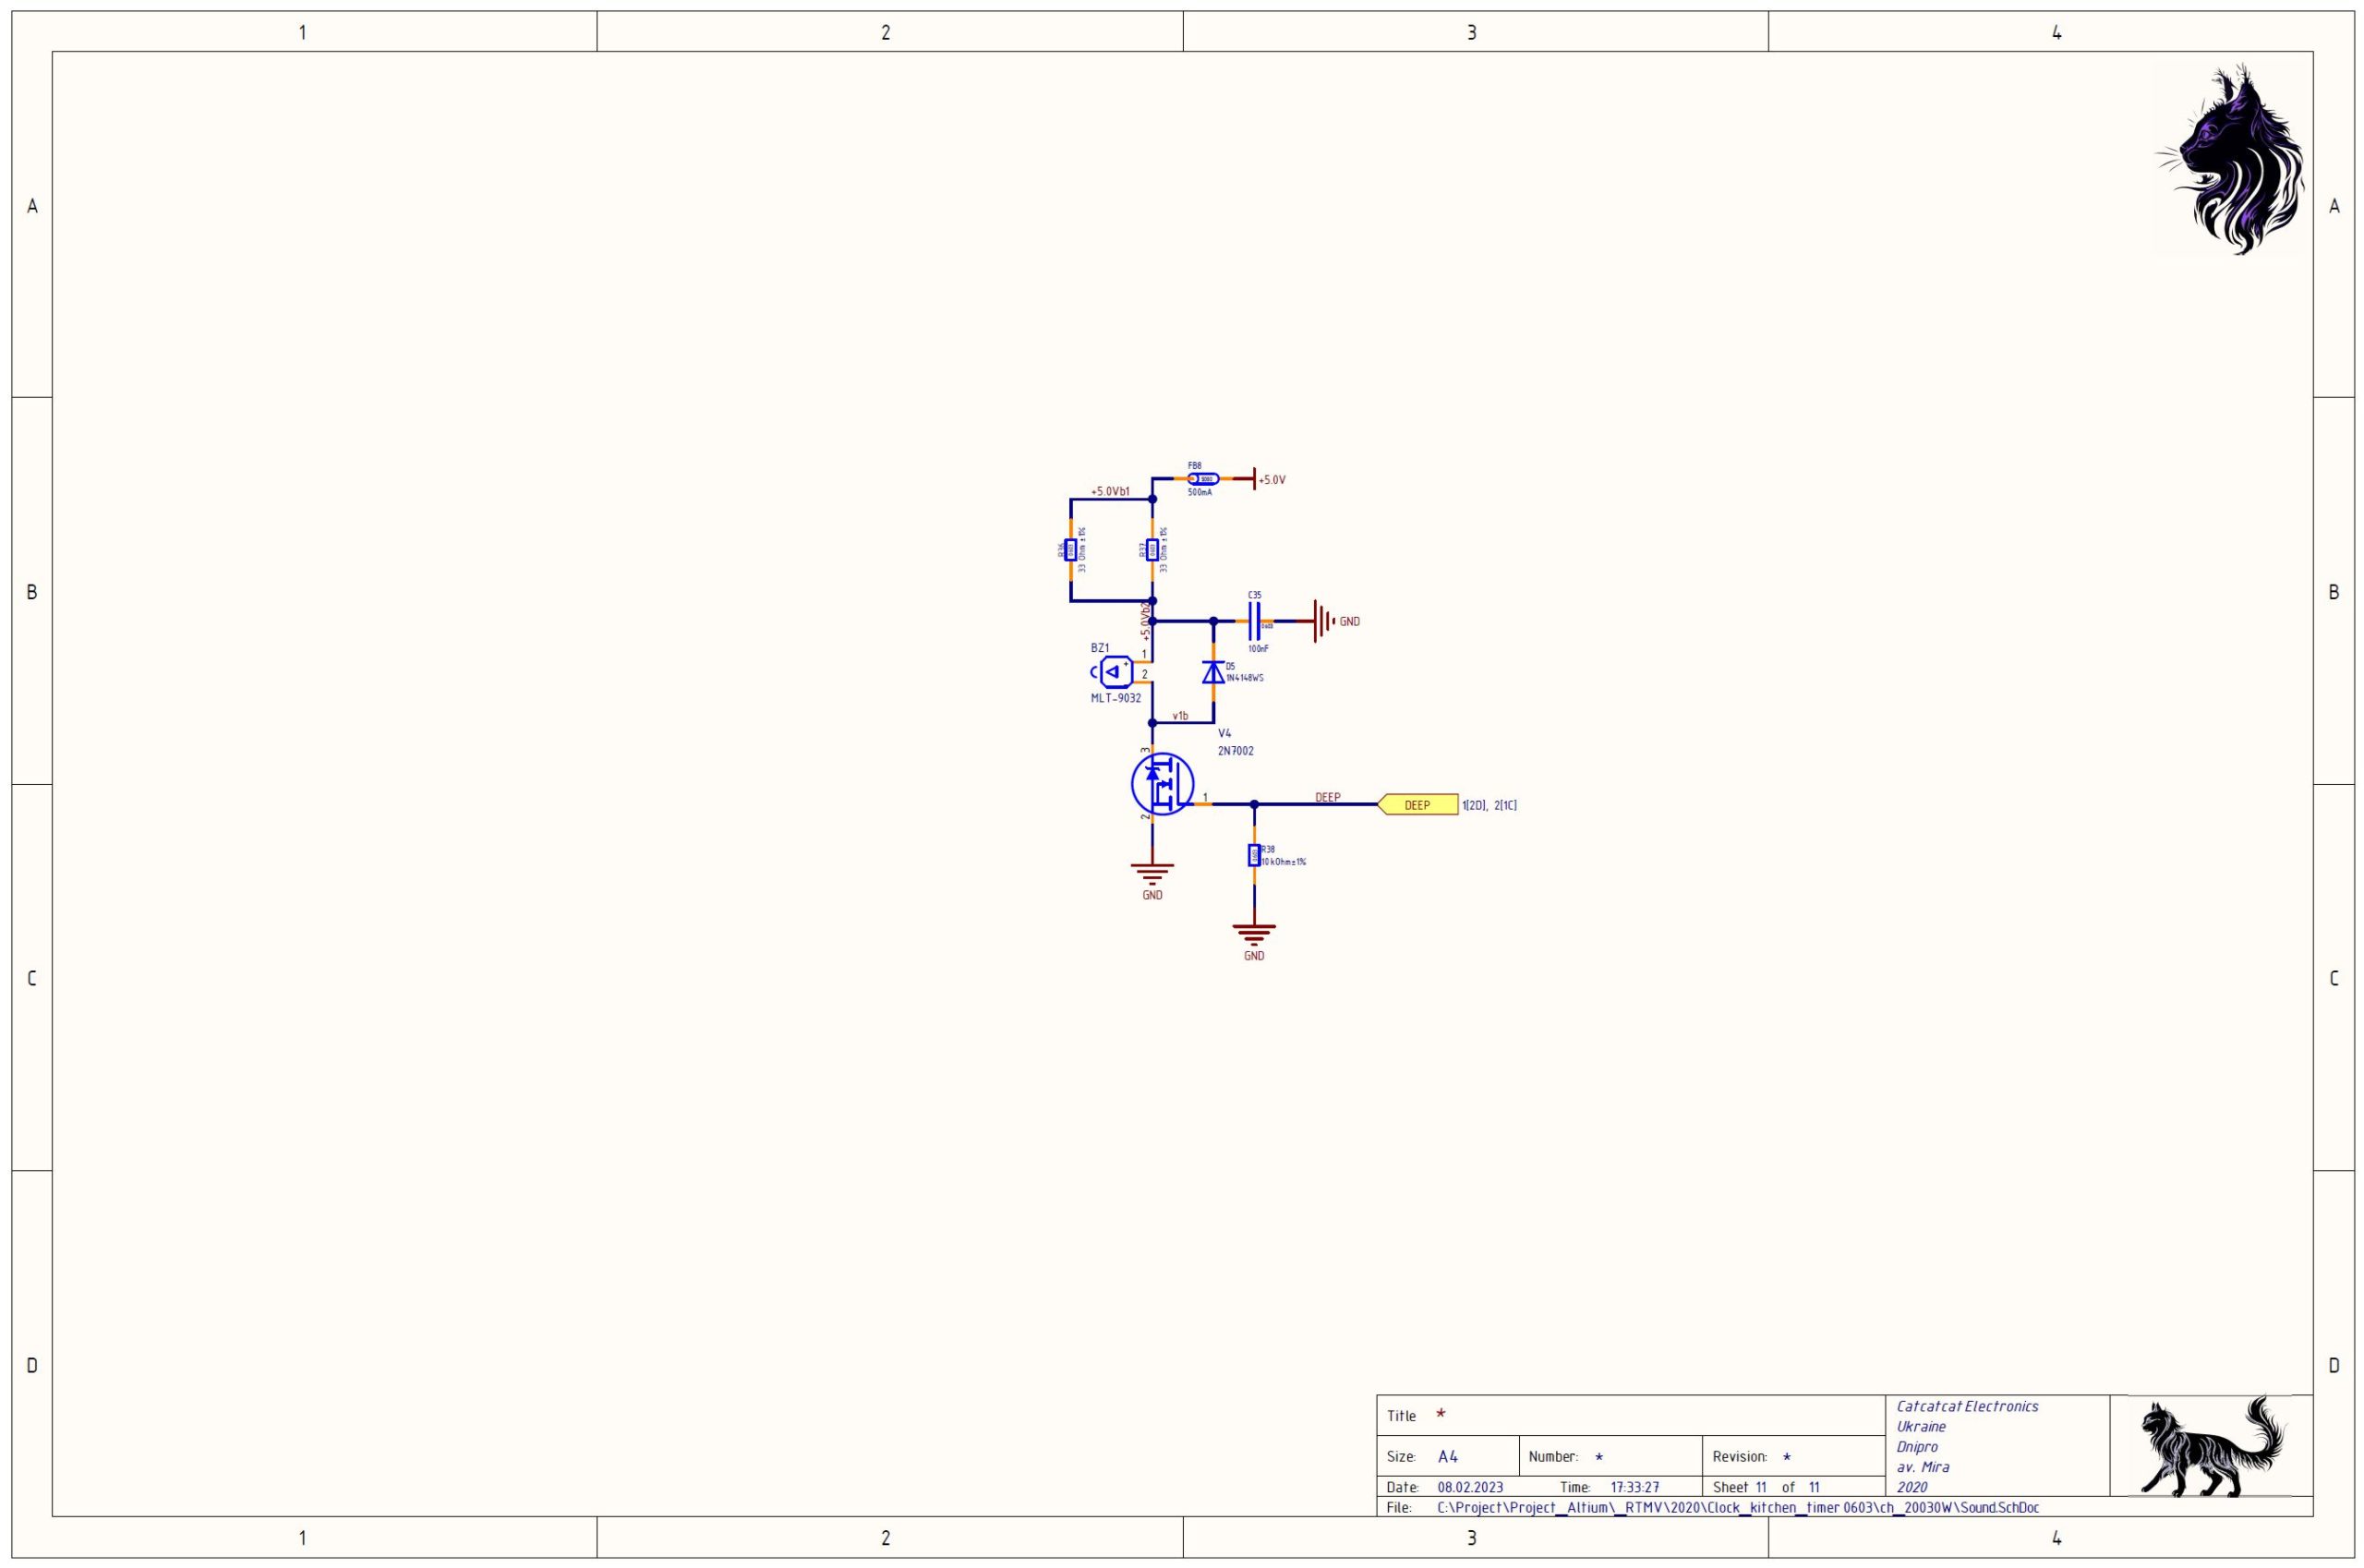
- What happens when the timer countdown is finished? A sound signal comes out. It repeats constantly after a certain period.
- How to turn off the timer signal? Perform approach gesture.
For information – indication of the day of the week.
9. WEB interface
The WEB interface allows the user to get modern visual access to advanced functions of the kitchen timer. User can: set alarm clocks, view measured readings, set a new functions’ parameters, remotely turn on or off the timer, change the setting of gas analyzer function, adjust the ventilation system setting, get access to additional settings, and also change the WIFI connection settings and set your logins and passwords.
Please note that the timer supports three default interface languages: English, Ukrainian and one depending on the software version. Depending on the modifications, Russian, German, French, Italian, Spanish languages can be supported (check with the seller for supported languages when buying). The language is set automatically depending on the language settings of the browser. If the timer does not find language in its memory, the WEB interface is shown in English.
If the timer does not display language, but this language is declared in your version, please check your browser settings. Desired language should be the first.
- Connecting to the kitchen timer via WIFI. This is the first thing you can do after first turning on the timer. User need at least to set up the operation of the real time clock. The easiest way to do this, when not acquainted with the timer, is to use the WEB interface. Open the network view on your PC or mobile phone.
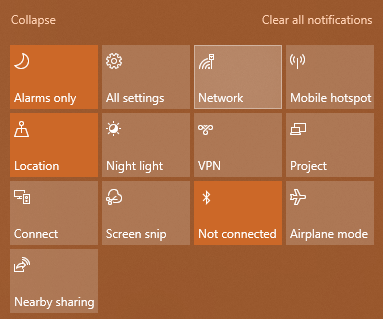
The network Kitchen Timer is available to connect.
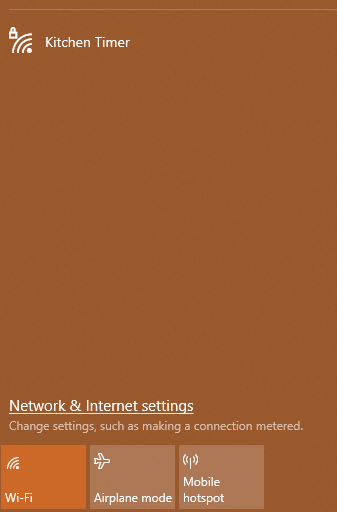
This network appears after the first timer enabling (you can change this name later or hide this network). Connect to this network.
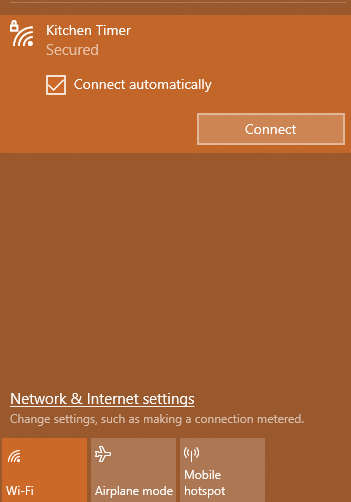
Enter password 12345678 (by default). It is highly recommended to change the network name and password for later operation.
Then open browser and enter http://192.168.4.1/ in the search field

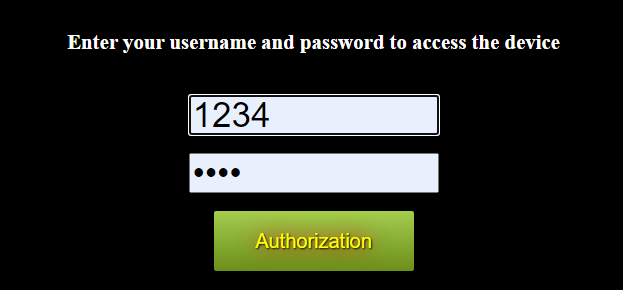
User authorization page.
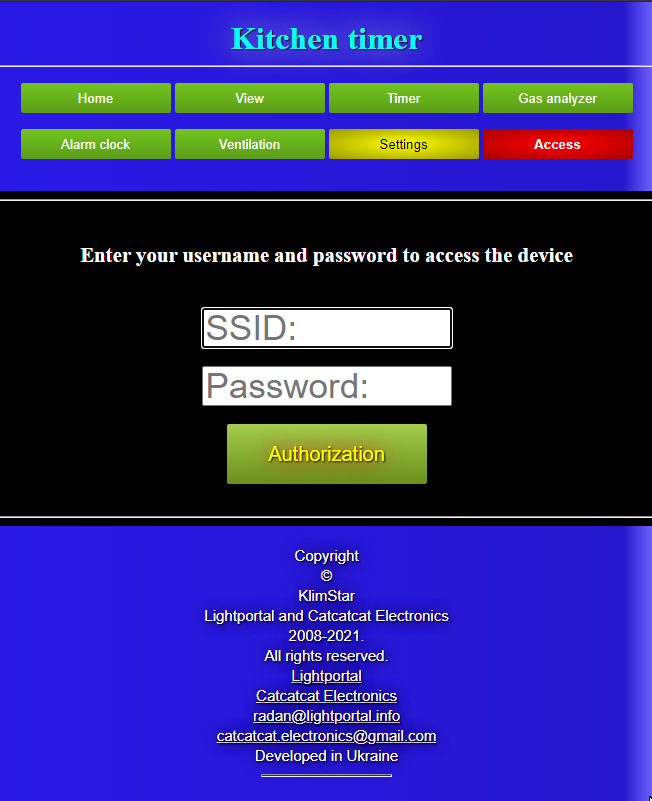
When the kitchen timer is accessed for the first time, authorization page always is loaded. Here user needs to enter username and password, in order to access timer settings. By default username is 1234 and password is 5678. It is highly recommended to change login and password in the future.
Please note that for security purposes, access to the WEB interface of the timer is provided for a certain time. As long as the user is interacting with WEB interface, access is maintained, but after some idle time, the subsequent logins will require re-authorization.
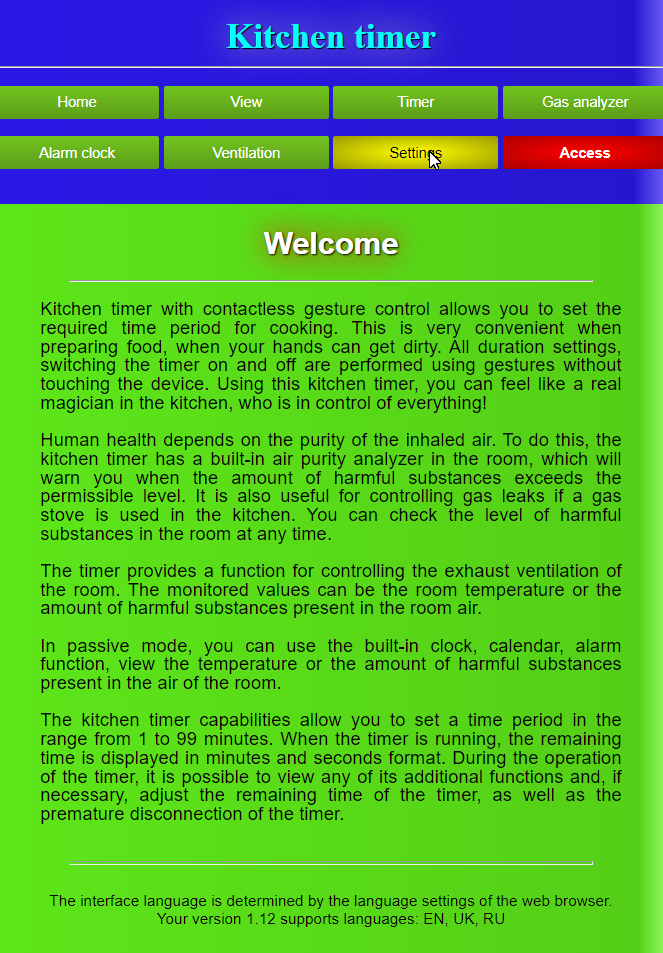
After successful authorization user enters the main page with a brief description of the functions and purpose of the kitchen timer.
Main page.
If the timer is connected to the Internet, links to the WEB page of the manufacturer are available. On this page, there is gratitude to people who helped in localization of kitchen timer versions.
On this page, user can determine which languages is supported by kitchen timer.
By default, the kitchen timer supports three languages – English, Ukrainian, and a third language depending on the localization version. If the time does not find a supported language in the browser, it generate pages in English.
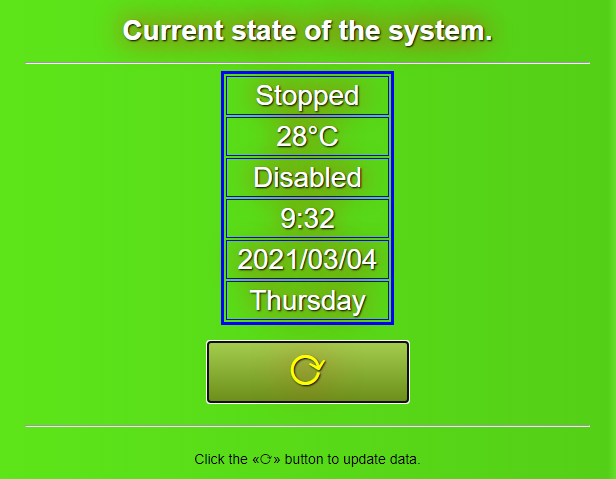
View page.
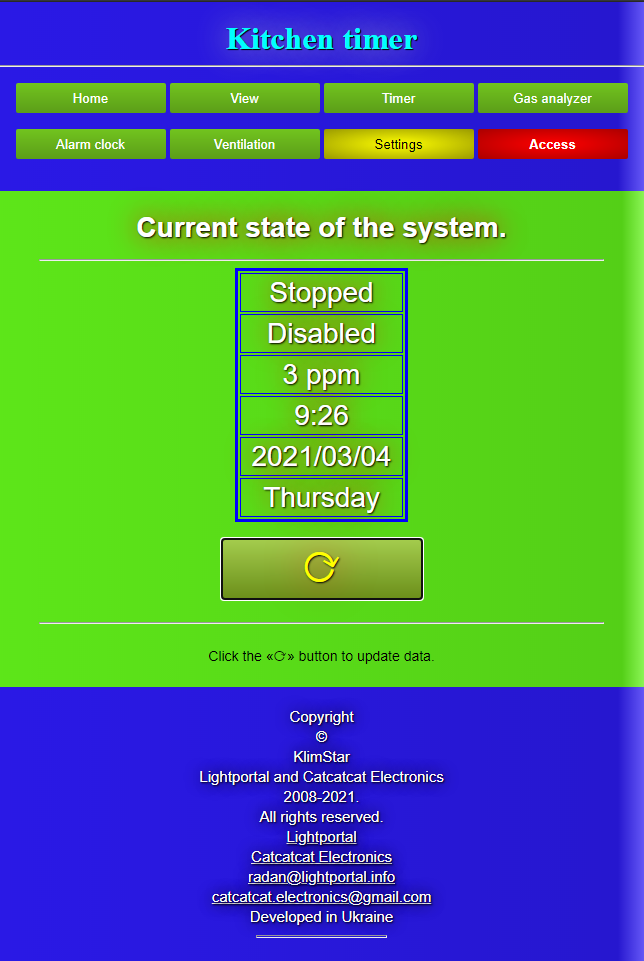
On this page user can view all the display functions of kitchen timer.
First line – status of KT is displayed. Stopped means that the timer is not activated.
Second line – air temperature in the timer control range (if the gas analyzer is disabled). On the screenshot, the temperature display function is disabled.
Third line – the amount of harmful substances in the room air.
Fourth line – current time in hour-minute format.
Fifth line – date in year-month-day format.
Sixth line – day of the week.
To update the values, click the refresh button.
Note: The gas analyzer takes time to get ready to start working. When timer or gas analyzer are turned on, the page displays the initialization inscription. When harmful substances exceed the set level, the parameter of harmful substances will flash.
Either the gas sensor or the temperature sensor can work at the same time. If the gas sensor is enabled, the temperature sensor is disabled. If user turns off the gas sensor, the temperature sensor is activated. Please note: If temperature sensor is enabled after a long period of gas sensor operation, it takes time for the temperature sensor to start showing the room temperature.
Since the kitchen timer internal sensor measures the temperature, the measured value may be slightly higher than the actual room temperature.
Display when the gas sensor is disabled:
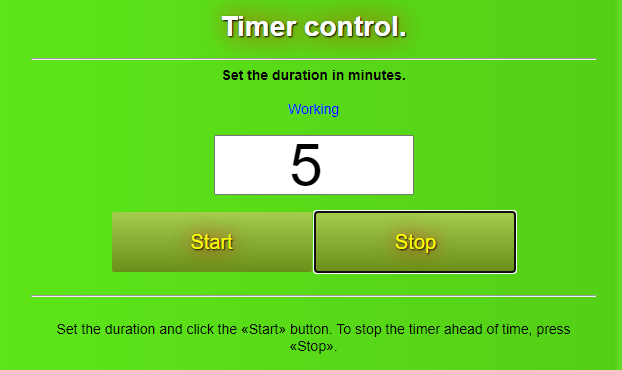
Timer.
Remote control of the timer. Timer button.
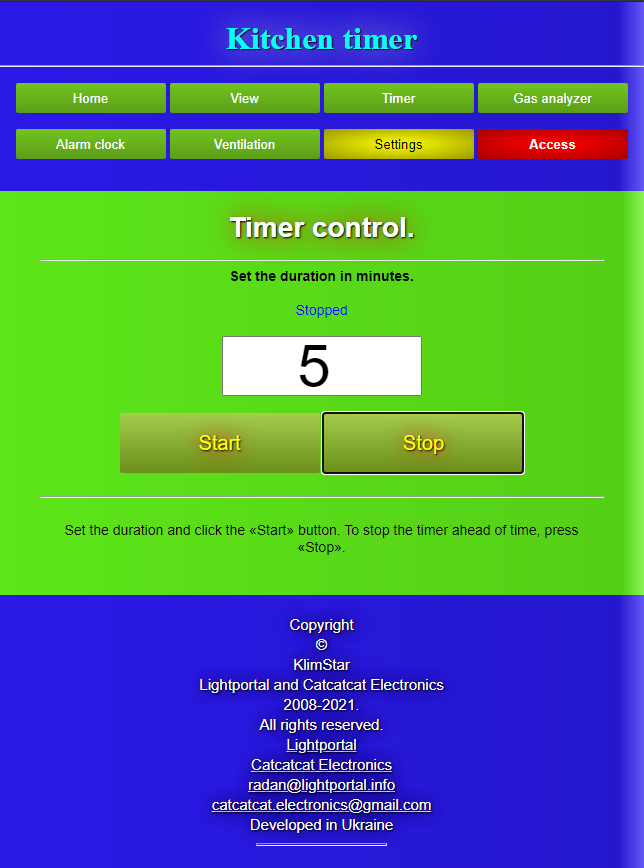
In this window, user can set the required duration of timer. Start the countdown by pressing the start button. If user needs to change the set duration, just set a new value and press the start button. The timer will immediately readjust to the countdown of the new period. If user needs to stop the timer prematurely or turn off the sound signal at the end of the period, press the stop button.
The timer remembers the last period set and the next time user opens this page, it suggests the value previously used.
The timer can remember up to six settings, you can call them up using the buttons ► ◄ . The user can customize each setting. For convenience, an Emoji picture accompanies each setting.
🍖 🍠 🍤 🍕 🍮 🍯
Please note that new settings are remembered only if user presses the start button!
The function of turning the timer off by motion sensor gives user the opportunity to turn off the signal only when someone enters the room with the timer. With this function user does not need to turn it off by performing approach gesture.
Gas analyzer.
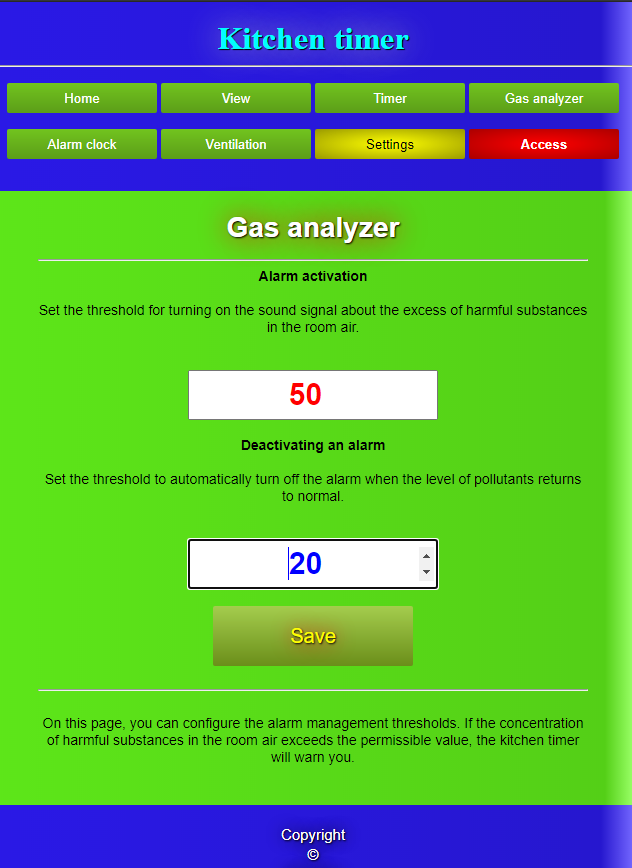
On this page, user can set the threshold for turning on the sound alarm and the threshold for automatically turning it off. If the level of harmful substances in the room air exceeds the threshold, the timer will start beeping. Sound alarm does not stop until the room is ventilated and the level of harmful substances does not fall to the lower threshold or below.
The sound signal can be temporarily turned off using the approach gesture. By default, the alarm sound signal is turned off for a period of 5 minutes, after which, if the pollution does not fall below the threshold, it will resume again.
In the timer settings, you can increase this period by 20 minutes. User can also disable the automatic shutdown of the alarm when the turning off threshold is reached. In this case, the user has to turn off the sound alarm manually by performing the approach gesture. See the functions of the Setting page.
Pay attention! The gas analyzer has priority over all other timer functions. If the gas alarm is activated all other timer functions are disabled. Ventilate the room and then the timer resumes its normal operation.
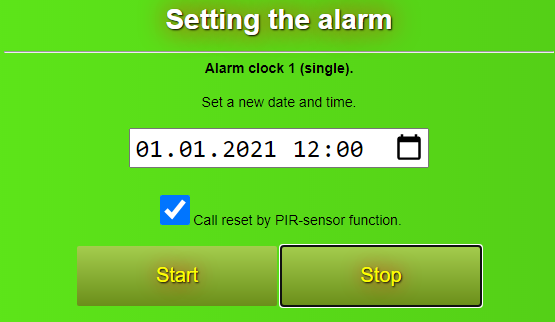
Setting alarm clocks.
The timer provides the user with two types of alarm clocks – single and periodic.

Single alarm clock.
A single alarm clock allows user to set an alarm for a specific time in the year. For example, it could be birthday. Set the date and time and press the start button. The bell symbol 🔔 will indicate that the alarm is on.
alarm clock disabled
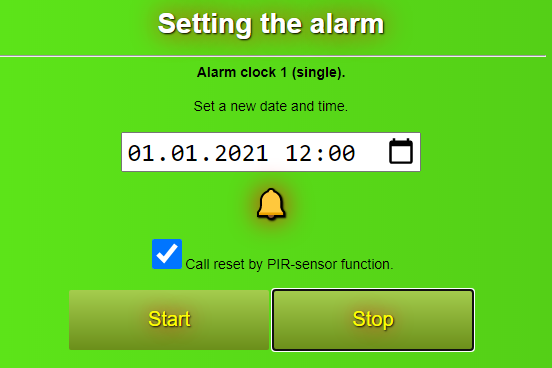
alarm clock on
Periodic alarm clock.
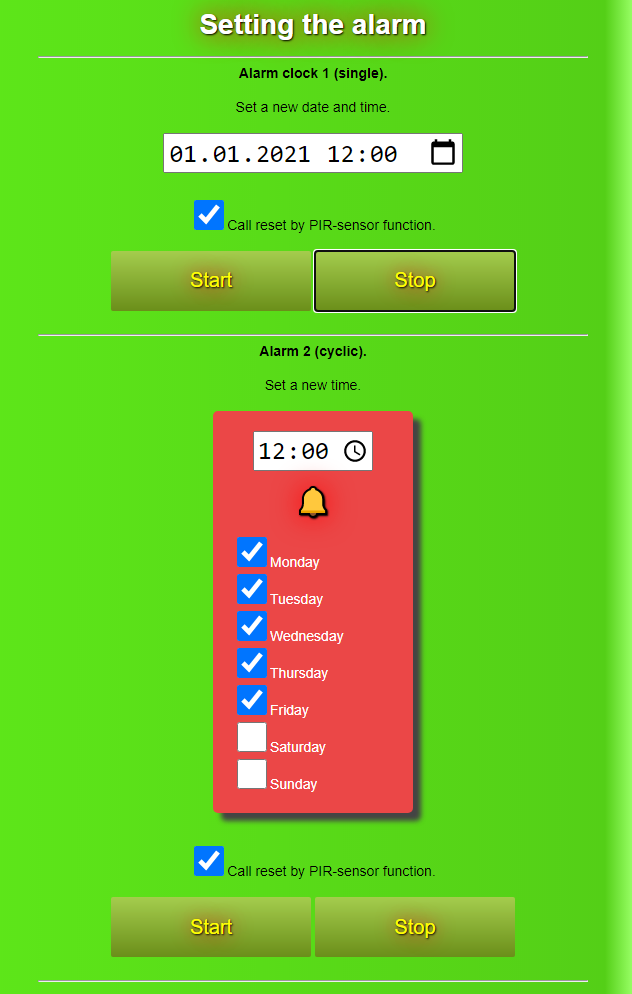
The second type of alarm clock is a periodic one. User can set the time and the day of the week when the alarm comes out. For example, time when user wakes up for work.
To turn on the alarm clock, set the time and press the Start button. To turn off the alarm clock, press the Stop button.
Resetting the alarm clock.
By default, signal reset is performed from both the motion sensor and the gesture sensor.
If option – ![]()
is activated, then to reset the alarm user needs to either enter the motion sensor control range or simply wave a hand (for example, if user is sitting at a table). In current design of the kitchen timer, the sensor confidently recognizes movement, at a distance up to 3 meters. If this option is disabled, user needs to go to the kitchen timer and perform approach gesture to reset the alarm.
The kitchen timer turns out to be convenient to use as an alarm clock. When the alarm sounds, user does not have to jump up to turn it off or look for the mute button, user can just wave a hand and the alarm turns off. And user can continue a dream.
😉
Exhaust ventilation control.
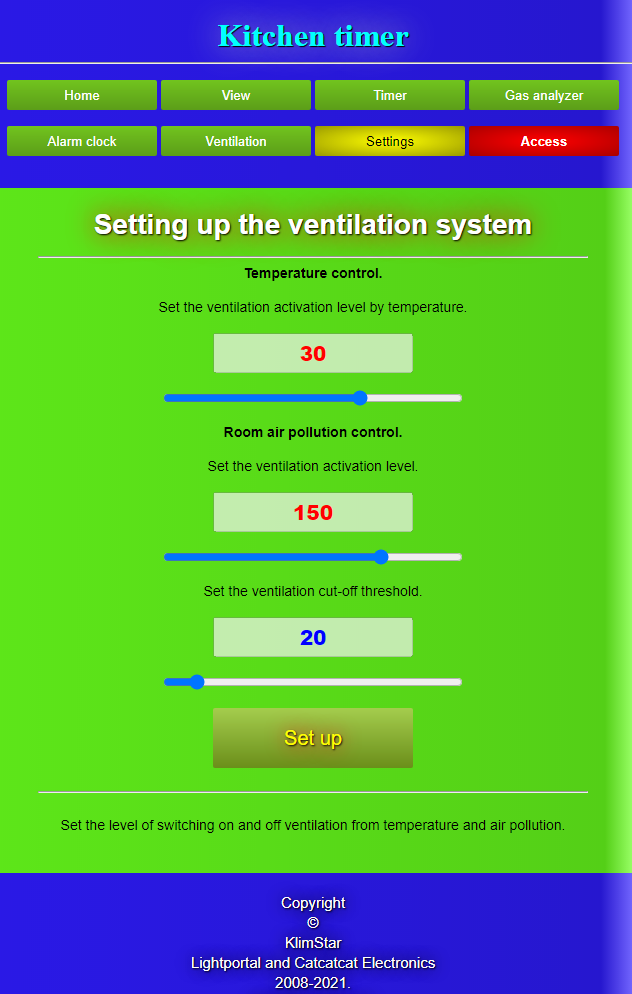
The kitchen timer provides function exhaust ventilation control. For this purpose, KT has two logical outputs by connecting to which ventilation equipment user can automate the operation of the ventilation system. See the connection diagram in the appendix.
Ventilation can be activated by temperature or by the level of harmful substances in the room air.
The kitchen timer has three physical outputs.
- The first output, is controlled by the motion sensor (switching on additional lighting).
- The second output performs the control depending on the temperature sensor readings (if the gas sensor is disabled).
- The third output performs the control depending on the measurement of air pollution (if the gas sensor is enabled).
Using the horizontal sliders, set the required thresholds for turning on ventilation by temperature (if the gas analyzer is turned off) or by air pollution (if the gas analyzer is turned on), and push the Set button.
System Setup.
This is a complex page with an accordion mechanism.

Hover the mouse over a section when working from a PC, or push on a section if you are using a mobile phone in order to open it.
Sound signals
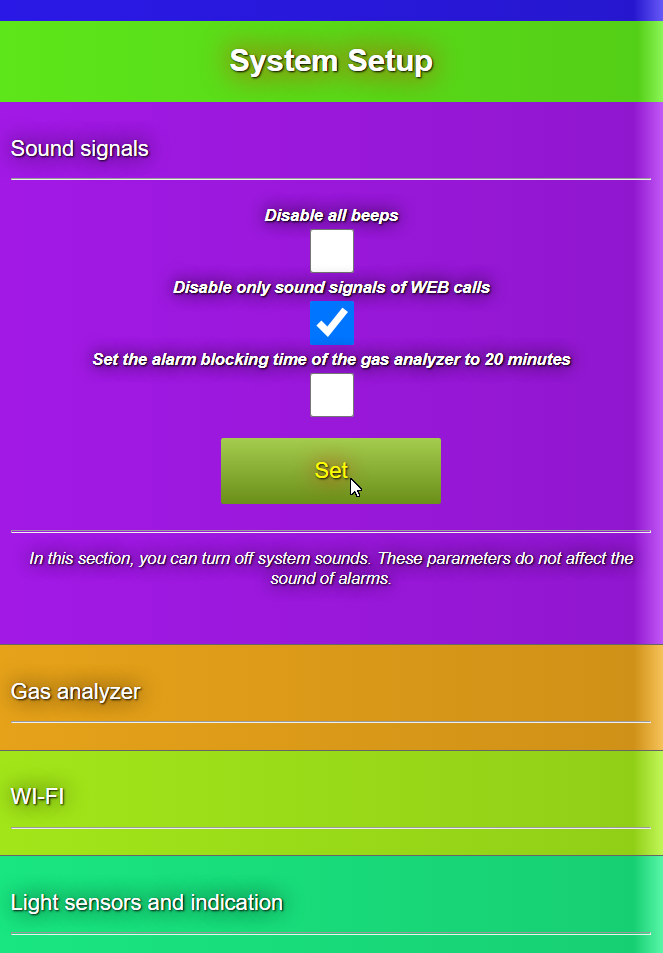
In this section, you can turn off gesture control sounds and/or WEB interface commands sounds. However, this does not effect on alarms, alarm clocks and kitchen timers.

The Disable all sound signals option disables all WEB interface sounds and gesture control signals.

The Disable only sound signals of WEB controls option – disables only the sounds of control signals to the timer via the WEB interface.

User can also change the shutdown time for the air pollution alarm. If this option is set, the duration of the shutdown will be 20 minutes. If the checkbox is unchecked, then the duration of the shutdown will be 5 minutes.
Be sure to press the SET key when finished setting.
Gas analyzer
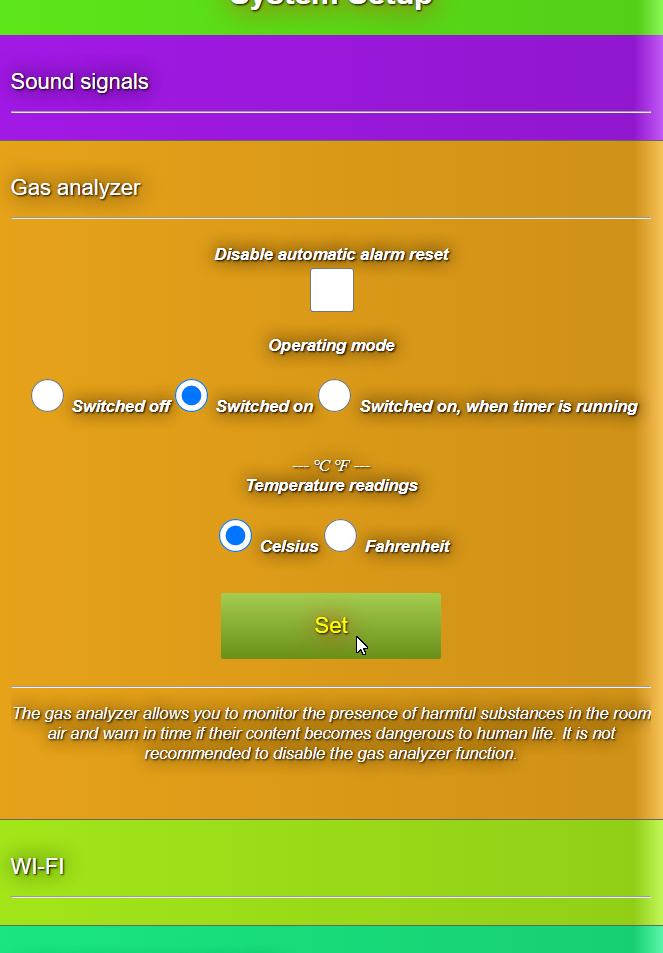

This option is intended to disable the automatic shutdown of the room air pollution alarm. This option may be useful if user needs to control, for example, the leakage of domestic gas during absence. This is especially important in those kitchens where a gas stove is used for cooking.

The gas analyzer module can be turned off when not needed. This reduces the power consumption of the device by 60% (if the gas analyzer is turned off, the temperature display automatically turns on).
User can activate the option that the gas analyzer will only turn on when the kitchen timer is running. I.e. it is disabled in normal mode, but if user turns on the timer, the gas analyzer also turns on. Pay attention, 1 minute is required to start up the gas sensor. Therefore, if, for example, user has set the duration of timer to 5 minutes, then after 1 minute initialization of the sensor, gas analyzer will only work for the remaining 4 minutes. However, if user has set timer for 1 minute, the gas analyzer will not work. Please note, that the gas sensor emits additional heat during operation. As a result, after switching to the temperature indication mode, the temperature is overestimated for some time.

When the gas analyzer is turned off, the temperature indication function becomes available. Set the temperature display type in Celsius or Fahrenheit.
Be sure to press the SET key when finished setting.
WI-FI
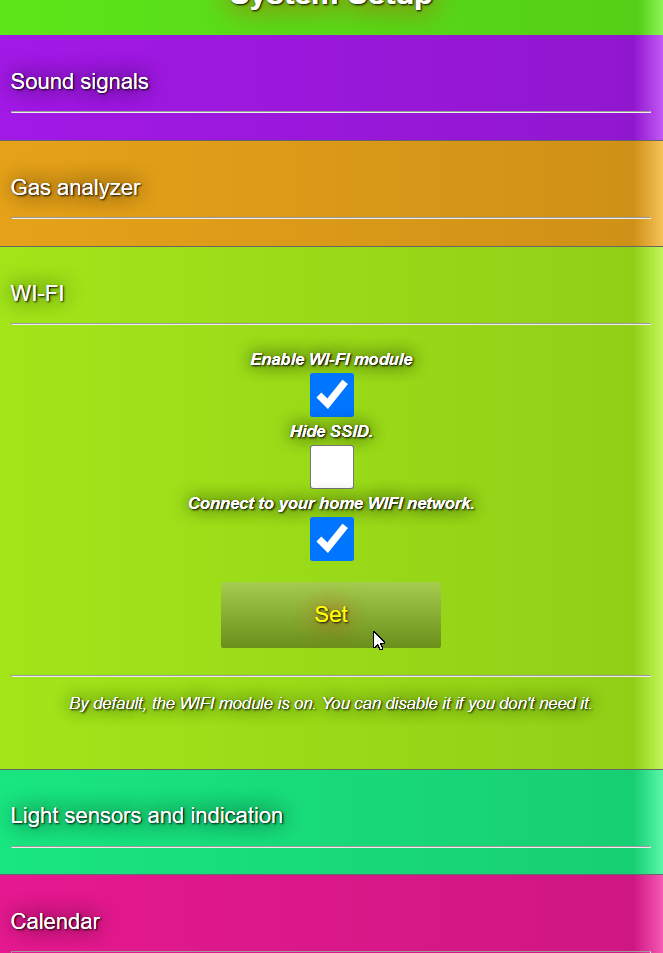

If necessary, the WI-FI module can be completely disabled. This will also reduce the power consumption of the device. For this purpose, uncheck the enable the WI-FI module box. It is possible to turn on the module by entering the setting mode of timer.

The hide SSID option is useful if user does not want someone else to see the WIFI network created by kitchen timer. Moreover, on the Access page, you can change the SSID and password for accessing your timer!

The option to connect to a home network is relevant if the SSID and password of user’s home WI-FI network router were entered into the memory of the kitchen timer. This can be done on the Access page. The timer, as far as possible, tries to be connected to user’s home network if home router is turned on.
Be sure to press the SET key when finished setting.
Light sensors and display
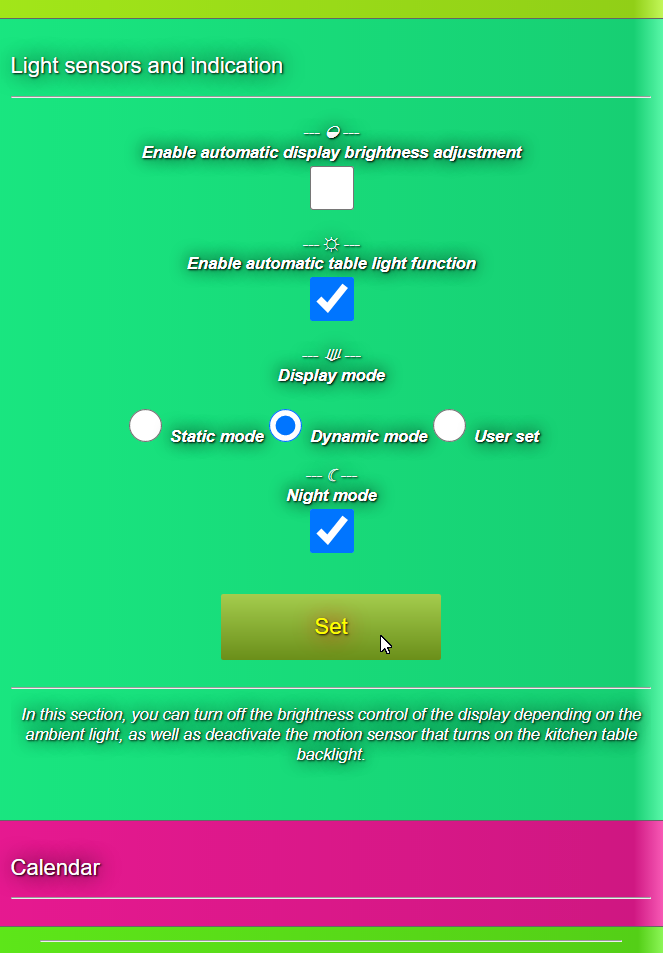

The timer can adjust the brightness of the display depending on the ambient light. Dimmer at night, brighter during the day. This function is active when the timer is in gesture mode. In approach mode, the timer always has minimum display brightness.

The kitchen timer can detect the presence of a person in the room. It can turn on the table backlight (if the timer is installed on suspension). The motion sensor signal is duplicated at the output of the timer, what can be used for lighting control (see appendix).

Static mode – the timer will always return to the current time display from any other modes.
Dynamic mode – the timer returns to displaying the current time and once a minute shows the day of the week, calendar and temperature or air pollution for 2 seconds.
Set by the user – in this mode, the timer will always show only the display function (gas analyzer, date or, for example, day of the week) that was set by the user.

Not everyone likes when the room is illuminated at night. If user requires complete darkness, then user need to activate Night Mode. In this mode, from 21:00 to 06:00, the timer turns off the display completely. However, if user is in the motion sensor range, the display turns on. This is convenient if the timer is used as an alarm clock, user just needs to wave hand, and the timer turns on the indication for 1 minute after which it turns off.
After the night, in night mode, the display turns on only if a person appears in the control range of the motion sensor. If after the night the motion sensor detects no one, the display remains off to minimize power consumption.
Be sure to press the SET key when finished setting.
Calendar setting.

The last option in this section, but the most important especially when user turns on the timer first time.
Your current time and time zone.

The timer has a supercapacitor that keeps the calendar running when there is a power failure. The the calendar in the off state can operate for more than two weeks. However, after purchase, the timer’s supercapacitor will most likely be in a discharged state and the first thing the user needs to do is to set up the clock and calendar. This can be done with one click from this section of the setup page.

If user plan to connect the timer to home network, then activate the option of calendar synchronization via Internet. As a result, the timer shows the time with an accuracy of a few milliseconds.
User can select servers from nearest region for more accurate synchronization.

This provides the most accurate synchronization.

If your country has daylight saving time, then activate the “Daylight saving time” option and the timer will do it for you. Use this option if internet synchronization are not used or when the available synchronization pool does not match to current country.
Please note: Country synchronization pools automatically change time if the country has a daylight saving time and this option can be omitted.
Be sure to press the Synchronize key when finished setting.
Access.
This page allows user to change all default access settings of kitchen timer.

There are several stages of device protection.
The first stage is to connect to the kitchen timer via its WIFI network.

Default login: (SSID) Kitchen Timer. Default password: 12345678. The user can change both the login and the password at his own discretion. Login and password cannot be less than 8 and more than 20 characters. This restriction is applied to the other settings. User cannot change, password or login separately, only both at once.
The second stage is authorization.

This is the authorization for access to the WEB interface of the timer. Default login: 1234. Default password: 5678. User should also change these values for protection. Login and password cannot be less than 8 and more than 20 characters. This is the login and password for following page:
The third stage is connecting to a home WI-FI network router.

If the user needs to remotely control the timer via a home network or via the Internet, then it is necessary to add the login and password of the WI-FI router to the CT. If user wants immediately connect to the network, check the “Connect to the router now” box.
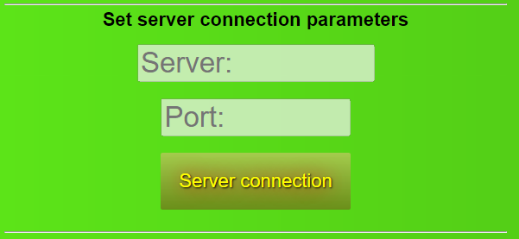
Note: the function Set connection to the server is not implemented in the current version.
Attention: When changing the login and password, their length must be at least 8 characters!
10. Connecting the timer to home network
How to connect to the timer from home network?
For this purpose, user needs to enter the login and password of WIFI router and, check the “Connect to the router now” box and press the button Internet connection (see section WEB interface – Access). Afterwards the timer can be accessed in two ways.

The first way. In the address bar of the browser, write the IP address that router assigned to the timer. To find out the IP address of the timer, log into the router interface and check the devices connected to it.
An example of how to do this on an ASUS router. Enter the router network map and find a device with the name LWIP (this name can be changed in the router settings).
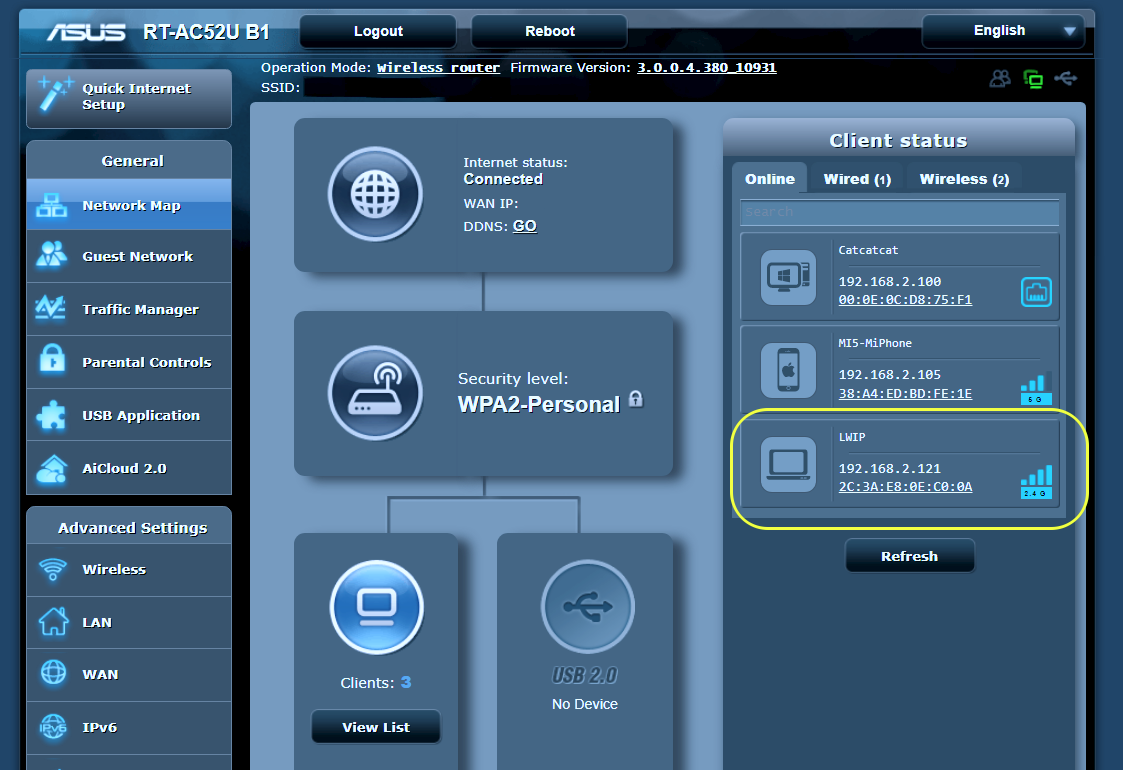
In the example, the IP address of timer is 192.168.2.121. Enter it into the address bar of the browser and get access to the timer via the WEB interface.
The second way is to enter the name: kitchen (http://kitchen/) into the address bar. However, this method may not work on some operating systems or only start working after appling the first method.
11. How to get remote access via the Internet
You can control your timer or view function parameters remotely from anywhere in the world. For this purpose, router must have a dedicated IP address or user must apply the DDNS mechanism.
DDNS (Dynamic Domain Name System) is a service that allows network clients to connect to a wireless router, even with a dynamic external IP address, via a registered domain name.
In the first case, if you have a dedicated IP address, you only need to do port forwarding. On the example of an ASUS router. Choose a port, for example 11116, (this allows to hide device from intruders to some extent). In Advanced Settings select section WAN and Virtual Server/Port Forwarding tab. In section Port Forwarding List (Max Limit : 32) enter the port 11116 into Port Range, and select device LWIP in Local IP (the router will substitute the IP address itself). Set Local Port to 80.
Press ![]() button
button .
.
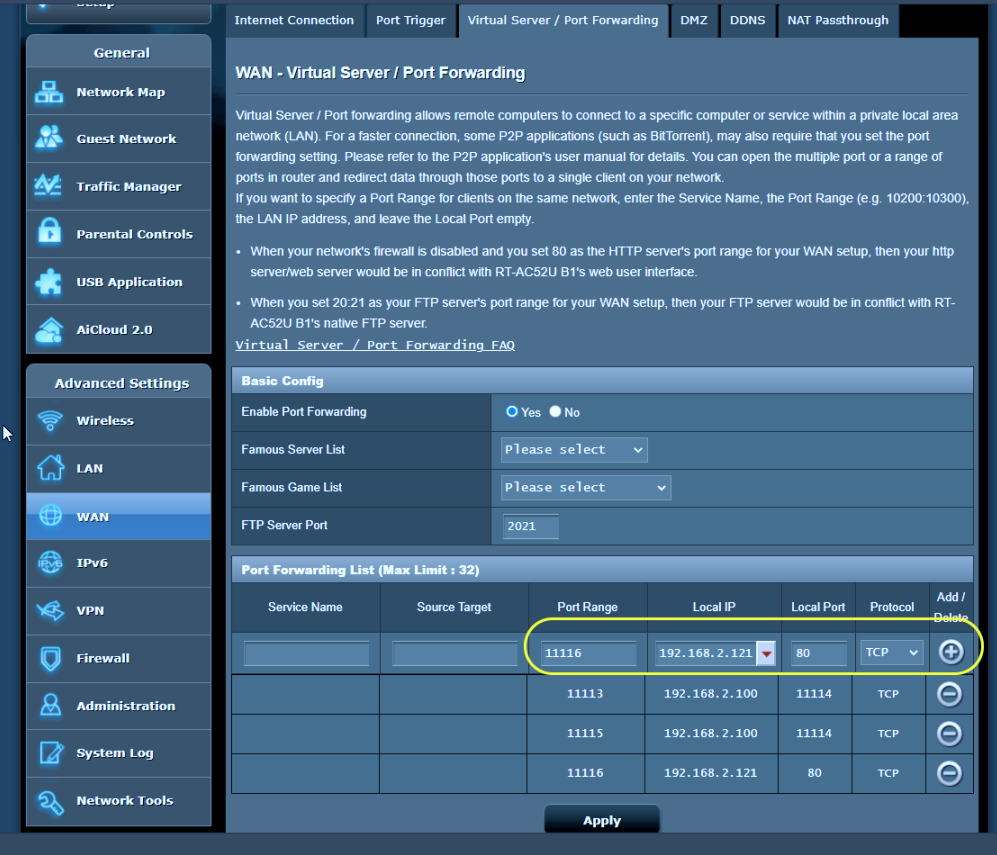
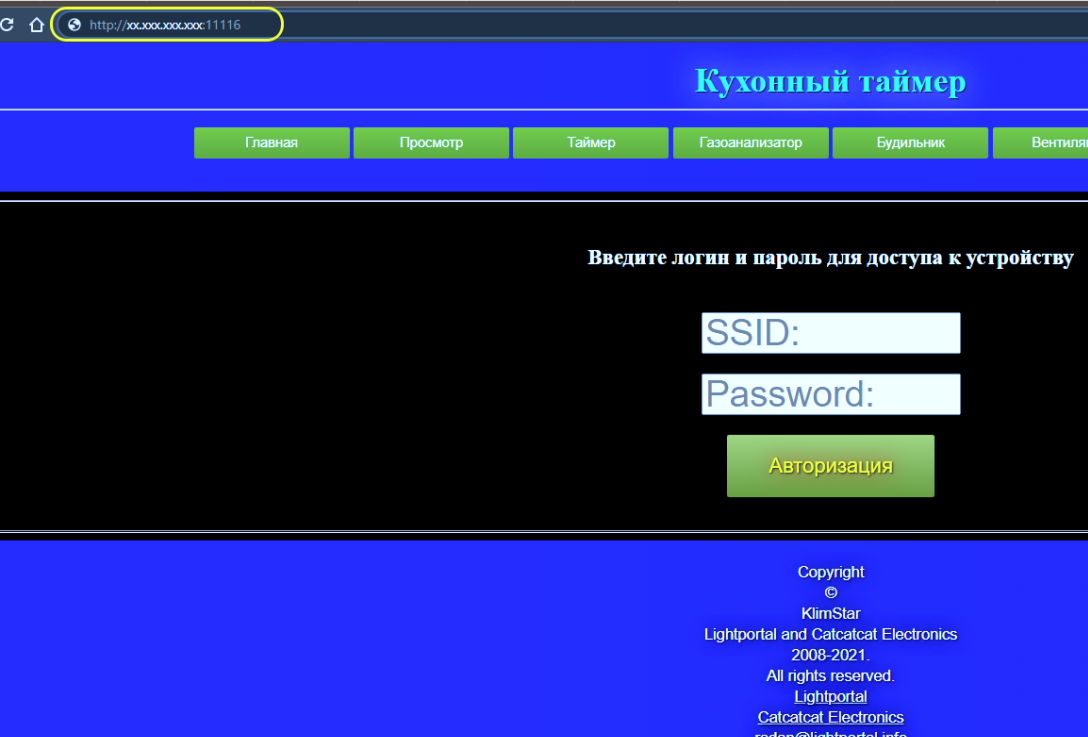
Now user can get access to WEB interface of kitchen timer from any network, by typing IP and port in browser.
For example: http://xx.xxx.xxx.xxx:11116 where xx.xxx.xxx.xxx is IP address.
Method of using DDNS an Asus router.
In Advanced Settings select section WAN and DDNS tab, enter the name (for example kitchen). Press the apply key.
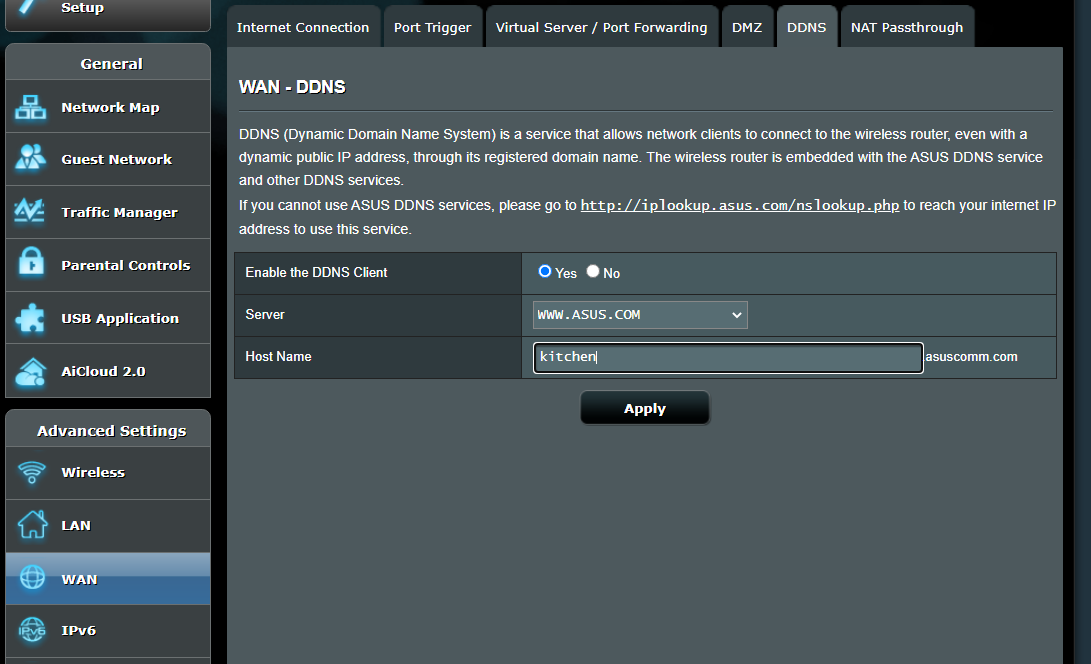
Next, you need to do port forwarding so that the standard calls on port 80 are redirected to your kitchen timer. Perform port forwarding as described earlier.

Now you can go to http://kitchen.asuscomm.com/ and log into your kitchen timer.
12. I forgot my access password
Have you forgotten your timer password?
To restore access via the WEB interface, there is only one way – to restore the device to factory settings through the setting mode using gestures.
To do this, switch the timer to setting mode. Select function 21 and follow the instructions described in the setting section. After that, all passwords and settings returns to the factory settings. User is able to access the kitchen timer using the default passwords.
13. Timer connection interface
The timer has a connector on the rear wall for connecting the ventilation and lighting control system.
Pin assignment:
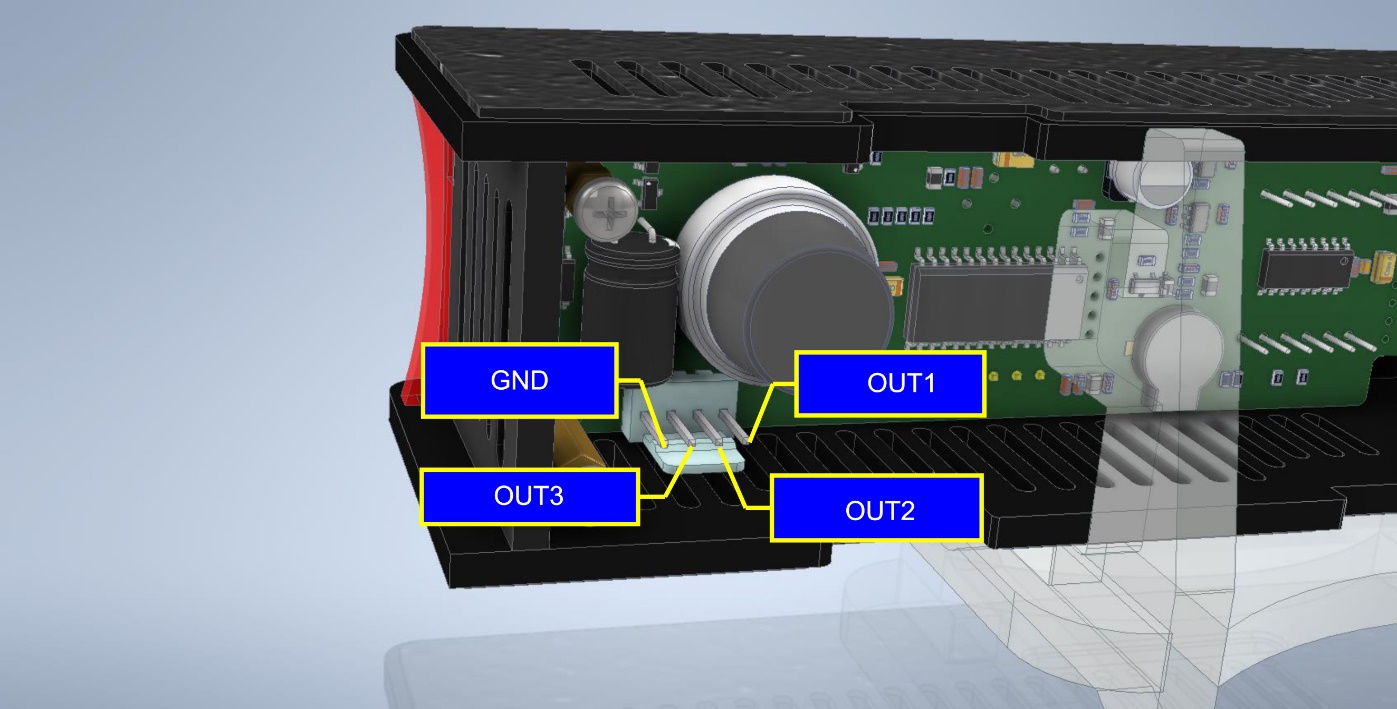
GND – common ground
OUT1 – motion sensor output used to control light.
OUT2 – exhaust ventilation control according to room temperature.
OUT3 – exhaust ventilation control according to room air pollution.
Logic levels 0 – 5 volts.
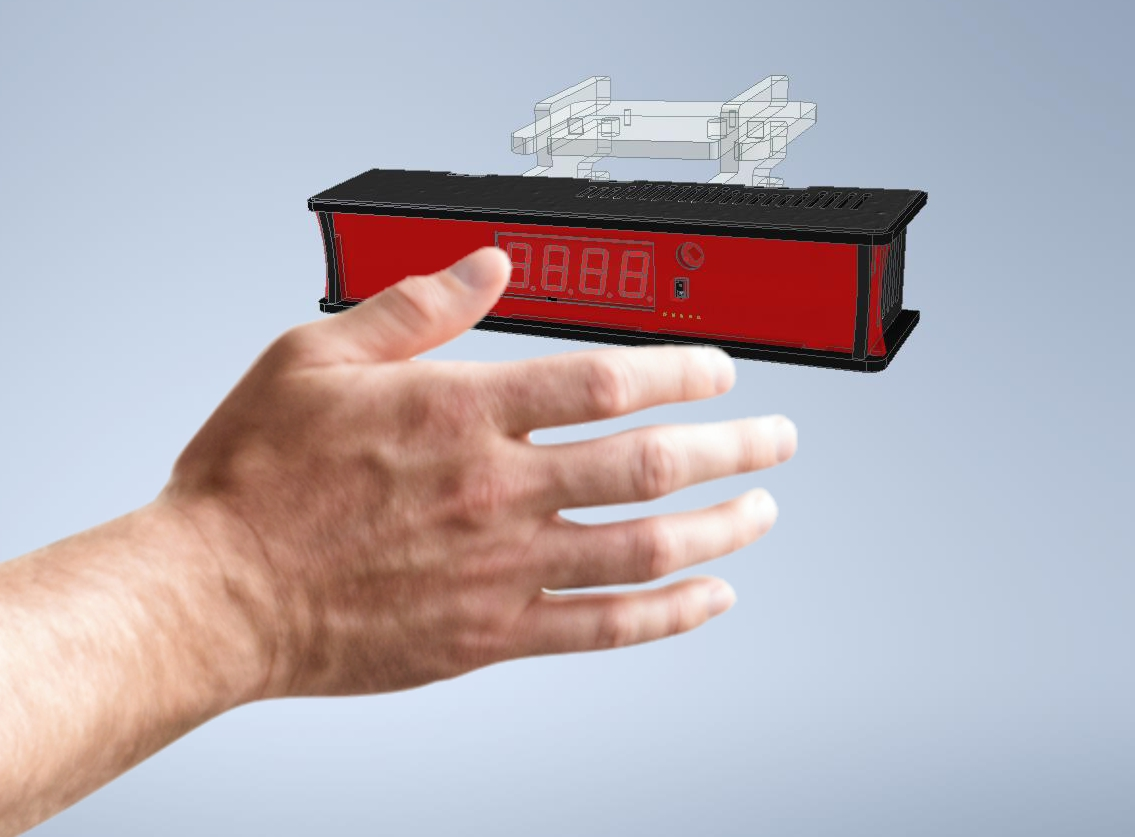
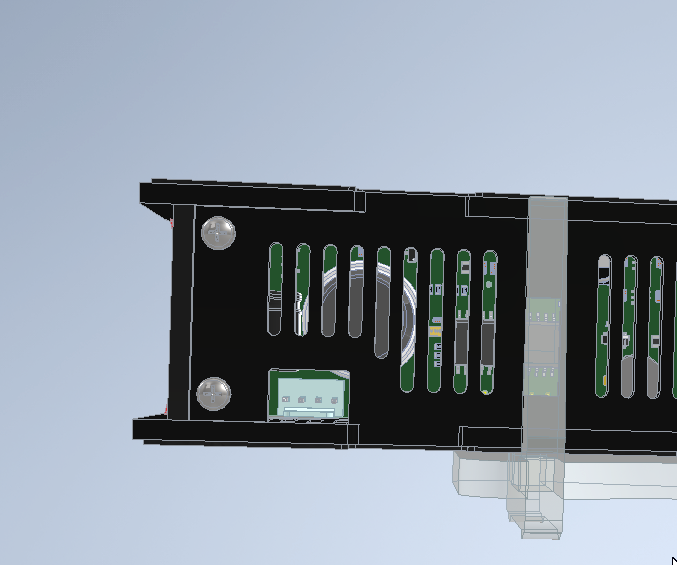
14. Timer assembly and installation
15. Gas sensor calibration
Calibrating the gas sensor is very simple. It needs to be calibrated in a clean room, or outdoors (of course, if the air is cleaner outside).
Ventilate the room for at least 30 minutes to calibrate the sensor. Start gas sensor calibration. See section “Setting mode” – function F 20.
The sensor is calibrated at the factory. However, after prolonged storage, the sensors need to work for at least 24 hours in order to reach normal sensitivity.
16. First start and timer setting
After turning on the kitchen timer for the first time, user needs to set at least the current time. This is described in setting section, but the easiest way to do this is to use mobile phone.
To do this, enter the settings of mobile phone and select the WIFI networks setting. There is a new network named:
Kitchen Timer

Connect to it using the password 12345678
Next, open an browser (for example, Chrome) and enter 192.168.4.1 into address bar. An authorization page will open at http://192.168.4.1/.
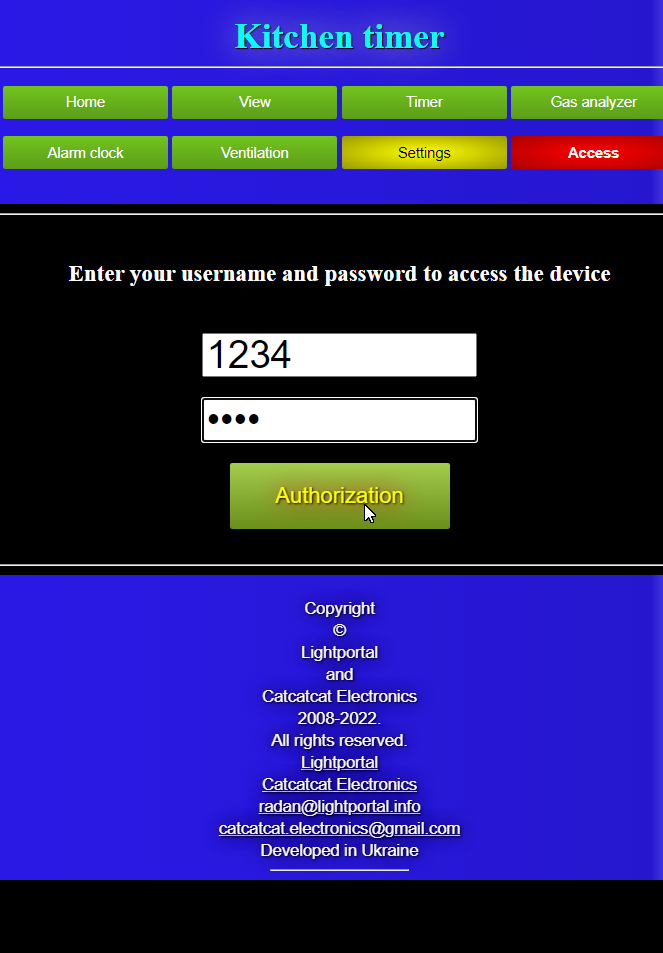
Default login: 1234. Default password: 5678. Enter the factory values and press Authorization.
The main page opens:

Press setting button
Open the calendar section

Press the synchronization key. Your clock and calendar time is set. After that, user can fully use kitchen timer.
17. Project participants
Author of the idea and head of the project– Hena Chernov
WEB interface developer – Vasya Rubashka
Housing manufacturing – Sergey Koshelenko
Marketing and Advertising – Yura Chernov
Thanks for the localization:
Henry Nennstiel – USA
Stas – Ukraine
Nadezhda Pikalova – Ukraine
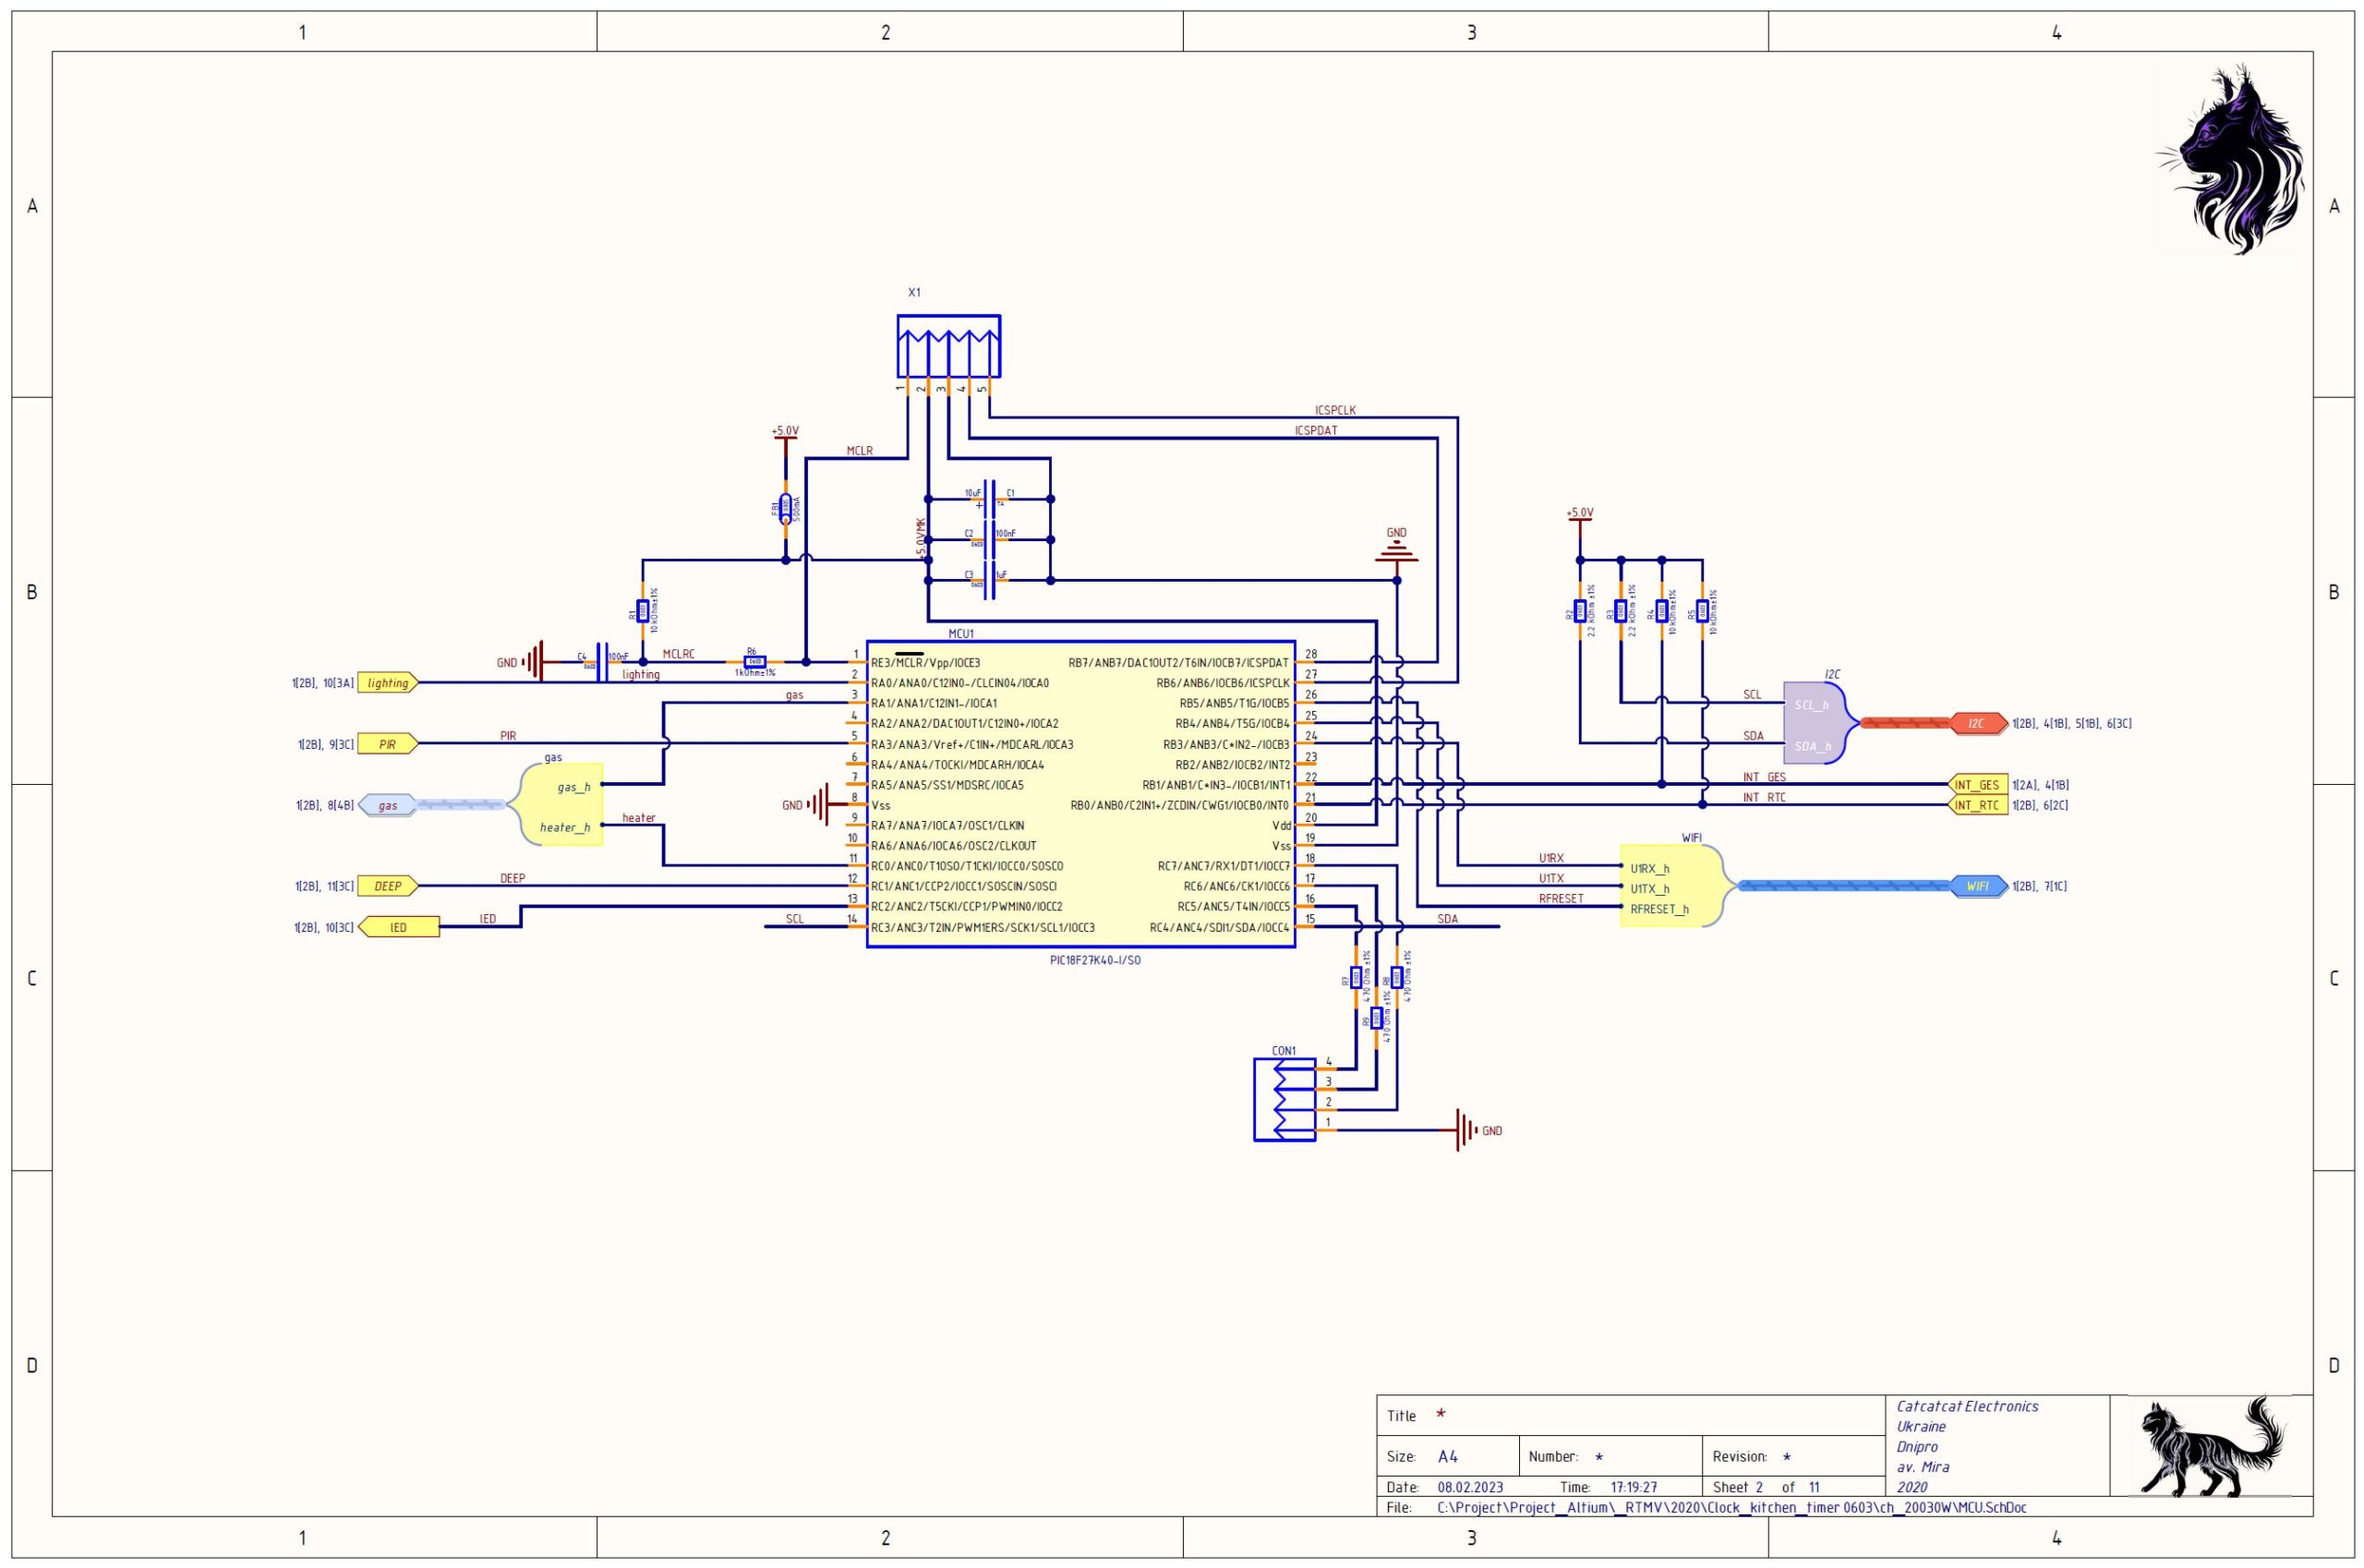
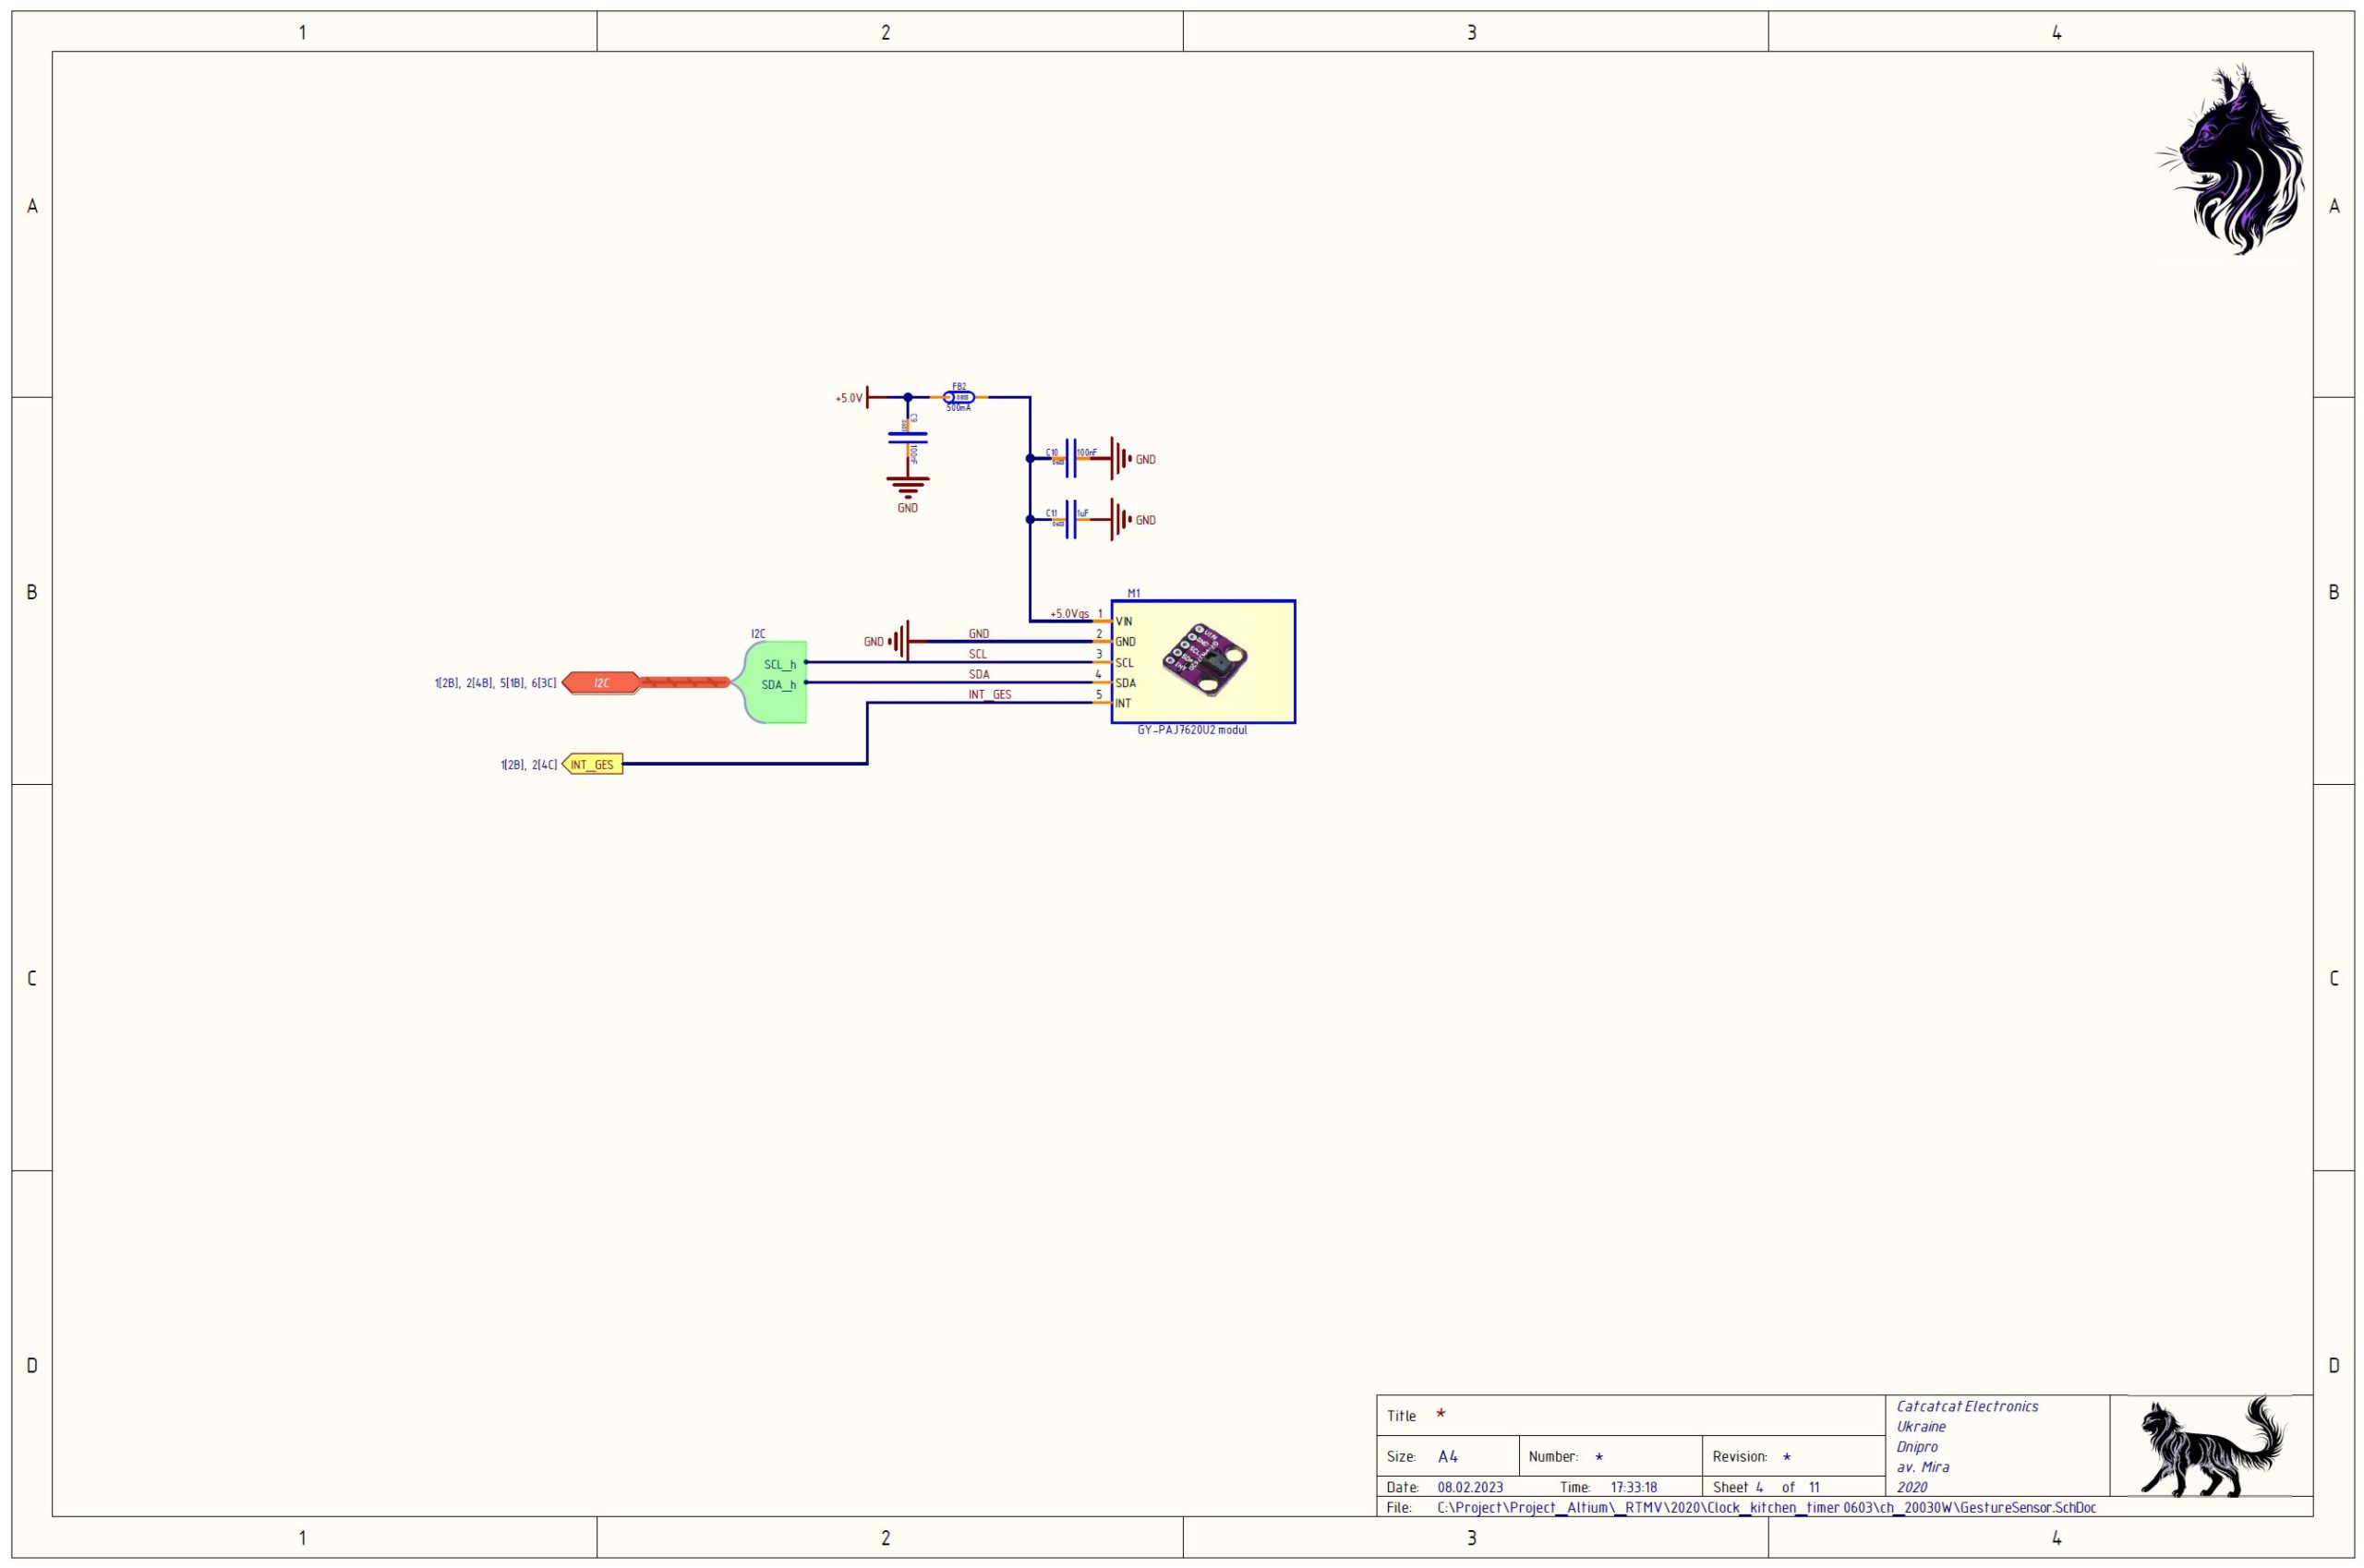
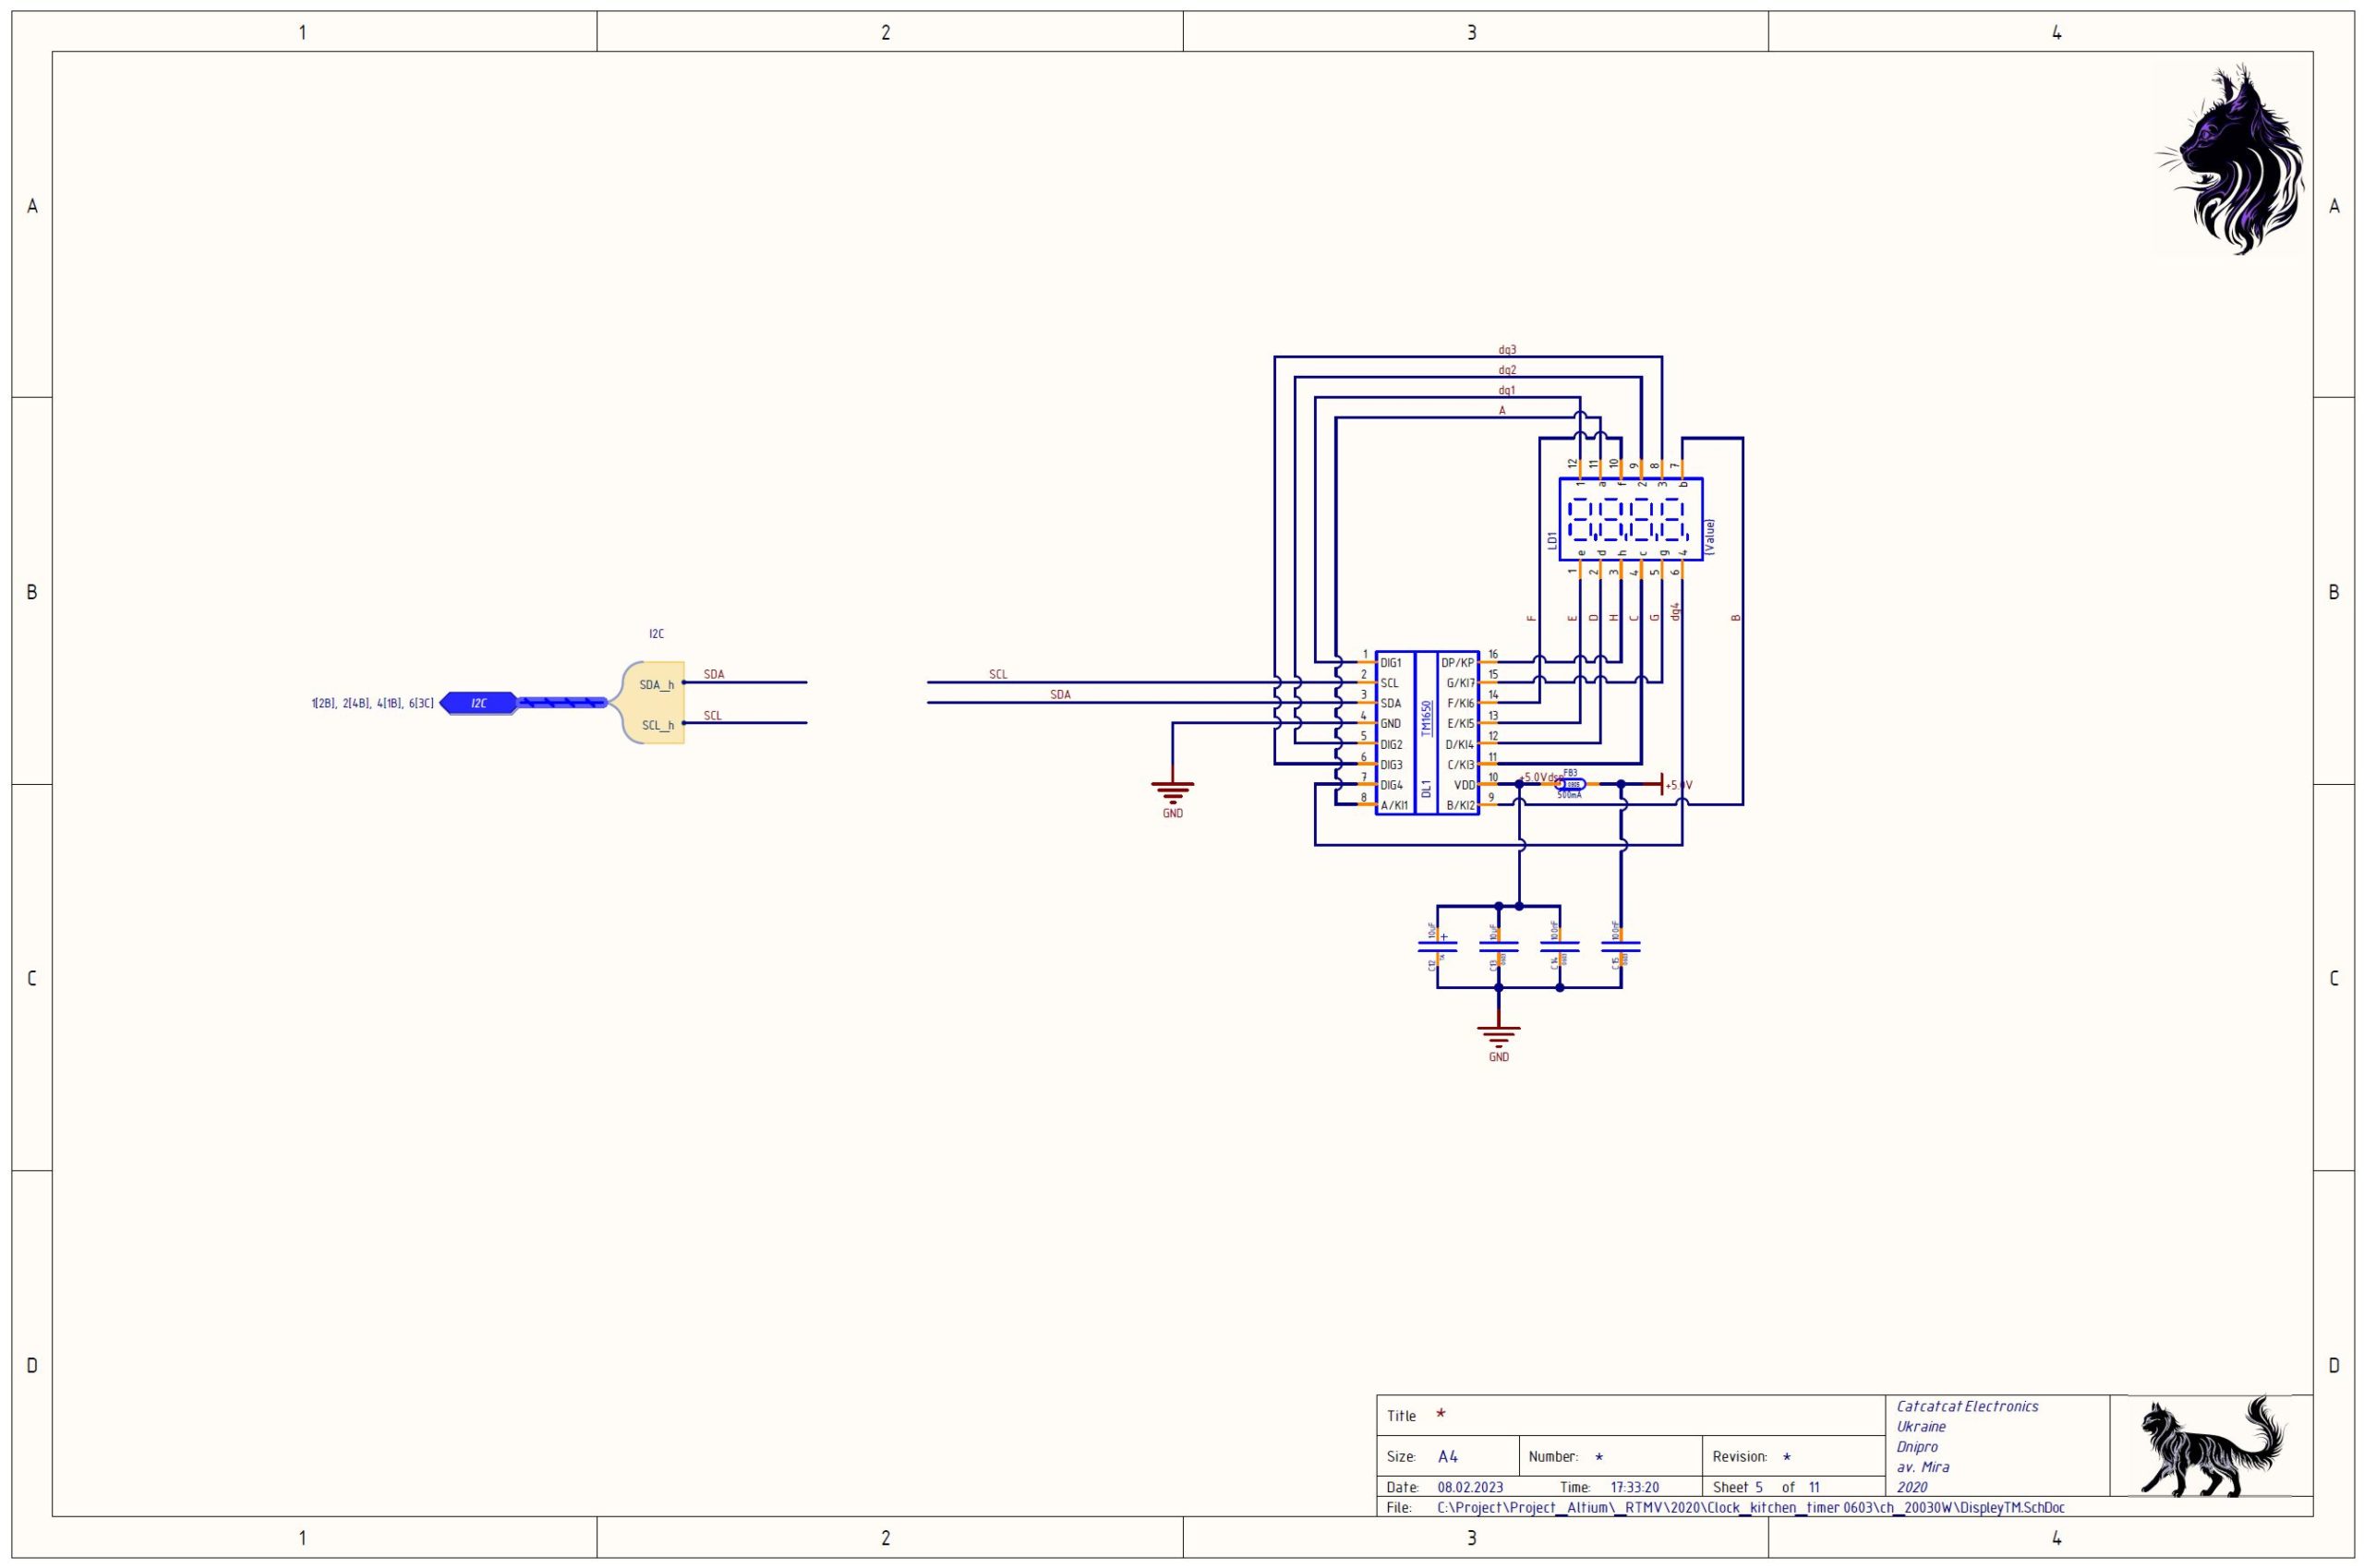
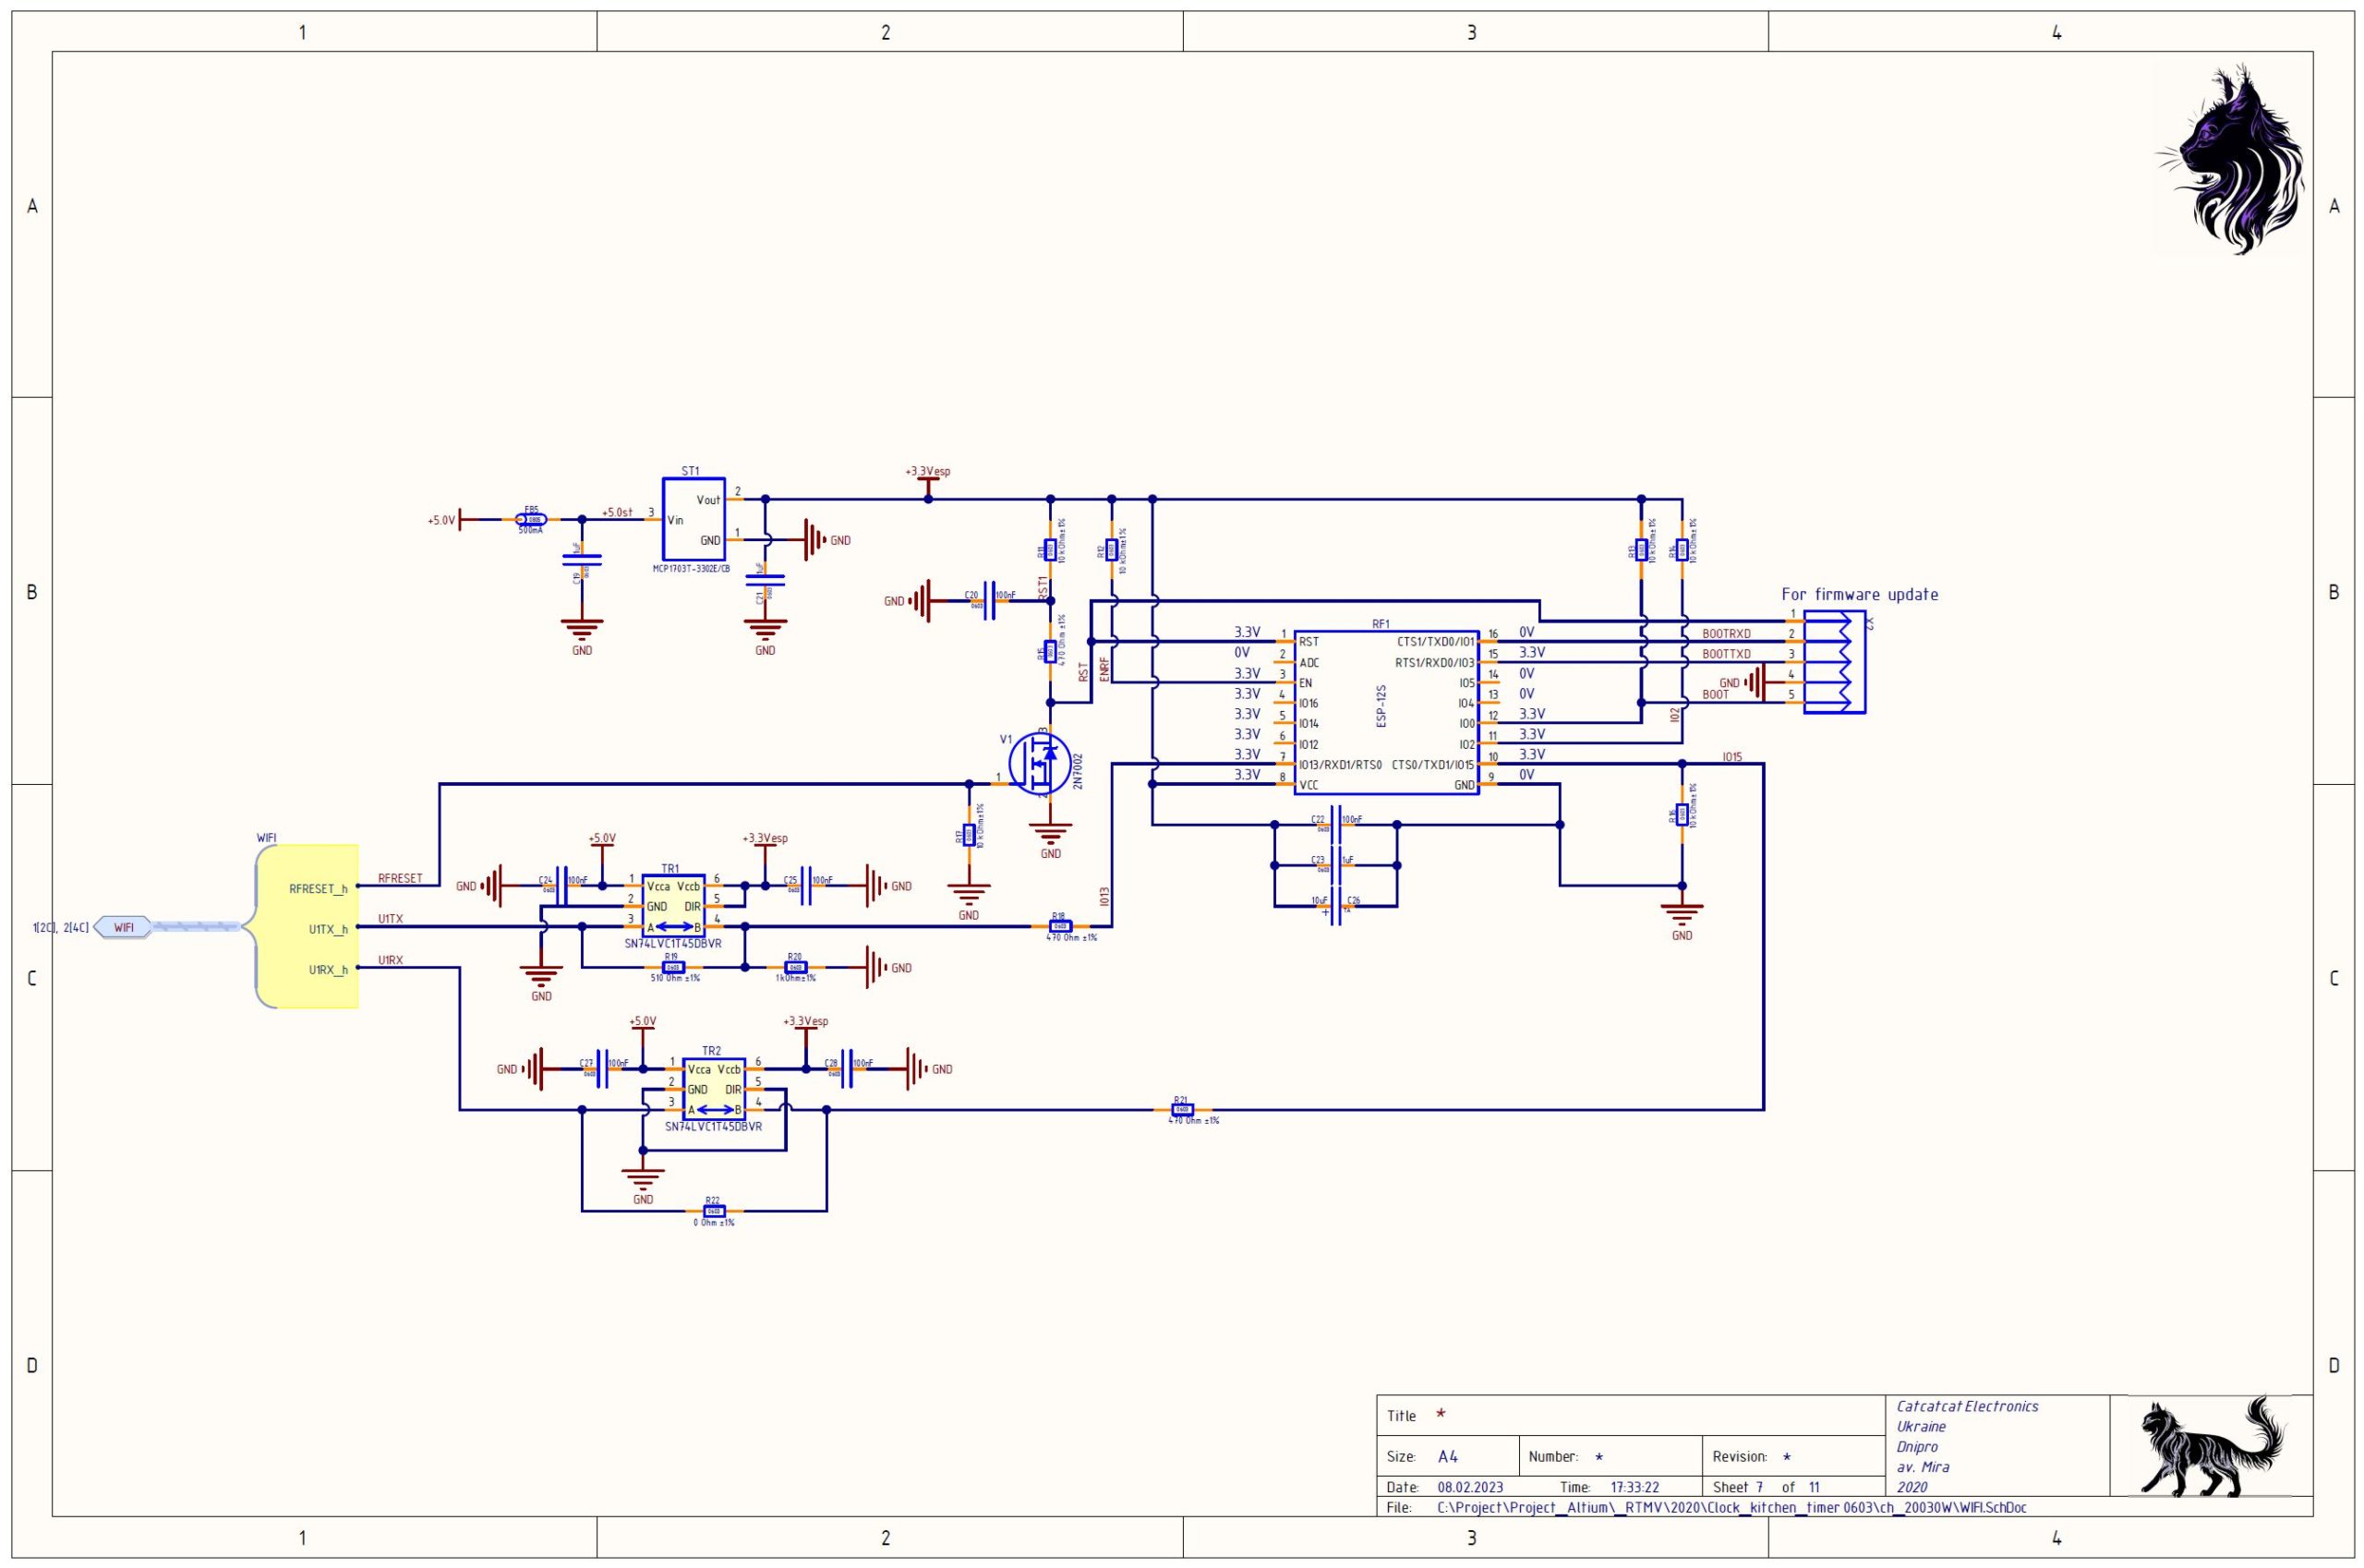
18. Electrical project diagram template


19. Download
Kitchen timer with contactless gesture control - Description 4 МБ 58 downloads
Description ...Kitchen timer with contactless gesture control - Firmware 83 КБ 57 downloads
Firmware V1.12 ...Kitchen timer with contactless gesture control - Project - Altium Designer 20.23 MB 73 downloads
Project - Altium Designer ...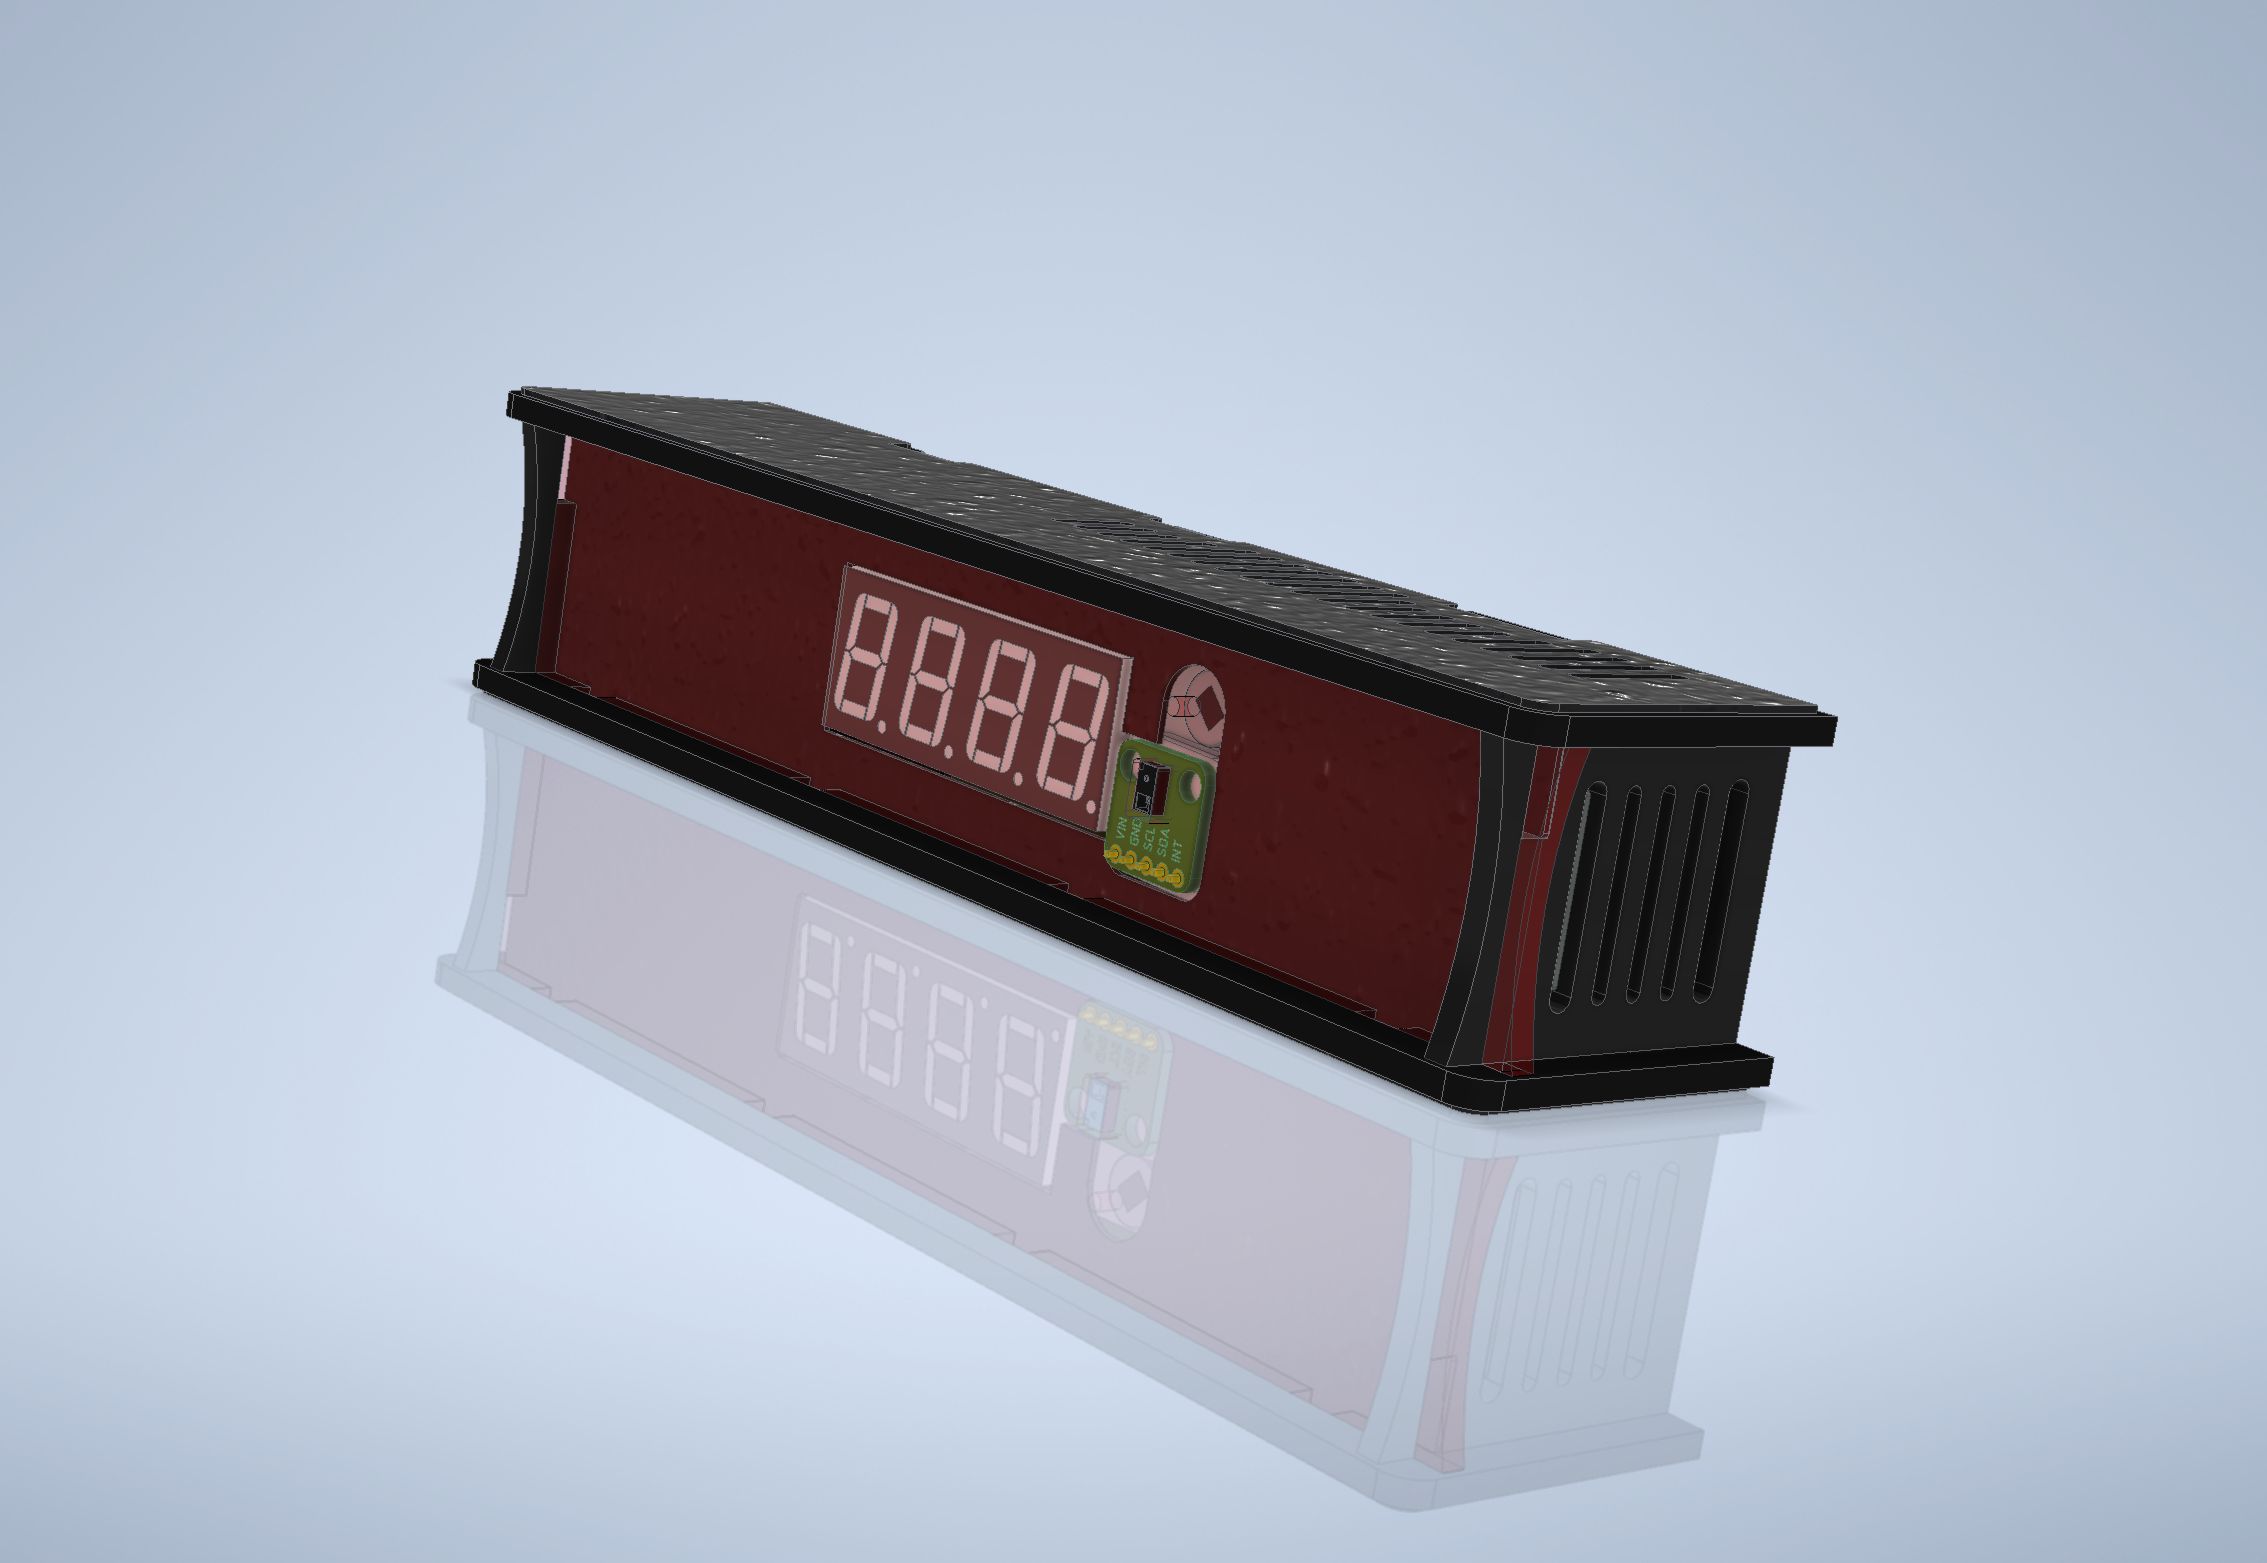
Это может быть интересно
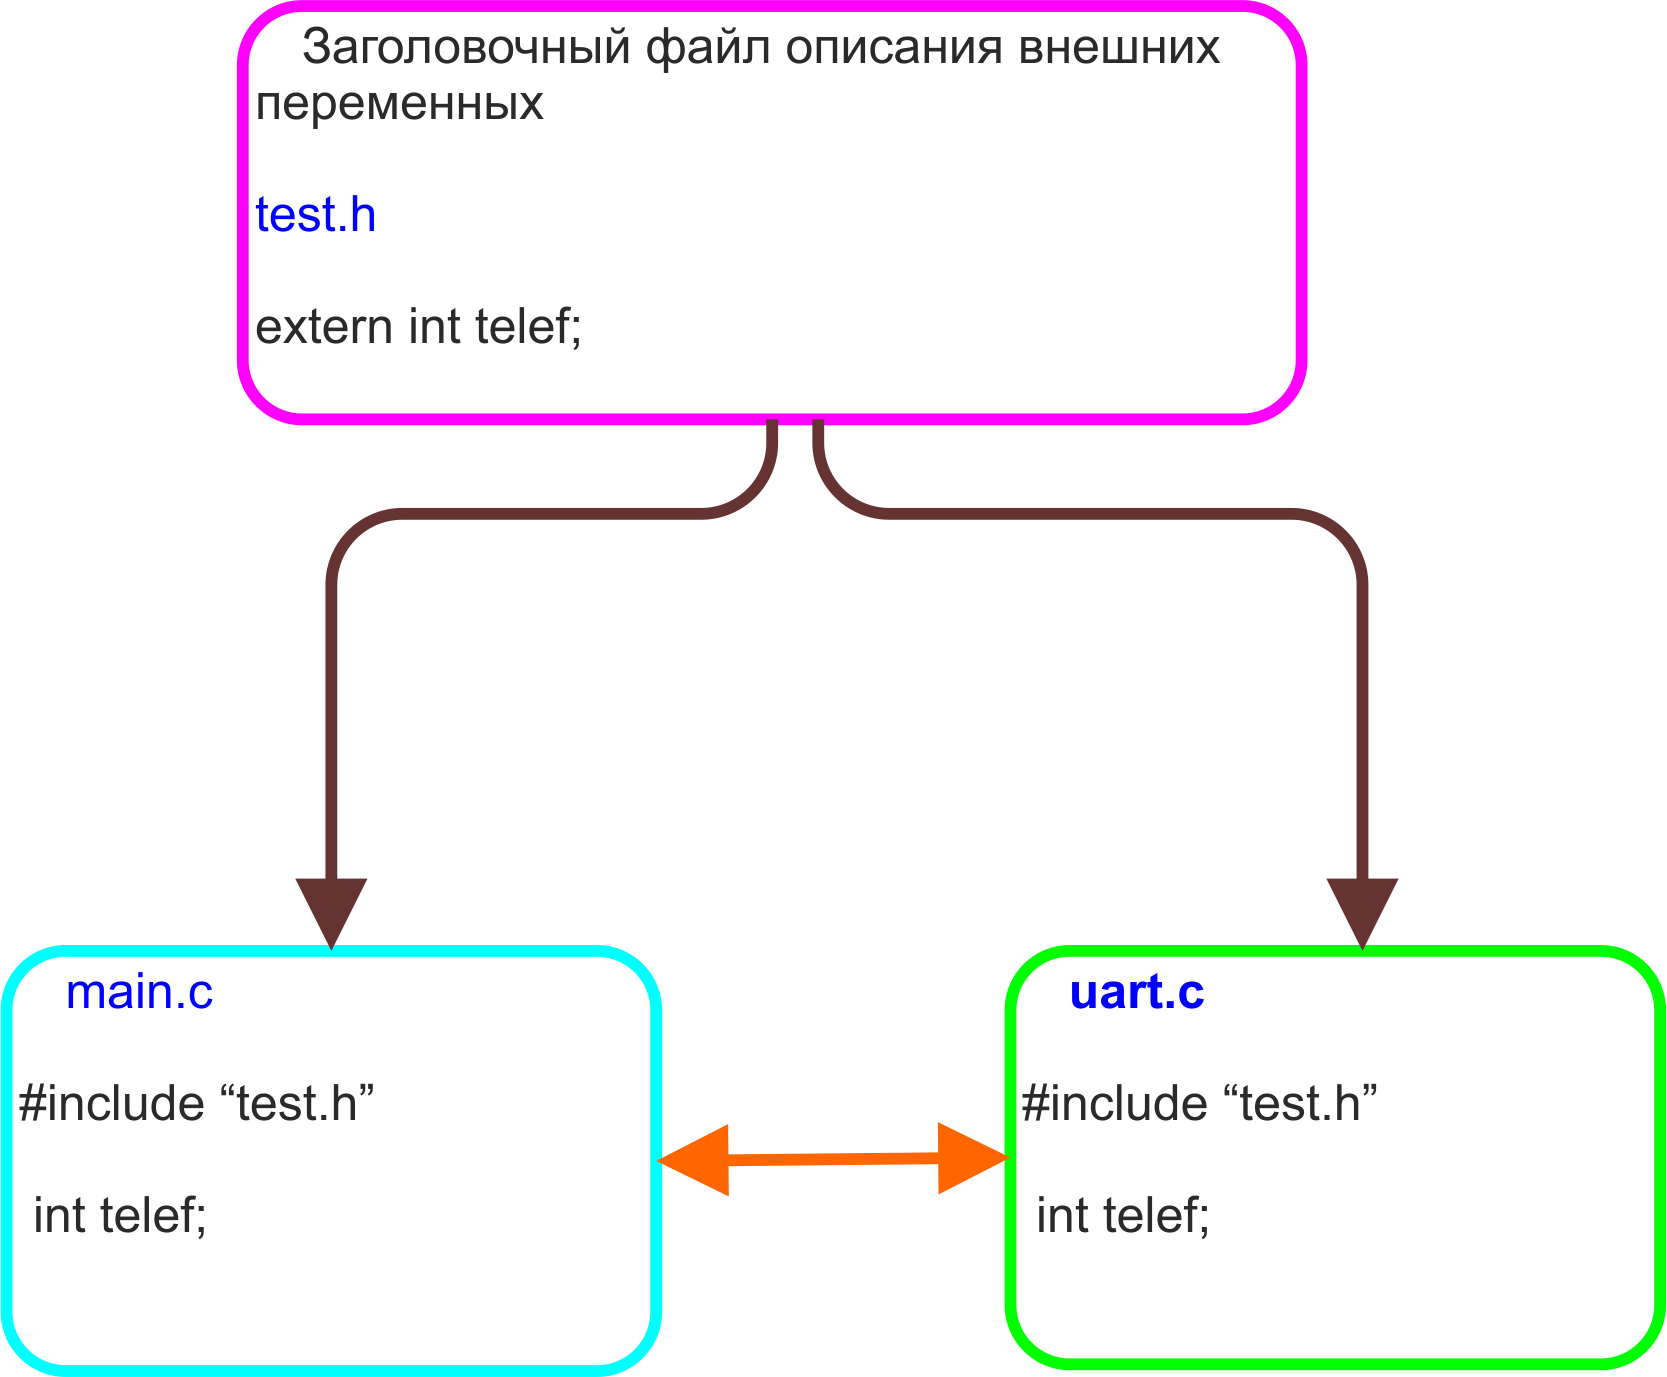 Просто о внешних переменныхViews: 791 Часто возникает задача когда необходимо предавать данные между модулями программы. Например, передать данные между файлами, или управлять работой модулей. Для этого создаем заголовочный файл и описываем наши переменные как …
 LED модуль P10 (1R) V706AViews: 7702 Это еще одно чудо от китайского брата. Это монохромные матрицы, называются они P10 (1R) V706A, ну типа R-красные, но не верьте паяют светики и зеленые и синие, в общем …
 AD9833 – Programmable Waveform Generator – part twoViews: 1769 Прошло время и появилась тема, что-бы закончить проект AD9833 – Programmable Waveform Generator. Приехали печатные платы. В этот раз я печатные платы заказывал в https://jlcpcb.com/ делал это в …
 Гаджеты для домашней автоматики – Емкостной сенсорViews: 1609 Управление светодиодным освещением – Сенсор емкостной. Данный гаджет предназначен для управления освещением где необходимо включением освещение сенсорным прикосновением. Датчик позволяет управлять светодиодной нагрузкой в виде модулей или светодиодных лент …
 MCC – K42 – настройка модуля DMAViews: 767 MCC – в версии v.3.95.0 и начиная ядра 4.85.0 конфигуратор предоставляет графический интерфейс для настройки модуля DMA. Для начала: Посмотреть какая версия МСС можно в закладке версии, если …
 Самый простой индикатор уровня звукового сигналаViews: 6306 Демонстрационный проект создания индикаторов уровня с использованием WS2812B. Изучив этот проект вы сможете самостоятельно изготавливать и конструировать свои индикаторы уровня звукового сигнала. Дополнительно читайте статью Бегущие огни на …
 Акриловый корпус для платы ch-4000Views: 658 Плата ch-4000 подходит для монтажа в корпуса на дин рейку, но для домашней автоматики необходимо что-то другое, поэтому был разработан корпус из акрила который позволит создавать настольные и настенные устройства. Корпус …
 MPLAB® Harmony – или как это просто! Часть 1.Views: 3586 Часть первая – Установка Гармонии. Музыкальная тема к статье, слушаем: В начале запуска нового проекта и выбора микроконтроллера стоит задача правильно его сконфигурировать, прежде чем перейти к реализации …
 TDA7294 part 1Views: 251 TDA7294 має унікальні дані для створення підсилювачів звукової частоти HI-FI класу. Варіант застосування є конфігурація BRIDGE (мостова схема включення), де використовуються два TDA7294, як показано на схематичній діаграмі …
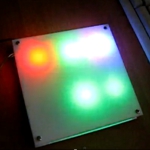 Интерактивные LedViews: 464 Тема проекта продолжение следует…. Это может быть интересно